

✨Introduction✨
Hi, I’m Siobhan, and in this tutorial I’ll be showing you how to draw characters in sitting poses. I’ll be explaining how I use Clip Studio Paint to draw these, but minus the 3D assets and poses you can find in Clip Studio’s asset website, anyone can follow along with the following drawing tips.
🎞️ Video Version
💪Anatomy Basics
Drawing a character sitting can be difficult to figure out compared to a character standing straight, viewed from the front. This is because there is perspective, foreshortening, various viewing angles, and different points of contact of the body against surfaces to keep in mind. In this guide, I’ll show you how to simplify the anatomy by starting with basic stick figures and then building up with simple shapes to make drawing these poses easier to draw.
🧍 Steps For Drawing Anatomy
Before explaining how to draw sitting poses, I’ll first show how to draw basic anatomy and proportions for a body.
(Time lapse of standing character drawing steps.)
1. Stick Figure
Starting with a basic stick figure makes anatomy super easy by laying down a foundation.
Draw a long line as a starting point, this is for the spine.
Sketch in a circle for the head.
Sketch out lines for the arms, legs, shoulders and hips, with dots or circles for the joints.
(Note: I used the Symmetrical Ruler in Clip Studio to help draw the standing anatomy steps.)
Proportion notes:
🟣 Total height around 7.5 to 8 heads tall
🔴 The legs are about half the total height from bottom of hips to the bottom of the feet.
🔴 The leg lines are roughly split in half for the placement of the knees, the lower half including the height of the feet.
🔵 The upper body, from the bottom of the hips and up to the top of the head, are split into about thirds. Split between the head to shoulders, upper torso/chest and upper arms, and the hips and lower arms.
Note: The proportions for the hips and the shoulders can be changed to make the drawing more feminine or masculine: Wider shoulders and narrow pelvis look more masculine, and narrow shoulders and wider pelvis look more feminine.
2. Shapes
Lower the opacity of the stick figure layer, and on a new layer above that, start drawing in blocks for the torso and pelvis, following the line for the spine in step 1. Use lines in the middle of the cubes between where the legs will be on the pelvis, and area for the sternum of the chest.
Add some spheres for the joints (think something like a ball-jointed doll).
Add cylinder-like shapes for the limbs and neck; these are not perfectly even and instead thinner on one end than the other, to be more arm/leg shaped.
3. Add More Detail
- Lower opacity again for the previous step layers, and on a new layer above, start fleshing out more of the body shape.
- Add curves, where needed, to start shaping up the muscles (look at 3D and photo references to help understand how that looks. They become more organic than the cylinder that we started with).
Reshape the pelvic cube to be more triangle-like with lines curving in. Think of the connections like a ball jointed doll.
For the rib cage, add in another shape that is egg-like, skinnier at the top, by the neck, and wider at bottom. Add a curve to the bottom, roughly at elbow height, to draw the bottom of the rib cage.
Add curves, where needed, to start shaping the muscles, pictured here with red lines. Look at 3D and photo references to help understand how that looks. They become more organic than the cylinder that we started with.
Draw in lines to join the shapes from step 2 (such as the armpit, knees, or pelvis and thighs).
4. Finish
Again, lower previous layers’ opacity, and draw on another layer above the rest to draw the body.
Clean up the shape layers, erasing overlaps.
Add more detail for muscle shape.
🧘♀️ Steps For Drawing Sitting Character
Drawing sitting poses uses the same steps from the standing character drawing earlier, but now body parts will be moved to sit, and can be overlapped and cause foreshortening. Therefore, it’s a little more complex, but breaking it down into the earlier steps makes it easy.
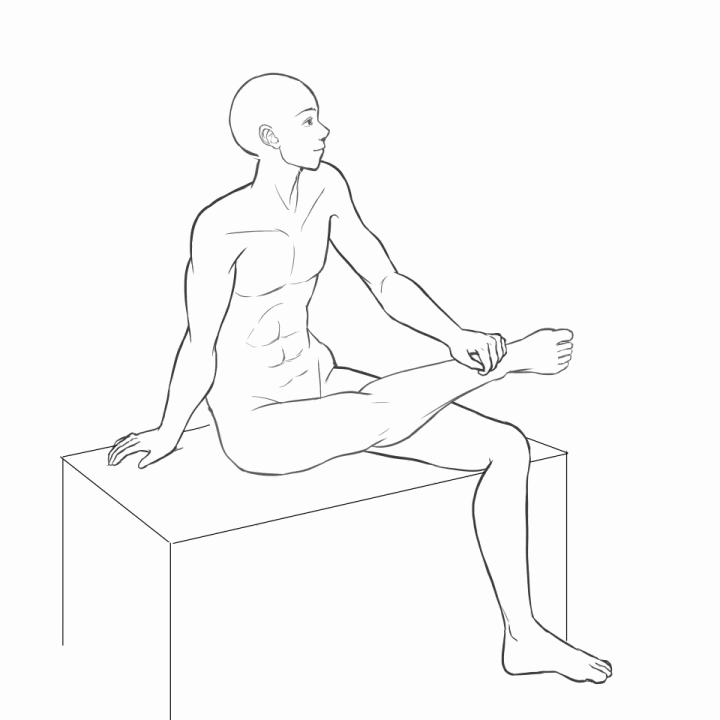
Time lapse of sitting character drawing steps.
1. Stick Figure
Mostly the same as the step for the standing character:
Draw a basic stick figure, with sticks as bones, circles as joints, a larger circle for the head, and square/triangle like shapes for the hands and feet.
Draw the line of the spine, but with more curve to show the shape of the spine when leaning slightly.
Pay attention to where the body makes contact with what the character is sitting on.
2. Shapes
Lower the opacity of the stick figure layer, and on a new layer above that, start drawing in blocks for the torso and pelvis, following the line for the spine in step one. See how the perspective affects the boxes making up the torso. They have some curve to follow the direction of the body, similar to the line for the spine in step one.
Use lines in the middle of the cubes between where the legs will be on the pelvis, and area for the sternum of the chest.
Add spheres for the joints.
Add cylinder-like shapes for the limbs and neck.
You can draw each of these parts on the same layer, but it would be easier to keep them separate in different layers within the same layer folder, so you can edit them as needed.
(In the next section, after these drawing steps, I’ll show how to use Layer Color Effect to change line layers temporarily, to better see how parts overlap.)
3. Add More Detail
- Lower opacity again for the previous step layers, and on a new layer above, start fleshing out more of the body shape.
- Add curves, where needed, to start fleshing out the muscles.
Draw in the rib cage shape, following the curve of the previous steps chest box to make the middle of the rib cage. This is where the sternum is located. Draw in lines from the top of this line, to the shoulders in order to add in the collar bone.
Draw in lines to join the shapes from step 2 (such as the armpit, knees, or pelvis and thighs).
Reshape the pelvic cube to be more triangle-like. Because this is from a partial side view, we’ll need to add curves to draw in the joining of the thighs and hips, and how it wraps around the side of the body. Similar to how underwear or a swimsuit’s bottom part would curve around the tops of the thighs at the hips.
Hide the stick figure and shape layers then start erasing overlapping lines, based on what parts of the body are hidden or not, and closer to the viewer.
4. Finish
Again, lower previous layers’ opacity, and draw on another layer above the rest to draw the body.
- Clean up the shape layers, erasing overlaps.
- Add more detail for muscle shape.
- Draw in curved lines for where the muscle of one limb is laying over another and being pushed against. Draw in flat edges where body parts are against a hard surface.
- A small edit to the upper thigh I made after reviewing the 3d reference model using the Liquify Tool. Make sure to review image references to help you draw your anatomy for a good starting point, and then make creative choices on how to make changes for design or illustration reasons.
🎨 How To Use Layer Color Effect
In this section, I’ll explain how to use Layer Color Effect when drawing in Clip Studio Paint. I keep my lines in separate layers when I have a lot of overlapping objects or when I have a lot of intersecting lines. I like to use this effect to make it easier to make changes to my drawing as I go. This is reversible and also customizable for what color you use. When I’m finished with line art, I reverse it, and at that point I may merge my line layer folder.
NOTE: This is an optional step that I personally like to use, but you don’t need to do this. I do this to help make the drawing elements make sense visually, and see which lines need to be erased later on. And keeping them separate helps to edit specific lines without messing up others. Skip this step to the next section if this isn’t your preference.
To use this effect:
1. 🔴 While in the layer menu, click Layer Properties
2. 🔵 Click Layer Color under the Effect menu.
3. 🟣 The default color is a light blue. To customize, click on the colored area next to the bucket icon. This will open up a color wheel so you can choose a color.
Clicking the layer effect button again turns the layer effect off and reverts the layer to its original color(s). This can be turned on/off whenever needed. You can also use this effect on a folder of layers, affecting multiple layers at once.
🦵How The Lower Body Moves When Sitting 🦶
It’s important to understand how the legs can move, since they’re a big part of how sitting poses work. Look at 3D models as well as photo references to understand how different joints move; because that affects how a character sits, whether that’s on furniture, other objects, or on the ground or floor.
(I used 3D models in Clip Studio Paint to show how legs and feet can move. I will explain more about how to use 3D model assets in a later section of this tutorial.)
🦵How Legs Can Move
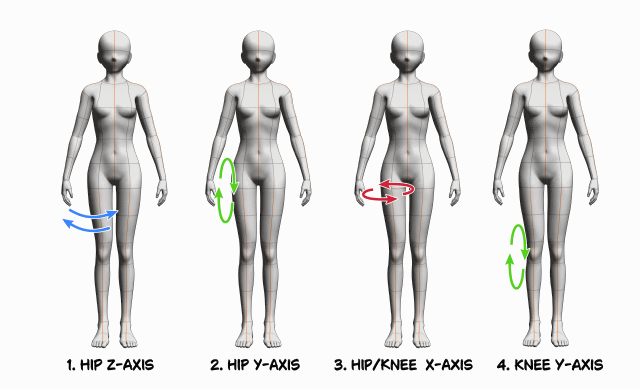
1. Upper leg angles left and right from the hip (the z-axis, the blue curve tool in Clip Studio)
2. Upper leg moves forward and backward from the hip (y-axis, the green line)
3. Leg or knee twist left and right from the hip (x-axis, the red line). (This motion is the same for the hip and the lower leg at the knee in Clip Studio’s 3D model, so I only showed it once).
4. The leg can also be bent at the knee to move the lower leg backwards (the y-axis, the green line).
🦶 How Feet Can Move
Feet are usually a point of contact to a surface when a character sits, and therefore important to know how they can move when drawing sitting poses.
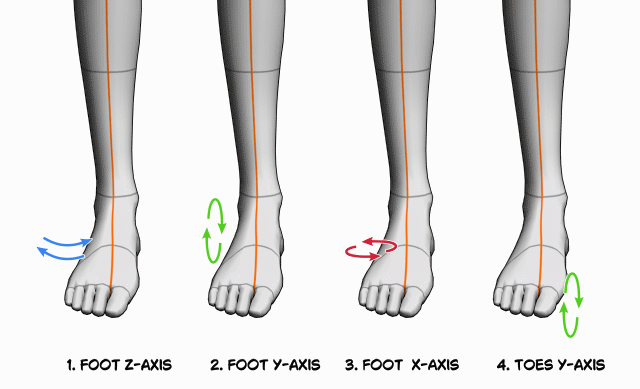
1. Foot rotates left and right from the ankle (the z-axis, the blue rotation line)
2. Foot bends forward and backward from ankle (y-axis, the green line)
3. Foot twists left and right at the ankle (x-axis, the red line).
4. The tip of the foot can also be rotated forward and backwards from the start of the toe joints (the y-axis, the green line).
The shown rotations and movement of the legs and feet can be combined to create all kinds of poses.
🚶♀️How Hips Can Move
The hips and pelvic area can’t technically move, but instead, its placement is affected by the movement of the legs and spine.
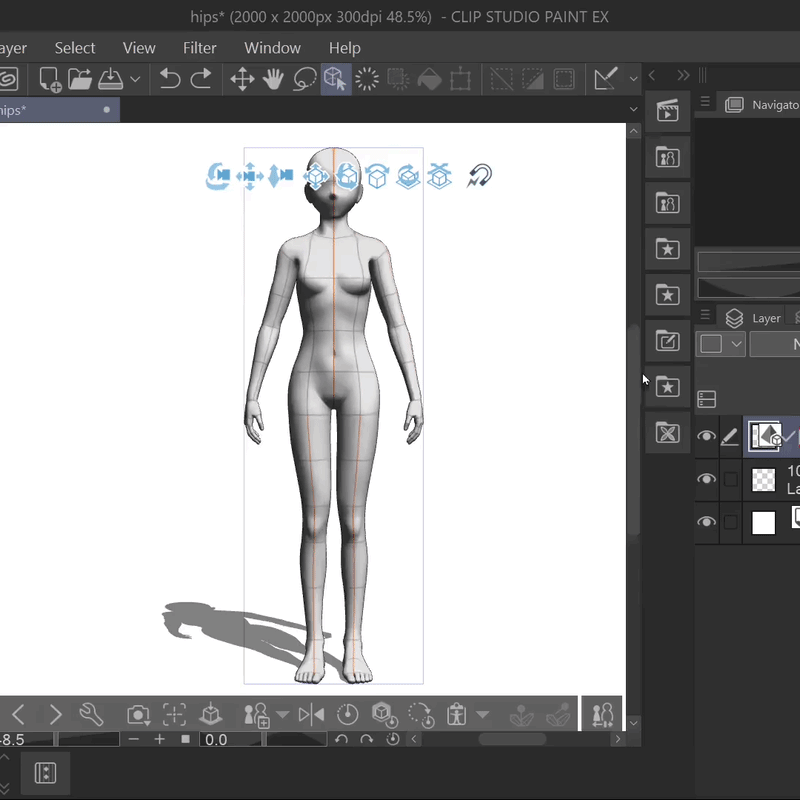
Above, you can see how moving the legs or upper body can affect the position and angle of the hips. They can cause the hips to tilt, rotate, or move up or down.
🫷 How Surfaces Change Body At Contact Points
The body’s muscles and fat are not totally solid; they are soft. Therefore, areas of the body that touch or rest against a surface become squished and flattened, changing certain curved lines and edges to be more flat and straight.
Hard surfaces flatten the body parts at edges. The area of contact makes a straighter line where the body touches the hard surface, and the bottom also sort of becomes squished, creating a curved area pushing outward.
While soft surfaces, like cushions, can instead create overlapping curved edges around and covering the sitting character where their body makes contact.
Remember to think about how the body makes contact with the surface it is sitting on, but also, how it makes contact with itself as body parts overlap.
🛣️ Foreshortening And Perspective
Drawing a character sitting can be more difficult than drawing one standing straight on or in profile. This is because the pose is more dynamic, limbs can overlap, and there can be some foreshortening effects due to parts of the body being closer or further away from the viewer.
🗑️ Foreshortening On Cylinder Shapes
(Foreshortening example using the same character, and same pose, but rotated to show how the shapes making the lower legs change.)
Notice how the drawing of the leg on the left is wider at the front facing end, and getting thinner as it moves away from the viewer while staying wider at the knee, and appears shorter in length. And in the image on the right, the leg is laying horizontal and perpendicular to the viewer, so it doesn’t get as much of a foreshortening effect from moving forward or backward in space. This changes how the cross sections look as well. More foreshortening and perspective will cause more variety in the width and shape of the cross sections because of how drastically the circumference of the limb appears to change when facing towards the view angle, while having less foreshortening causes them to be more similar sized and shaped throughout the limb.
Using circular cross sections can help draw the cylinder shapes in sitting poses and make sense of the foreshortening effect on the body from different poses. Parts closest to and pointing at the viewer remain more circular, while parts farther away from the viewer become smaller, and the more the limb is turned the more distorted and ellipse-shaped the cross sections become.
Below is a cylinder shape I animated to help demonstrate how the body parts could change with foreshortening caused when posing.
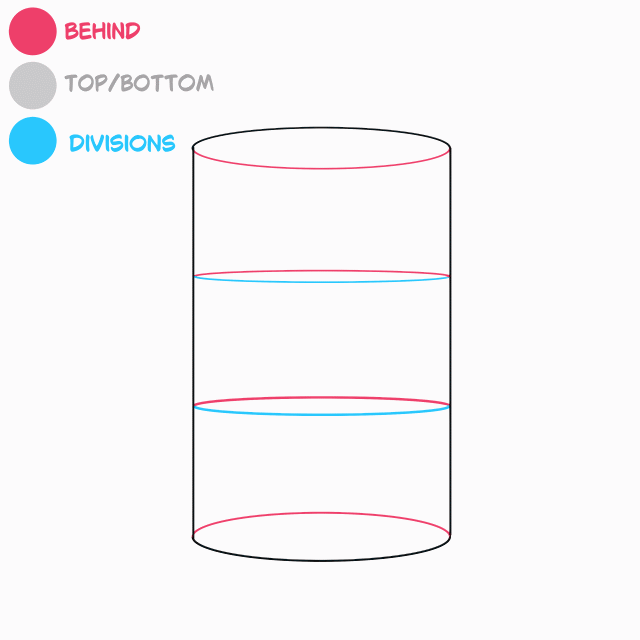
I colored some of the lines to help make more sense:
🔴 red = behind/invisible lines
⚪ grey = visible top/bottom
🔵 blue = front of cross sections/division
Remember that limbs aren’t perfect cylinder shapes. The circle cross sections are not the same size. The legs/arms can be wider or skinnier in the middles or at the ends based on the shape of muscle groups, or areas of fat.
Here’s a visual example of legs to demonstrate the difference between the organic leg forms vs regular cylinders. They can be a good starting point, but the body has a lot of varying thickness throughout creating curved vs straight areas.
📦 Foreshortening On Cube/Box Shapes
For the torso, containing the chest and pelvis being first drawn in as cubes or boxes. It’s the same concept as box drawing when practicing perspective, using a vanishing point.
The edges of the box shapes move away to vanishing points, making the box bigger in the front and closer to the viewer, and smaller as it moves away. The tops and bottoms are more visible when the box is tilted towards the viewer, and thinner and less visible as it tilts away.
↪️Drawing The Same Sitting Pose From Different Views↩️
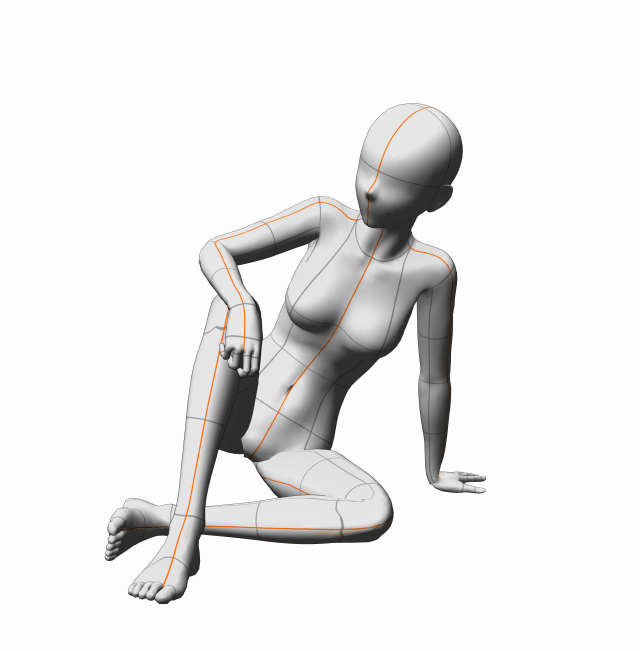
Drawing the same pose from other angles really shows how the viewing angle can change the foreshortening and perspective of a character. In Clip Studio Paint, using a 3D model asset is very helpful with this, as you can rotate the camera or the 3D character itself and keep the same pose, but shown at a different view. For this example, I used the same posed model, and made copies of it, then rotated them at different angles, then essentially animated them in Clip Studio Paint’s Timeline window. I did this to show how the body looks different based on how it’s turned. I drew each angle by using the same steps from earlier in the anatomy section.
1. Reference
A 3D pose that I then duplicated, and rotated to create seven different versions, each with a different viewing angle of the model. (Then animated using Clip Studio’s Timeline Tool so I could show the seven drawings rotating to really help demonstrate how the body changes visually).
2. Stick Figure
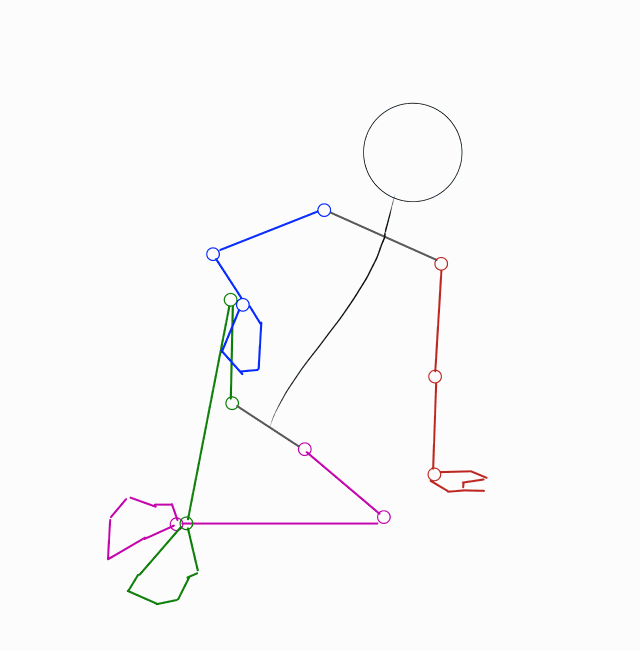
Again, I used different colors to help keep track of each limb as it rotated. You’ll notice later that at certain angles, parts of the body aren’t visible and it becomes harder to know how they should be drawn. Using guidelines like the stick figure (and the next shapes step) helps when drawing them.
3. Shapes
Here you can really start to see how the different body parts change with foreshortening and perspective as the model rotates. Like earlier examples, I built up the body using spheres for the joints, a sphere for the head (that later became more egg shaped to add the jaw and chin), cylinder-like shapes for the arms and legs, and cubes for the torso.
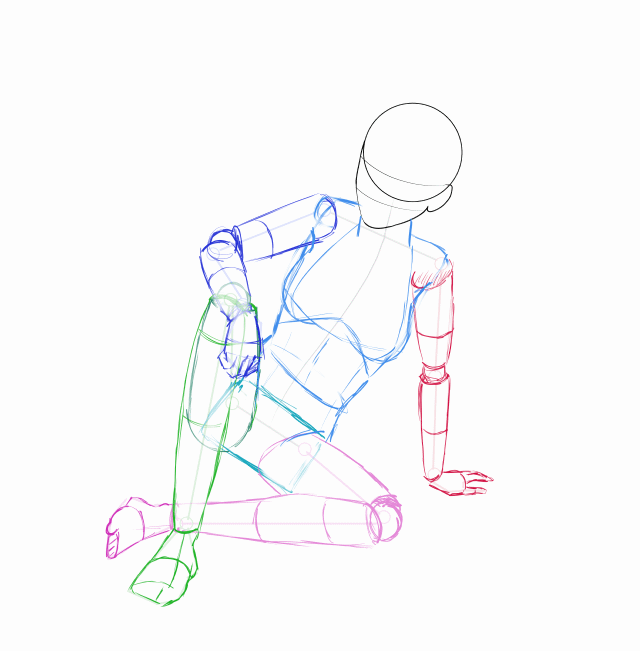
4. Add Detail And Finish
I added in the curves for muscles, but also flattened edges where the body makes contact with the ground and the fat and muscles are pushed against. This character’s left leg (the one outlined in pink) is resting against the floor, so areas of the thigh, the pelvic area, and lower leg have straighter edges to show where the character is resting their weight against the hard surface.
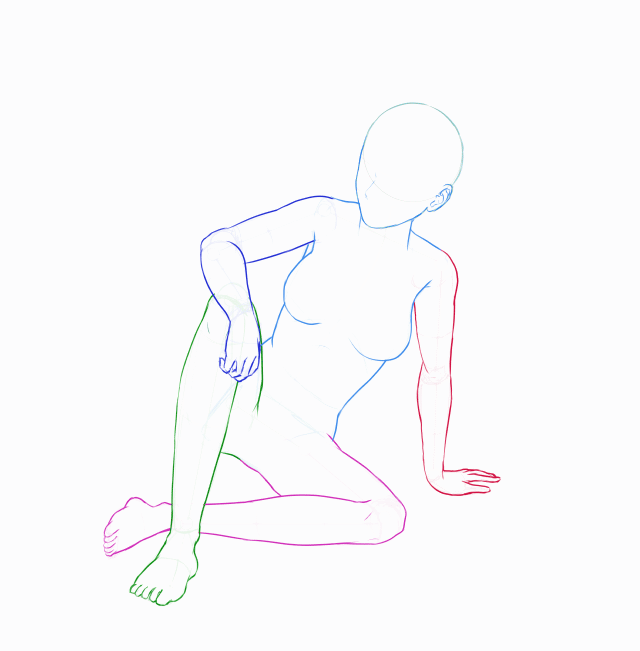
After cleaning up the lines, I turn the layer color effect off of all layers, and hide the layers with the stick figure and shapes.
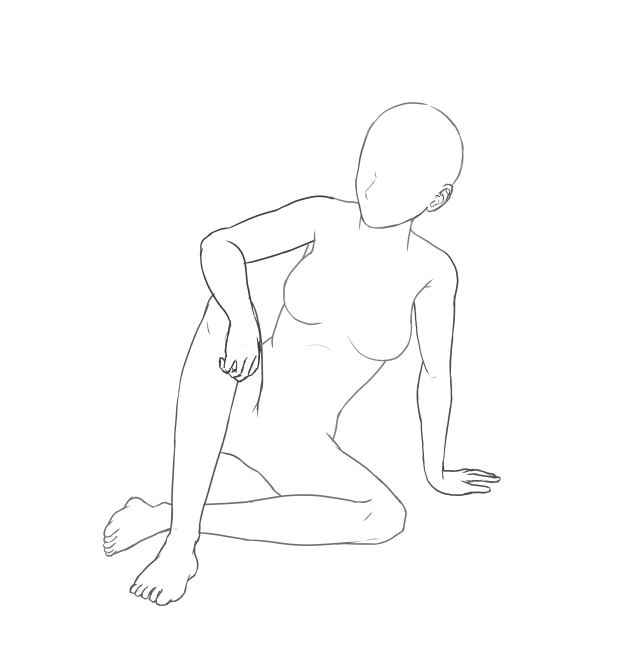
How To Draw Different Types Of Sitting Poses
🪑Sitting on Chair/Furniture/Object
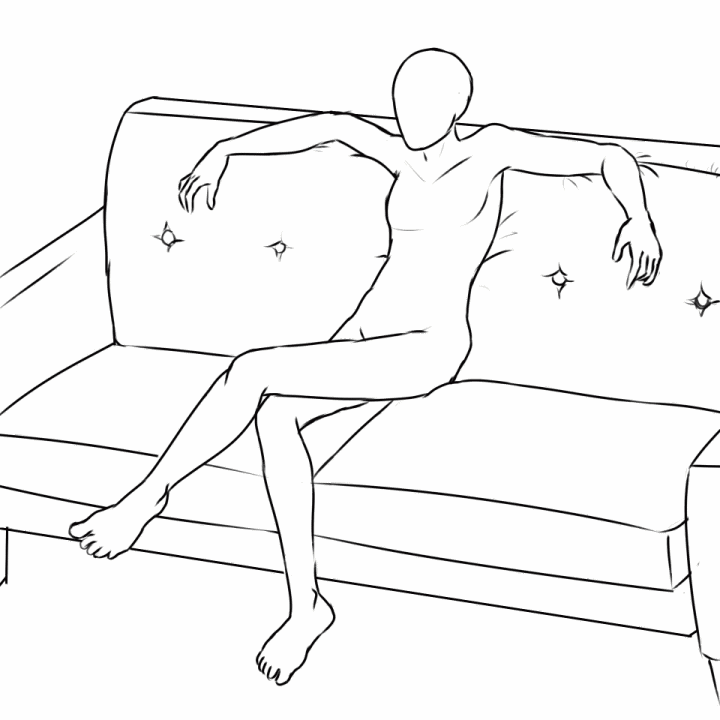
(Time lapse of character sitting on a couch.)
Drawing sitting poses on furniture uses the same steps explained earlier in the anatomy section, but now, we’ll look at how the character interacts and sits upon another object, like a chair.
Soft furniture, like a couch, will be more comfortable and characters can sit more relaxed and laid back. The character will sink into a cushion, causing crease lines and some possible overlapping of the furniture over the character.
While a character sitting on a hard surface has flattened areas of their body, where they rest against it, such as a hard wooden stool.
For this example, the character doesn’t have a back rest and needs to have a center of gravity to stay balanced and seated on the chair. The center of balance is through the chair and the hips and spine of the character, and then they stabilize themselves and rest some of their weight with their feet touching the floor, leaning forward with their elbow on a thigh.
Above are more examples of characters sitting on various chairs using 3D models.
(Assets used are listed at the end of this tutorial guide.)
🧎♀️Sitting On Floor
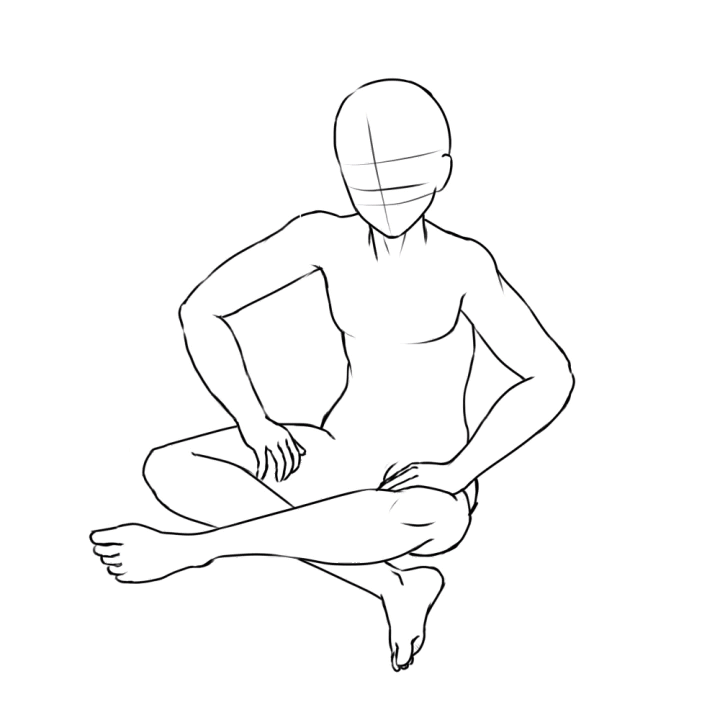
(Time lapse of character sitting cross-legged on the floor.)
When drawing a character on the ground/floor, you’ll need to keep in mind the plane and perspective of the flooring (pictured here with a grid).
Sitting cross-legged makes a lot of the thighs not visible, and also foreshortens them. With the steps I explained earlier using overlapping shapes, you can figure out where these hidden parts should be. This is important because for example here, the thighs and pelvis make contact with the floor and place the character on that flat plane.
The red lines here show where some of the areas of the body have flat edges where the floor makes contact.
Here are some examples of 3D models sitting on the floor in different poses.
😣How Body Language Affects Sitting Poses☺️
Body language can affect the mood of a character’s pose. Here are a couple examples of poses while sitting on a chair but with very different moods because of the characters’ body language.
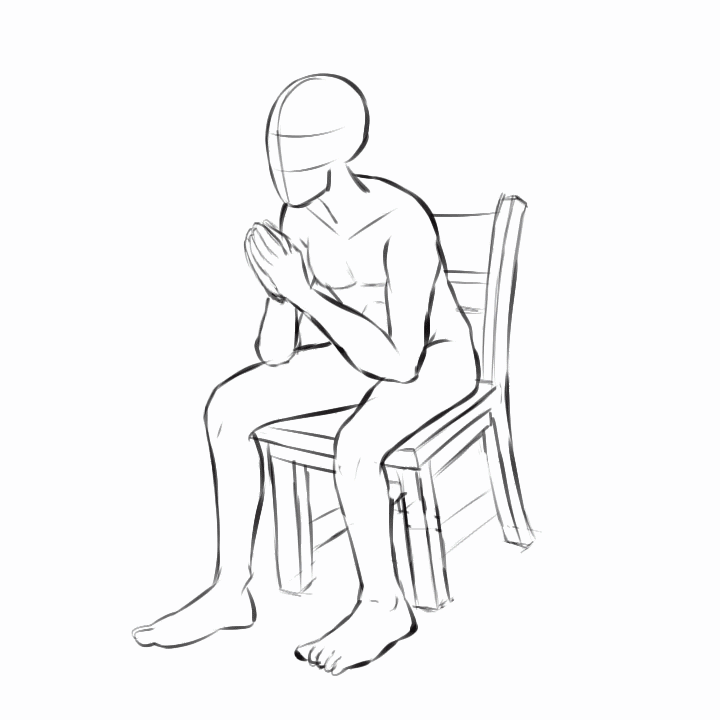
Pose 1: Leaning forward, with hands clasped together in front of face, and looking forward. This body language says this character is interested in what is happening around them, maybe they are talking to another character and are listening intently to them, probably making eye contact as well.
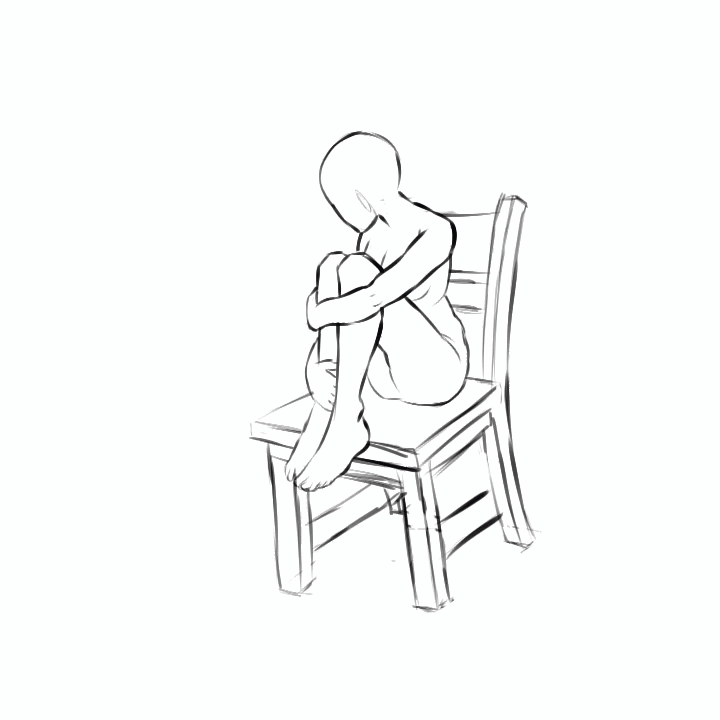
Pose 2: For this example, the character is sitting in the same chair, but has their legs pulled up and has their arms wrapped around their legs, hugging themself. They are also looking away. This body language implies this character is upset, maybe insecure, and closed off.
How To Use Clip Studio 3D Models For Sitting Poses
For this tutorial, I used many 3D models and pose assets on Clip Studio. You can find downloadable assets from their website:
To add a 3D model to your canvas, open Window > Material > 3D > and pick and choose a 3D figure or pose asset onto your canvas.
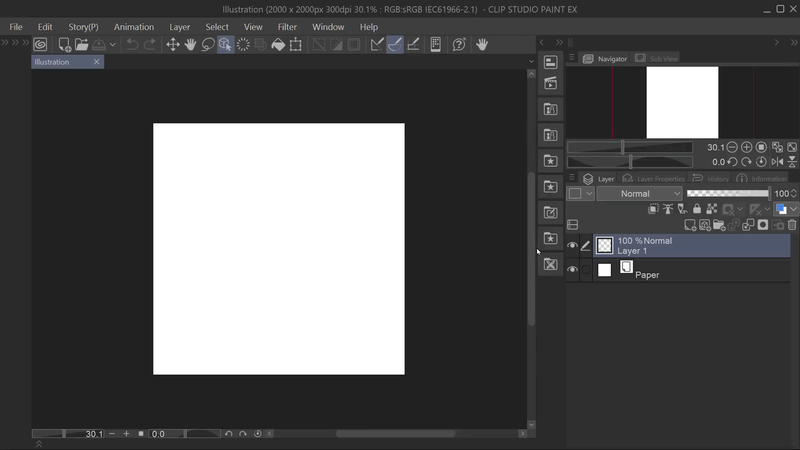
After dragging a 3D model from the Materials window, you can pose the model using Operation >Object Tool > and then click onto the 3D model.
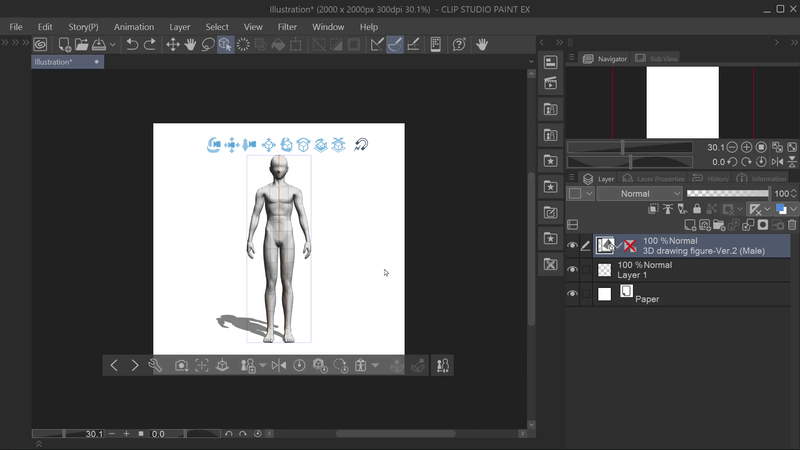
The red, blue, and green controls that pop up are how you rotate and pose the 3D model. Highlight and then click on individual body parts to move/rotate them.
For the controls: the Z axis is BLUE, X axis is RED, and Y axis is GREEN. The rings are for rotation, the arrows are for moving in directions.
The blue circles are for moving points of the body and will affect the rest of the body at the same time (for example: moving the circles on the feet will affect the whole leg). Hovering over the controls will highlight them in orange, so you know which you are selecting. Highlight the body part you want to change (body part will highlight in red when hovered) and then click on individual body parts to move/rotate.
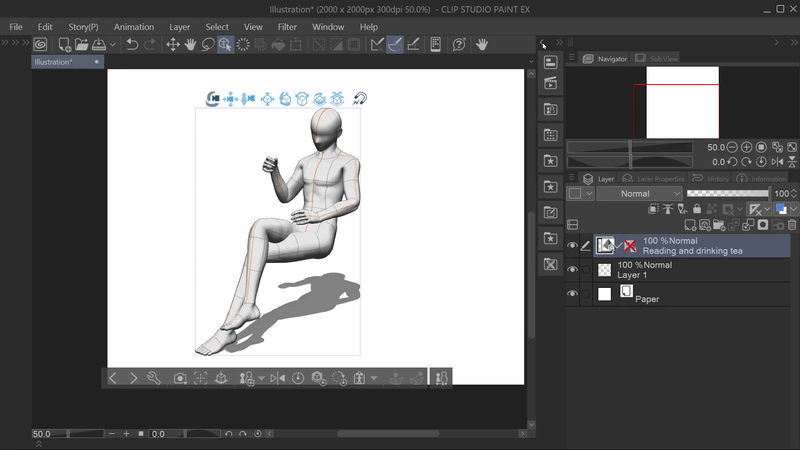
Or you can automatically pose a model, by using pose assets.
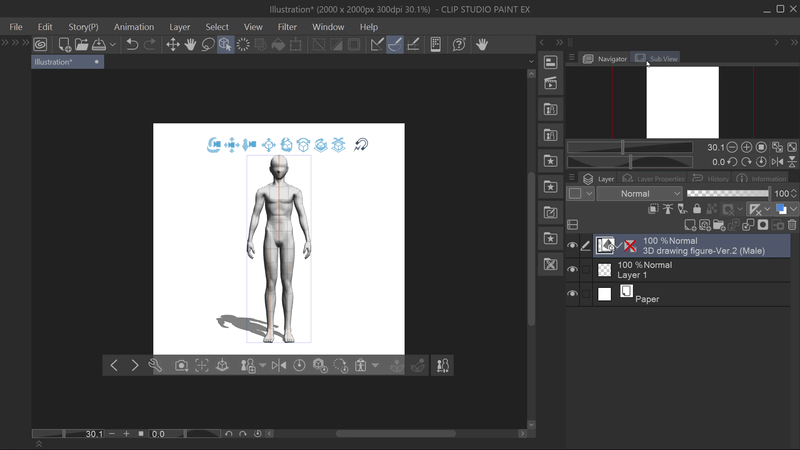
Do this by going to the same Materials window, and with the layer with your 3D character selected, pick and drag a Pose onto your 3D model from the Materials window. This is the method I usually use. I add a pose to a model of a character I’ve saved to reuse, and then fine tune it into the pose I need for an artwork.
You can also just drag the pose asset onto your canvas, and that will add a model in that pose.
For adding props for your sitting character, such as furniture, you can also drag other 3D objects from the materials window onto your canvas.
Make sure it is on the same layer as the character model, by having the layer with the 3D character selected when you add the new object. This will make the models have the same camera view and perspective.
Edit the placement of the character, so the character is sitting on the surface of the chair and not going through it, (called clipping).
3D Object Grouping
For sitting poses with furniture, like chairs, I like to make something called an object hierarchy for the 3D objects before going too far with editing them. This causes any changes like rotation or movement made to the furniture, to also affect the character and keep them sitting in place.
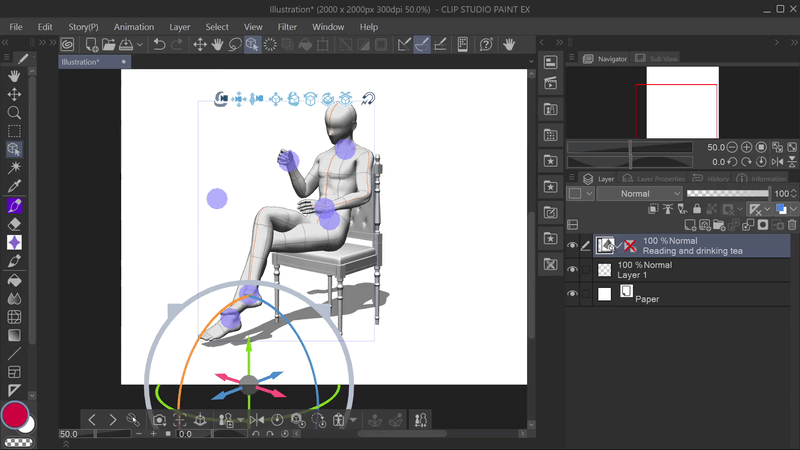
You can do this by clicking on one of the 3D models with the object tool, a menu will open, then click the wrench icon. This opens the “Object list” in the Advanced Tool Settings. Drag the 3D character and drop it onto the other 3D object.
(If you’re not sure which named model is which, just click on them in this menu, and they will be selected and highlighted in the work area.)
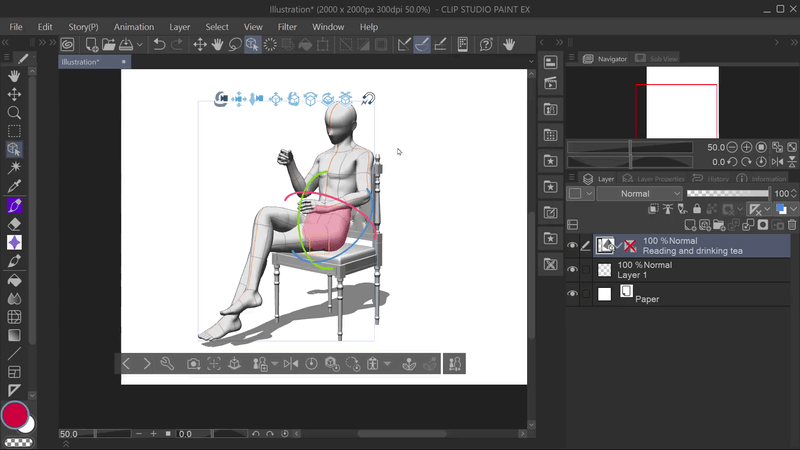
When you create the object hierarchy, the character can still move independently, but if you move the object they’re sitting on, the character will follow it. If needed, you can always undo this by going back to the object list and dragging the character’s model away from the other object to un-group them.
📐How To Use Manga Perspective Effect
Manga Perspective is an effect that you can use in Clip Studio Paint to add a dramatic look to your 3D model. It makes parts of the body that are closer to the camera view look even closer by making them look larger and more emphasized, and for parts farther away, it makes them smaller.
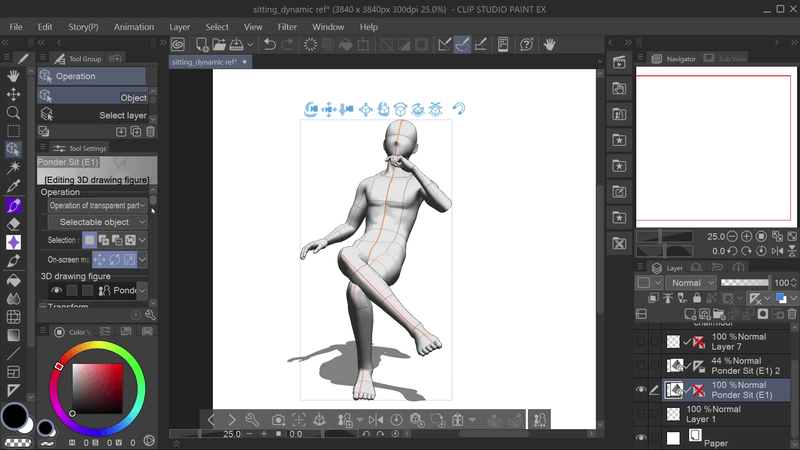
Found by using the tool Operation > choosing Object in the Tool Group > have the 3D model selected that you want the effect on > then in the Tool Settings menu, scroll down to Manga Perspective. Click the box to check mark it in order to turn it on, then use the slider to choose how strong to make the effect. And then there is another setting called Collision Correction beneath the Manga Perspective effect. This helps prevent parts of the 3D model that may try to collide, or called “clipping”.
2 Ways To Draw Sitting Poses With Clip Studio 3D Models
I’ll show how to draw a sitting pose using 3D models by tracing and also drawing free-handed.
Tracing is way faster, of course. It took me about half the time as it did to draw the other sitting pose using the 3D model as only a visual reference by keeping them and my drawing in separate canvases.
😇 Faster and Easier - Tracing 3D Models
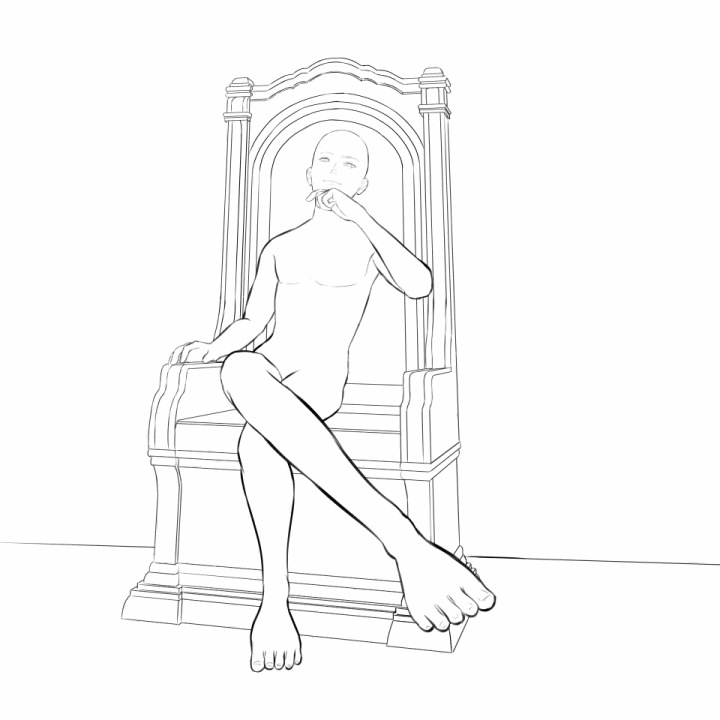
The fastest and easiest way to draw a sitting pose in Clip Studio Paint is to start with tracing. Is this cheating? Maybe, but it can also help you understand the anatomy and elements of a character’s pose, specifically for this tutorial, the sitting poses. Plus, if all of your 3D models are in the same layer with the same camera, they will have the same perspective and vanishing points affecting them, making your artwork more cohesive.
So, start by adding a pose or posing your 3D model manually, add in your furniture or other object they’re sitting on, lower the 3D layer’s opacity, then on a new layer above, trace with your preferred brush. I used the same drawing steps as before, but with tracing you can also skip those steps.
Earlier I talked about body language affecting the pose. For this pose, the body language makes the character look intrigued but also smug. Their leg is crossed over the knee, their arm is laying on the armrest but the hand is not clenched, so they are not stressed. The other hand is raised to their face in a way that makes the character feel in charge and smug. This is also further implied by how I angled the camera to be looking up at the character, so they are looking down onto the viewer.
Since we’re already tracing for this method, you can use one of Clip Studio’s head models to help draw the facial features, (which has more facial detail than the body models).
How To Add And Attach Head Model To Body
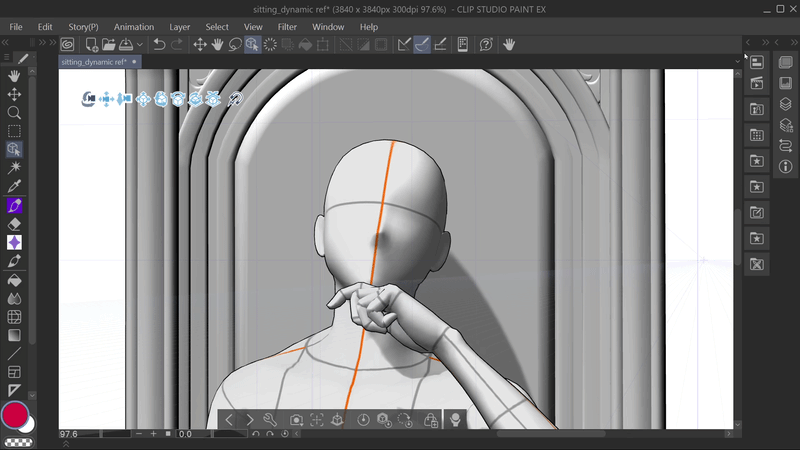
While on the layer with the body model, go to the Materials window, under All Material > 3D > Head, and drag a head model onto your 3D model. Then with the wrench icon, open Advanced Settings, and in the Object List, drag the head onto the 3D character to attach it to the body model.
How To Hide Head Of Body Model
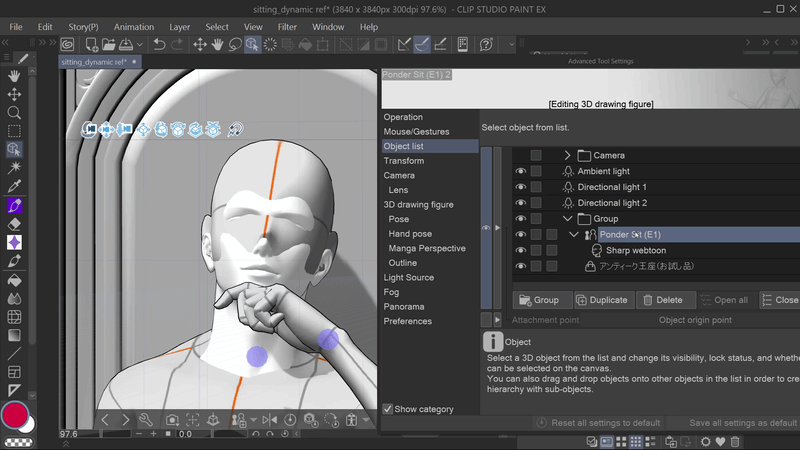
I then edit the settings of the 3D character model to make the neck and head smaller, so they are hidden inside of the head model. While still in the Advanced Tool Settings window, choose the body model in the Object List, then 3D drawing figure, and click on the head icon and adjust the head size.
(Note: I recently learned that you can do this step automatically by using Advanced Tool Settings > 3D drawing figure > and turning off “Show” for the head. I didn’t know this feature had been added)
How To Edit Head Model
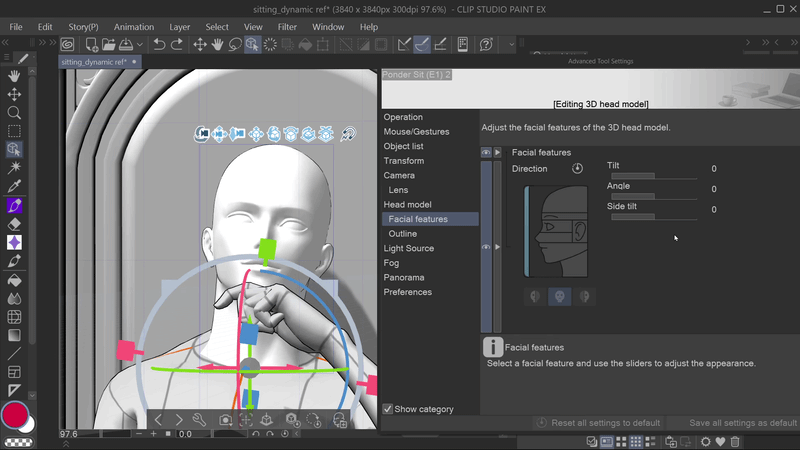
Then, with the same window open, you can edit the pose of the 3D head by going to Facial Features, and with the bar next to the head selected (so it poses the whole head rather than features), adjust tilt, angle, and side tilt. The other settings are for changing size and shape of the facial features, like the eyes and jaw.
Tracing 3D models is good for at least a starting point, but I recommend changing elements of your drawing from the 3D reference such as:
Line weight. I made some of the lines of closer parts thicker, and lines for further away, thinner.
Making slight changes to the anatomy, like curves of overlapping body parts or parts touching another object’s surface.
This will help make your drawing more organic looking and less stiff.
Another example is that I used Manga Perspective on the 3D character (as shown in a previous section), and I thought that the chair would look a little better if it’s perspective was edited a little to better match the Manga Perspective effect. I used the Free Transform tool > Perspective, and moved the corners to make the bottom portion of the chair wider like the character legs, and the top part more narrow like the character’s upper body.
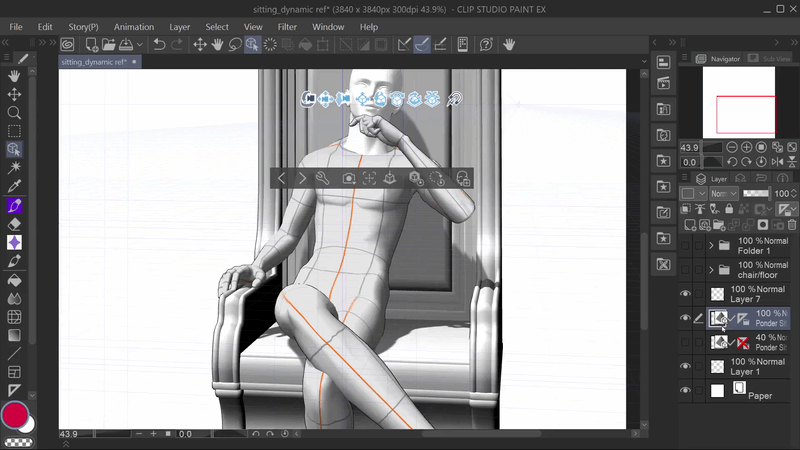
Even though I used a lot of tracing for this example, I also used perspective rulers to help draw the throne chair model, because of how many straight lines it had.
I did this by copying the ruler from the 3D models layer onto my drawing layer. Rulers can be copied by holding ALT and clicking on the ruler icon of the 3D layer, and then dragging onto the drawing layer. Then with Snap to Special Ruler on, you can make straight lines using the perspective seen in the 3D model.
Slow and Challenging - Using 3D Model As Visual Reference
The other way I use Clip Studio’s 3D models to help me draw, is to use them as a visual reference in a separate canvas window. It is more challenging but great practice for drawing anatomy.
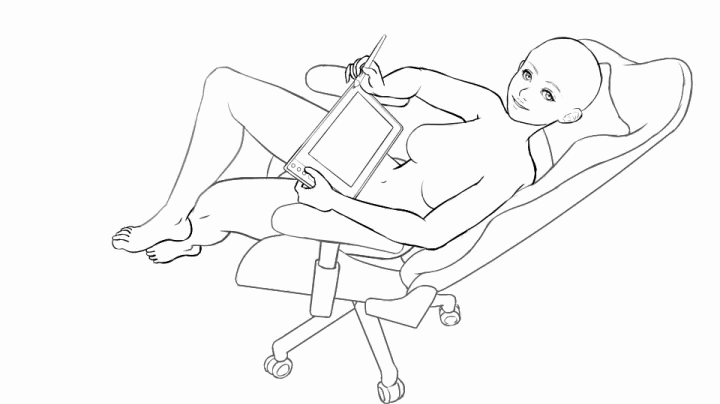
(Timelapse of drawing sitting pose.)
3D Pose Reference
For this example, I used a camera angle looking down onto the character, who is posed as someone using their art tablet while sitting in their computer chair. The body language is relaxed as they are leaned back, with one leg crossed over the other in a comfortable way. Their body language is also open, and appears inviting like they are sharing their drawing on their tablet with us.
I mentioned having the drawing and the 3d model in separate windows. What I mean is that the drawing and the 3D model are in separate Clip Studio files, and are opened at the same time. Then one of the windows can be dragged to the side of the other canvas, so they are both visible in the workspace.
Drawing by reference involves imitating angles, lines, and shapes accurately, which can be hard when by freehand. Something that I do to help with this is use a grid on both canvases to help me see where elements should be in the drawing. It’s like using a ruler to draw a line grid on paper to practice drawing.
The grid can be turned on by going to View > Grid. Then go to View > Grid > Grid/Ruler Bar Settings, to change the number of lines and what part of the canvas they start from.
For this to work, the canvas size, and the grid settings need to be the same for both canvases - the reference image and the one for drawing in.
If the sizes and grid settings are different, it will not be helpful for drawing from reference.
Below are the steps I used to draw this, the same as the ones used throughout this tutorial.
Stick Figure
Shapes
Detail
Here you can see how even though the right leg is crossed over the left, the left knee pushes up into the right leg, making it overlap the right leg’s edge. And you can see how the chair's seat flattens the left thigh, and because it’s cushioned also pushes up against the leg.
Finish
Tracing vs Freehand Drawing A 3D Model Sitting Pose
Earlier I showed the work time information for both the tracing and the freehand drawings, so you know the tracing method is much faster; I literally spent about half as much time on the drawing using tracing, even with all the time spent on posing the 3D models and setting up perspective guides (the throne chair I used had a lot of straight lines that I wanted to copy correctly). Whereas, with the second method where I made the drawing by looking at the 3D model as a visual reference in a separate canvas took me so much longer. I had to adjust parts of my drawing many times, to get the correct proportions and angles as the reference models. But this way of drawing is better for practicing drawing and improving at copying what you see accurately by eye as well as hand - eye coordination.
Drawing with only 3D models, by tracing them can cause your drawing to be more stiff and not as dynamic or natural looking as just looking at the reference. However, tracing 3D posed models early in an artwork process could help figure out the anatomy and also to get correct perspective, placement, and proportions. It could be a good starting foundation to help plan out the rest of your drawing.
Conclusion
That’s the end of this Tips Article! Thank you for checking out my tutorial, especially if you stuck around to the end. I hope it helped you learn how to draw sitting poses, and also helped you understand how to use some of the many tools available in Clip Studio Paint to speed up and aid your art process.
Clip Studio Assets
I love finding and trying out assets to try in Clip Studio Paint 3D poses. Below are links to the assets I used while making this tips article:
Users who liked this post


Comment