Introduction
In this tutorial, you'll learn about:
What to do and don't when drawing eyes
Step by step from sketch to finish
Guide about Ambient Occlusion, Lighting, Ambient Light
Video process how to render final piece
I'm using Clip Studio Paint, but any digital painting software should fine to do this.
Hopefully this tutorial help you to improve your art, enjoy!
Brushes
Nothing fancy, the only brushes I use for any illustration I did include this tutorial are default "Colored Pencil" in [Pencil] sub tool
This pencil has good opacity control and texture, that's pretty perfect for initial sketching
and the second one, this "Standard Round Brush", we're going to use it almost 90% in all progress. You can download it here:
The important part of this brush settings are size dynamic (small square) and Hardness setting, we can setting it to make blending feels better
Basic Anatomy
I know we're not a doctor here, but as an artist, we have to know at least basic anatomy for everything we draw, in this case, here some important basic anatomy you have to know (if you can't remember the name, just remember each object separation)
I use my own artwork for this example, it may not perfect but it's already shown what we need to knowing about basic anatomy of the eyes.
As you can see, I put the "Tear Duct" isolated from the other.
No, I'm not racist or evil, I isolated it because tear duct seems optional depending on your style, many artists out there don't show it in their art especially in stylized style such as cartoon or anime, but we're include it in this tutorial.
Sketch
Draw basic eye sketch including parts of anatomy we learn before. We use simple line placement for eyelashes in this part because we'll make a decision either how much or how long it is in the next step.
Ah, also keep in mind about bottom eyelashes, it's placed in top edge of skin surface, not inside the skin, so in this angle, you should draw the sketch like this
Basic Colors
Start painting from back to top layer, it will make blending easier. In this case, paint the base skin color (I also darken the canvas/background color to relax our eyes from sharp white color).
After that, paint the sclera with semi-white color, not fully white so it will looks more natural, also remember to not press the tip/pressure to hard so it will show a nice blending.
Next, add the iris & pupil, use any color you want, I'm using dark brown color for this tutorial.
Don't forget our isolated tear duct, and you can enhance eyelashes color to make it more appealing.
After you satisfied with those basic colors, go to the next step.
Lighting
In painting, we're going to add/reduce the lights, not shadow because shadow will shown automatically if we're not giving any light. To make that happen we have to darken the image using [Hue/Saturation/Luminosity] option, you can find it in Layer > New Correction Layer > Hue/Saturation/Luminosity
Or simply by pressing CTRL + U (Only work if you're using only one layer), then set the value like this
Start adding basic lighting, I'll use classic top right light source to make it easier. When choosing light color, pick base color and then choose brighter color and move the hue in color wheel
Looks so dull right? because our current color doesn't have hue variation, remember that skin has flesh, blood, vein, muscle, water, etc inside it and skin also have some transparency that cause "Sub Surface Scattering (SSS)" happens.
To apply it, pick base color and go to some vibrant warm colors, here an example (remember to keep playing with your pressure handling, don't push it too hard to make a nice blend)
We're missing one more important thing in lighting, there's "Ambient Occlusion (AO)", first time hearing that? don't worry, here a simple explanation
There's a tube squeezed by two balls.
Imagine those things hit by direct top right light, you may think something like this
right? the light hit and cast shadow already applied there, but we're missing one thing to make it more realistic
Those soft dark area called Ambient Occlusion, it happen because this is the deepest part of each object that light cannot reach, remember the nature rule "dark means no light", everything we can see is because light hit it and reflect the information to our eyes, if the light cannot reach it means no information given to our eyes, that's why there's dark and we can't see it.
and here how it would looks like if we apply that theory
Ok, I think we're going out of topic too far, let's back to our eye painting.
First, think where the deepest parts of the eye, it usually happen in some folds and layered area, we're going to add AO there.
just by adding simple AO and our eye painting looks more realistic drastically right? after doing this step our lighting is basically done.
Now let's move to the final step
Rendering Process
When you're rendering an object, make sure to imagine "where" the object placed, let's pretend this eye is outside, there's clear blue sky affect the color it called "Ambient Light", we can add some blue color to indicate that sky ambient light, here the example
And after adding that ambient light color, we can start blend all this color into final piece, here a quick video demonstration how I render it
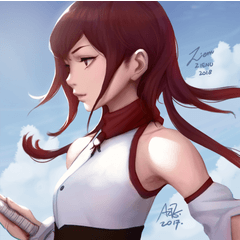
The video was speed up 3x and here the final result
Bonus Tips
The distance of each eyes are about one eyes
In side view, eyes placed slightly away from the forehead because "one eye" distance
Pupil placed inside the iris, not on top of it
Users who liked this post


Comment