
Hello everyone!
here is a tutorial on how I make realistic oil paintings. personally I use the brushes from a set that I downloaded (see link), but I do mention which brushes you can use as replacements. Lastly English is not my first language, so sorry if I made some grammar mistakes or if I wasn't clear with the instructions. This is after all my first tutorial. let's begin!
link: https://gumroad.com/l/JYUHf
I personally like to make a sketch first. You can use any pencil you want. Our sketch will be our first layer. Also, the sketch can be as messy as you want, as long you still can see the features of your person.
We add another layer (2nd layer) under the first layer and start drawing the base colors. Not everything has to be perfect. I used an oil brush that I also downloaded from the set I linked, but the oil paint flat brush or the round gouache (thick paint) will do too, if you don’t feel like downloading the set.
We add another layer (layer 3) above layer 2 and start shading with the same brush. A tip is to shade first with a low opacity and then add the darker colors with the full opacity. Also, I recommend blending with the base color in a low opacity and a mix of the shade color.
We add another layer (4th layer) and more shadow. Again, use the same tip I mentioned before.
Yes, another layer above the 4th layer (5th layer) and this layer is for the highlights. Use a lighter color for the highlights, but don’t use white as lighter color. Even if you are painting pale skin.
Now we are going to focus on the eyes. I add a 6th layer and just do everything on that layer. I also switch between reducing the opacity of the sketch layer (30%) to none (0%) to see where I need to add shadow and highlight.
Moving on to the lips. We add another layer (8th layer) and use a slightly darker color than the base color and we start shading it into the middle of the lips and the shape of the lips. Use a low opacity of both base and shadow to blend better but keep the middle dark.
Now add more shadow to it with a darker color and use an even darker color for the middle. Again, use the opacity tip for blending.
I also added the highlight on the same layer with a lighter color than the base color and lowered the opacity. Just press a bit harder or brush over it If you want more highlight, but don’t overdo it. Also, if you don’t like the color of the lip, you can change it by tonal correction.
Moving on to the hair, we add another layer (9th layer) and start using a slightly darker color than the base color. Add even a darker color on top of the head and at the sides of her shoulders. Do this all on the same layer. I also used a darker color on her eyebrows.
We add another layer and start highlighting the hair. Personally, I’m not very good at painting hair, so I tend to leave it a bit bland and this is just how I do this.
We choose a lighter color that is close to white but with still brownish tint, since our character has brown hair. Lower the opacity and make brush moves
now for the clothing you just use the same technique.(add shadows and highligts, switch between opacities) Use reference pictures if you don't know how to shade clothing.
Also for the background. put it under layer our base color layer and above the paper layer and just have fun with the background! I simply used the same technique on the background, but you can also add effects by downloading brushes or image material from the "clip studio assests"
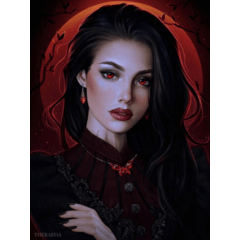
Well this is the final result! I hope you found this tutorial useful. If you have questions, you can ask them in the comments! good luck to everyone!
Users who liked this post


Comment