
For those of you who would learn more effectively if the tutorial is in a video format, feel free to click on the link to the video located at the bottom of the page!
Hey, everyone!
With so many features that Clip Studio Paint provides, it is quite easy to get confused or overwhelmed, especially when you are new to it. Like, I’ve been using CSP for a while now and there are still things that I find out about to this day. Like… did you know that it can… color FOR you? It uses machine learning to color your art for you. It’s crazy cool!
So yeah, I definitely get it.
Luckily, I will show you curious artists who are looking to make their webtoon ideas a reality, how to go about this. To do so, I will look at Clip Studio Paint’s update: Ver.1.10.6 which so happens to be the update that in my opinion, CHANGES THE GAME in the world of webtoons AND producing digital art in general.
Let me explain. (Also, this new update can now use PHOTOSHOP brushes!)
TIME-LAPSING
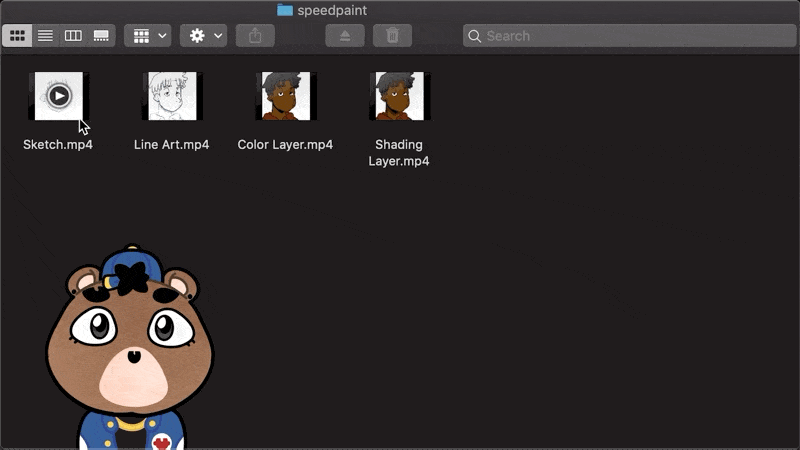
Now, I will start off with the one feature a lot of artists out there are gonna love: the time-lapse features. If you’re not familiar with what a Time-Lapse drawing is, it simply is whatever you draw on a clip canvas… recorded. Yes, almost every stroke and command is recorded. Meaning, you no longer have to rely on third party apps to record your screen anymore, because Clip Studio Paint now has your record of your drawing BUILT IN to the app itself!
So when making a new file to draw on, you’ll see a checkbox on the lower left corner of the file setup window, that says “Record Time-lapse”.
And when that box is checked, every single stroke you choose to make on that file will be recorded for you to view whenever you feel like! Just keep in mind that since you are getting a video along-side your file, that the file will be larger than usual. But don’t fret, since you can simply export your time-lapse at any time during your drawing process to stop it from recording instead. If you do wanna keep better track of your file space while you do speed paints, what I recommend doing is record the time-lapse in increments, that way you’ll have a separate smaller recording for your sketching, your line art, your color layer, etc, and just compile it later!
But if you do have a ton of space, have at it!
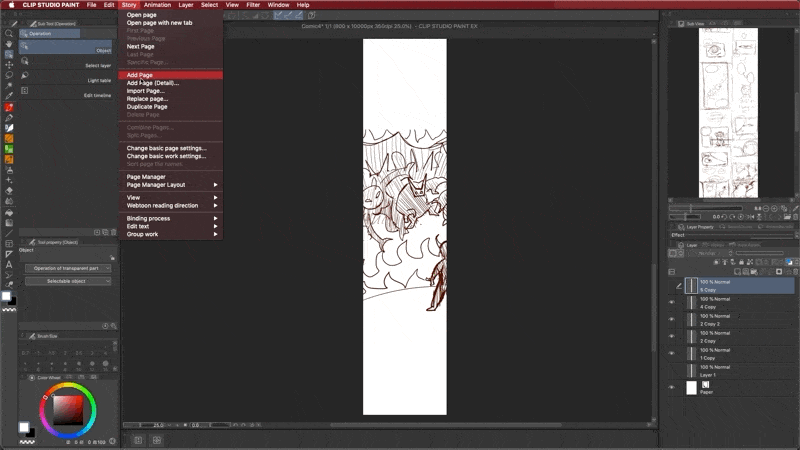
Webtoon Production
Okay so last but definitely not least, is the webtoon specific features that are now integrated into Clip Studio Paint.
Now right off the bat when making a new file, there is now a new icon exclusively for making webtoons located right next to the illustration icon!
Clicking on that when making your file will put CSP into “webtoon” mode, giving you access to a couple of cool features, such as creating multiple long canvases and arranging them in the order of your story. You can create a file size precisely at the size that will make exporting it super easy.
Let’s go to the Story Menu, where you can add and delete pages as well as view how your pages look in a real-time viewer, that way you can improve on the framing of your comic panels a lot better without having to crop and export it first. Super convenient!
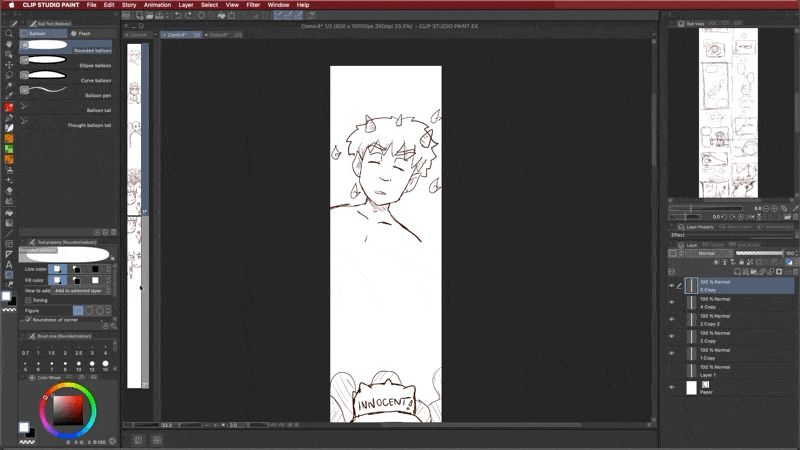
Of course all the other comic features, such as speech bubbles, comic panels and such work in this format as well. This way you can set up your scene exactly like you imagined… like for instance, a webtoon idea about a demon who woke up in the human world, and has to learn how to maneuver through everyday life without getting caught, all while trying to protect the Earth it once revered against monsters of their own on top of keeping up steady grades and hanging out with the love interest who demon thinks has a thing for them but they’re not sure because they’re not very forward and demon is too shy enough to be forward so it’s a bunch of the “will they/won’t they” stuff and it’s uh… hmm.
Okay, got a little carried away there--moving on!
That’s not all though, because now they have a feature in the view menu called On Screen Area (webtoon), where you can see how your art will look on the average smartphone in real time so you can pace your webtoon better for scrolling. The size for the viewing area can also be adjusted, in case you want to check the flow on different devices.
Now with exporting, in the past before this update, you would have to rely on a slice tool in other programs or a third party site to crop your pages to meet dimension requirements, but thankfully just like time-lapsing, automatically cropping your file is now built into Clip Studio Paint.

You can export the crop into any size you’d like, and have CSP just handle the rest no problem. You have the option to specify the size of each exported image and the number of images as well. You can choose which file format you want to export the images in and Clip Studio will automatically save the files in the folder you specified and number them according to their order.
This way, you have all your parts in one place and can easily upload them to services like Webtoon or Tapas!
Hey everyone, the name is Darren Esquire, and I am a multimedia artist with skills including drawing, video-editing, and host an animation youtube channel by the name of “uToonz” where the video portion of this tutorial is located on! Feel free to contact me and/or check out my socials for more content from me!
And thanks to Clip Studio Paint for continuing to help artists BE artists!
And as promised, the link to the full video tutorial below. (As well as some links to my socials! bother me if you'd like!)
Twitter • @darrenesquirex | https://twitter.com/DarrenEsquireX
Instagram • @darrenesquirex | https://www.instagram.com/darrenesquirex/
Youtube • @uToonz | https://www.youtube.com/c/utoonz
Users who liked this post


Comment