
In this tutorial I'll try to explain step by step on how to make glowing magic circle and how to shade and lighting the character to blend with it.
I'll mention the tools and color used in this piece, in case someone curious about it.
(I'm not English native, please let me know if you found mistakes)
1. Idea and Sketching
Assets and materials used in this step,
Canvas size : A4 at 300dpi
I'm using 3D model to help in visualizing idea. Use [Manga Perspective] for more interesting pose. Adjust the pose and try various camera position.
Since I plan to make the character affected by light from the magic circle, I make change on the shadow too. By doing it, I'll have reference for where to put the shadow on the character.
Select the 3D model and then open the sub tool (wrench icon), then go to [Light Source]. Click and drag around the sphere image to change the position of the light source. In this case, magic circle will be the light source. So, the light will hit around character right hand part and the left side of the character will be in shadow.
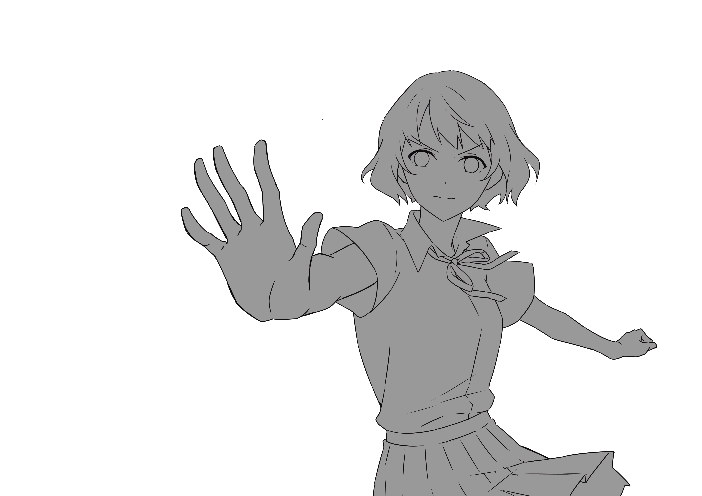
After satisfied with it, make sketch or go straight for line art.
Adjust 3D model layer opacity around 25%. Make new layer above 3D model layer and start sketching using the 3D model as base. I change the pose a bit and add clothes, hair and other details.
Use whataver brush you are comfortable with for sketching. I'm using [G-pen] with brush size pen-pressure OFF
2. Line Art
After done with sketch, make new layer above sketch layer to draw the line art.
My brush for line art is default [Turnip pen], but you can use whatever brush you comfortable with. Organize line art in folder to avoid mess :).
This is how my line art look like over the sketch. I ended up changing the hair style and expression.
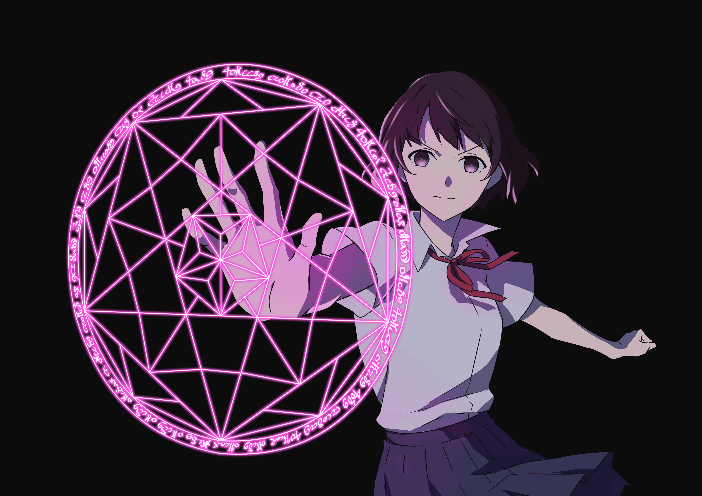
Next is adjusting the magic circle perspective to fit character direction using [Transform] tool in [Perspective] mode.
More explanation on how to use [Transform] tool :
Put magic circle and character line art in separate folder.
This is how the final line art look like.
3. Coloring Magic Circle
Step 1
Change magic circle color into your liking. Mine use Magenta-pale [R:255 G:153 B:237].
Step 2
Make a copy of magic circle from step 1. Put above first magic circle and change the blend mode into [Screen]
Step 3
Next, make magic circle outer line glow.
Make another copy of magic circle in step 1, named it 'copy2'. Put under first magic circle layer. Change the color into slightly darker [R:193 G:66 B:170].
Select 'copy2' layer and then right click. Choose [Selection from Layer] > [Create Selection]
After magic circle image get selected, open [Auto Action] and use [Expand selected area by 5px]. Click play button icon.
If you want more thicker outer line, follow this step below.
Make sure the part highlighted in image below turned on. Play auto action.
Pop-up window will appear. Fill expansion width as you like and click OK.
Now the magic circle should have thicker line art.
To make it softer, blur using [Gaussian Blur]. Go to [Filter] menu > [Blur] >[Gaussian Blur].
Adjust strength setting. For this piece I'm using 15.
Step 4
Copy magic circle from step 3. Put it in the most top of magic circle folder.
Change layer mode into [Add (Glow)] and adjust layer opacity.
4. Coloring Character
I use cell shading style for coloring because it's fast and simple.
Make new folder under line art. All character coloring layers will go here.
Make new layer and fill in area inside character line art with flat color. Any color will do.
Tool I use in here:
Base color
I'll using [Clip at Layer Below] function to keep the color and shading inside the character.
More about [Clip at Layer Below] can be found here:
Make new layer above flat color layer, turn on [Clip at Layer Below]. Start coloring the character part in this layer.
Since the image for this example is simple I end up using one layer for base color. I make new layer to color the eyes.
It's also fine to make different layer for each part, Ex: skin layer for skin color, hair layer for hair color, etc.
Since I plan to add shadow on the hair, I avoid using pure black [R:0 G:0 B:0] for hair color. Pure black is the darkest color, so I can't add another color for shadow if it used for base color.
For white shirt, I'm using Gray-10% [R:230 G:230 B:230].
Shadow
Make new layer above base color layer for shadow, click [Clip at Layer Below] and change the layer mode into [Multiply].
Color used for shadow is[R:112 G:130 B:162]. Brush used, default [Turnip pen].
Use 3D Model from before as reference for shadow placement, paint the shadow on the character.
Match the color with atmosphere
To match with atmosphere or mood, it's easier to put background first and then making color adjustment.
For this example, I use Gray-95% [R:12 G:12 B:12] for background because dark color will make the magic circle appear more glowing.
Make new folder under character folder, named BG, put background layer in here.
After putting the background, I feel like the character is too bright. To make it darker, make new layer above shadow layer. Turn on [Clip at Layer Below] and fill it with same color as shadow color. Change the blending mode into [Multiply] and adjust the opacity.
Now, I want the character too have pink-ish color to match the light source color (in this case magic circle). Make new layer, click [Clip at Layer Below] then fill it with Magenta-pale and change layer mode into [Color]. Adjust layer opacity.
I want the part that near the magic circle have more strong pink light color, so I made new layer in [Soft Light] mode. Still using Magenta-pale, use [Soft] airbrush to color desired part.
Turn on magic circle layer to see how it look.
Light on character
For light, make new layer and use [Screen] blending mode.
I'm using [Mapping Pen] for light in right arm and hair.
For eyes, use [Lasso marquee] to select eyes area and [Photoshop brush 2] to add light color.
Gif animation for what happening in this step.
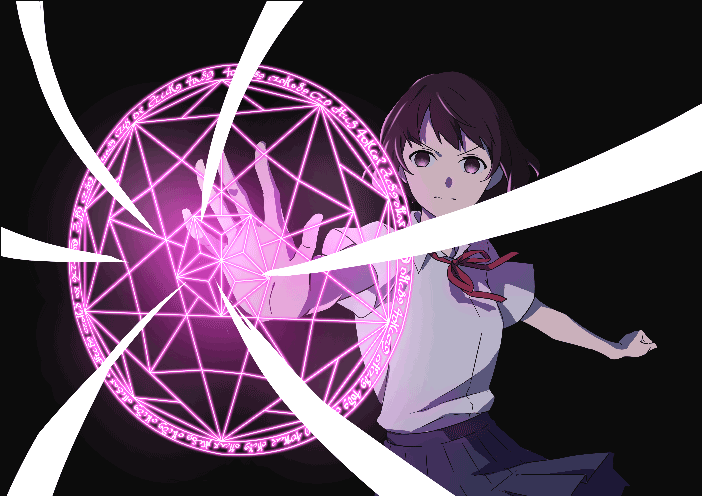
5. Effect
Make new folder above magic circle folder for effect. Make sure it's on [Through] mode.
Make new layer and set blending mode into [Screen]. Brush around the center using [Soft] airbrush. Color used here is [R:229 G:45 B:197].
I want the color more strong in center, so copy previous layer and adjust the opacity.
Add new layer again. This time use [Add(Glow)] mode and brush around magic circle to make it glow.
Now, how to make the wind thingy.
Make wind-like shape using [G-pen] or other hard edged brush. It directed into the center of magic circle. Change the color into your liking. Mine use Magenta-pale.
To make illusion as if it's moving to center, use [Radial Blur]. Go to [Filter] menu > [Blur] > [Radial Blur].
This is the setting I use.
Make sure the little red cross placed in the center of wind.
After done rendering blur effect, change the layer mode into [Screen] and adjust the opacity to make it looks transparent.
To make the color more saturated, copy the layer and change into [Overlay] mode. Adjust opacity if needed.
Gif animation of this process.
6. Finishing Touches
Make new layer above lineart. Use [Soft Light] layer mode, lighten area around bangs using [Soft] airbrush.
For details in eyes, I make new layer and use [Add(Glow)] mode to make the eyes look shiny.
To add more contrast, I made area around character glowing.
Copy flat color layer (named Layer 4, in my example). Use same method as 'Step 3' in 'Magic Circle Coloring' to make outer glow effect. Set the layer mode into [Screen] and adjust opacity.
Change lineart color to make it appear softer. Most noticable change can be seen on eyes and mouth.
Add particles
Make new layer and use [Add(Glow)] layer mode to make the particles look glittering. Brush used is [Battlefield Dusts] brush.
Since the background looks boring, add gradation and particles.
For overall color adjustment, I want it to have pink-ish color from magic circle light color. Make new layer and place it in most top. Fill with Magenta-pale color and change layer mode into [Color]. Adjust the opacity.
Final image and layers organization.
Done :)
Thank you for reading.
Users who liked this post


Comment