
Intro
Thanks for visiting this tutorial! I am going to go over the figure tool in Clip Studio Paint. I will summarize the video here. I recommend watching the video over reading the article because I could go more in-depth and it also has my timelapse painting!
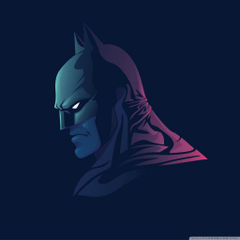
I used only lasso fill for the painting, without using any brushes. It was a great learning experience and I highly recommend doing it too :)
I will go over general tools for Figure and share some tricks as well.
This is where it is located. There is no shortcut for it, but you could go into File -> Shortcut settings in order to change that. It's pretty easy.
These are the options that the tool gives you. Stream line and saturated line are mostly for manga and fills with graphics, so I am not going to cover them. It is fun to play around with it though!
Straight Line and Polyline
Straight Line is mostly made for making lines (duh). There are not that many options, which makes it a great tool to use because it is so simple. You could change the brush shape though, which could be helpful for specific effects.
Using spray for example, will give you a nice textured approach as if it was created with rough pencil. You can also change the size and opacity of the line.
The option that you could play around with is Anti-aliasing. There are a lot of articles about it out there if you want to research more. The short answer is left options will give a sharper pixel, while the right side will give you more smooth experience. Like this
If you use a simple line tool and it is around 5 pixels, then I would say left is better. Anti-aliasing is using your computer power, so less stress is better in most cases.
A polyline is the same thing, but has a few more options. It connects lines automatically, so you can have multiple straight lines.
If you hold "Ctrl", then you can move the point around for the polyline before you are finished with it.
Also, it has different filling options.
The left one will make the shape at the end, while the middle one will just create outlines.
Curves
I think the curve that you should use is Bazier Curve. There are different modes for it. The most versatile is the 4th one.
It acts in a very similar way to the pen tool in photoshop. You can use Alt and Ctr to change the point and angles during the process. You can use the fill option like on polyline too. The other 3 options are a great addition, but I think you can do 90% of the work with just the last mode.
Extra tip, you can create a vector layer, create points and then change them in any way after you are done with it. Just use the Operation -> Object tool.
Circle and Boxy thingy
These are great to build construction and create dimension in your art. The secret is to use perspective tools! Just create a vanishing point and it will follow it and create perfect lines in perspective.
This is super helpful for anyone doing architecture or any mecha drawing. You can also follow my perspective tutorial if you want to check out that as well.
The curve tool is a quick way to create lines at an angle. Just drag and let go and then you will have the option to change the angle of it.
It is super simple and quick :)
Lasso Fill
This is the coolest tool out of all of them. The short description is that it will make a color fill for whatever selection that you made. It lets you create specific shapes that would take longer while using a brush. The nature of it makes it easy to create shapes like that in less than a minute!
If you are working on the same layer it will give you more options to change your image and make faster color changes. It also has opacity so you can build your color fills step by step.
I created an entire painting just using Lasso Fill, which made me aware of colors and shapes. It made my painting process fast and easy. I think it is a great exercise for people who want to learn edge control and focus on shape design.
You can also use it with a combination of locked transparency. Watching for the shape of the object and then going into detail later will force you to observe the object more and think about your next move.
Here is the painting I made, you can watch the video and the time-lapse if you scroll all the way to the top. I hope you learned something and happy painting.
Users who liked this post


Comment