How to bring out the texture of knitted wool
#MonthlyTIPS202207
#drawfabrictextures
Hi all.
Welcome to this new tutorial where I will show you how I proceed to bring out the texture of my models' clothes.
Seeing an illustration like the one below makes you wonder how long it took to make it, but it's much less than you can imagine.
The texture we are going to obtain is that of a garment knitted with wool.
Step 1: Create the texture.
The texture I chose to apply for this tutorial is that of a knitted garment. It's a texture that illustrators tend to avoid when designing characters; for the simple and good reason that it could take too long. It's even worse if it's about making it into a comic book character.
You imagine if your character needs a garment with these textures…
First, you have to do a little sketching to get an idea of the knitted design.


Then we are spoiled for choice; we can then choose to paint one of these designs or combine several.
Personally I have a preference for the middle design. In addition, it gives me ideas as to the use of the colors that will be applied to it.
Since the design is meant to be turned into a pattern, I highly recommend doing it on a square canvas.
Place your sketch on your canvas and reduce the opacity. History to paint quickly on it (we are not going to reinvent the wheel).
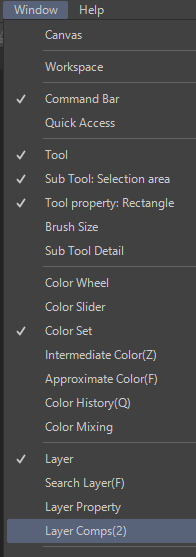
Put the layer of your sketch on top so you don't get lost during the painting stage. Don't worry about how colors look on the canvas, the "Mix Colors" and "Color History" palettes will let you know what exactly the color you're using looks like.
To access it, go to the menu: [Window_Color History] and [Window_Mix Colors].
It must be admitted that it takes a little time, but it is time saved in the next stages of creation.
Step 2: Transform the texture into a pattern.
To create a pattern in Clip Studio Paint, it is first essential to transform its image into an image material. The procedure is quite simple:
- Group all the layers that make up our design in a folder.
- Right-click on the folder and select the option
- In the [Convert Layer] window, pull down the [Type] tab and choose [Image Material Layer].
Once the image material has been obtained, transform it into a pattern by going to the [Edit_Save the material_Image] menu.
The Material Property window will appear. Name your pattern, activate the tiling, select its save location and confirm with OK.
Step 3: Make the drawing of the model to be dressed.
Here we are just going to put a short video for you to save time, while noting that we are going to give our character a clothing color closest to that of our texture.
At this stage of the work, we can apply our clothing texture.
Step 4: Apply the garment textures.
It is now that our pattern will serve us. To use it, go to the Materials bar and find your texture in the location where you saved it.
Drop the material onto your canvas and scale the texture scale to your liking.
From this step cut and orient the texture according to the different areas of clothing. In the case of our illustration you can for example do as indicated below.
Make a copy of the texture for each of the seven areas shown and use the Mesh Transform to warp the texture to match the volumes of the garment. I see showing you the process for zone 1. And you can do the same for the other zones.
1. Select the area and copy and paste.
2. Activate the Mesh transformation by going to the menu [Edit_Transformation_Mesh transformation].
NB: you can increase the number of stitches to have more precision in dressing.
3. Deform the texture to fit the shape of the garment.
4. Select the exact area where you want to apply the texture, invert the selection area and delete the outer area.
Personally, I like the result. It only remains to do the same for the other parts.
That's it ! I think it really looks like our model is wearing a dress with a knitted wool texture.
We can now move on to finishing. However, it is possible to change the color of our texture to see what the garment could look like with other colors. Just press the CTRL+U keys on the keyboard to then play with the colors.
However, we will stick to our base color.
Step 5: Finalize your drawing.
It is at this stage that we can water down our work, generate lights and improve shadows. Add a background etc.
Conclusion
Depending on the type of texture we want to achieve, the method of creation may vary. But my experience with Clip Studio Paint has shown me that this one is one of the best and fastest. Succeeding in creating a texture is not everything, you also have to make good use of it by managing to apply it well. If Clip Studio Paint's mesh transform didn't exist, it would have had to be created.
Thanks for following this tutorial till the end. I hope it will help you unleash your creativity.
I invite you to visit my pages via the following links:
https://www.youtube.com/channel/UC2wCYjpHBCs2R_c2jina_Gg
https://www.facebook.com/Martial-Ngandé-1930460387013696


Comment