
Hello everyone!! Layer blending mode is a very good feature for the final touch on images. It can create ambience to an illustration or animation in a very easy way.
In this tutorial. I will show you a time saving strategy to create an ambient background and beautiful animation effects. These can be added to your artwork with layer blending mode and video footage adaptation.
No worry if you’re new to digital art or clipstudio, you can follow my examples step-by-step.
Let’s start!!
Video Tutorial
Part 1 : Preparing the resources
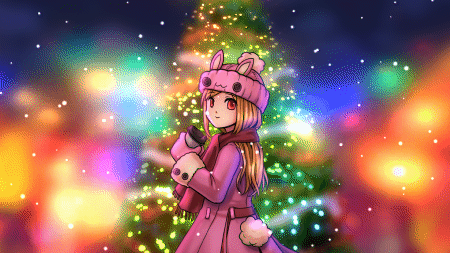
In this tutorial, I will create a bokeh background for my character.
Let’s take a look at some quick concepts.
Bokeh simply means when the background is blurred, it happens when one takes a photograph and the focus is on the object at front and there is some distance between the object and background
I will simply prepare the character and blurred background
these two files are in .clip format
For the character, I painted simple shadows for basic details
For the background, I use image materials from clipstudio assets and blurred it.
The christmas tree is closer than the rest of the background, so it’s less blurry.
(the details of making this background, I added it in the bonus chapter at the end of this tutorial.)
For the effects video, I’ve prepared 3 footage effects, for the snow and the lights
I prepared it in .mp4 format
The effect footage that can be used in clipstudio must be on a black or white background.
If the effect is about light, the background must be in black so it works with Clipstudio blending mode
You may create your own footage with a phone camera, make it with Clipstudio or download from any stock video service.(you can also find some free footage)
The footage video have to be format supported with video import feature in Clipstudio :
• For Windows version: AVI format (.avi), MP4 format (.mp4), QuickTime format (.mov)
• For macOS/iPad/iPhone: QuickTime format (.mov), MP4 format (.mp4)
• For Android/Chromebook: MP4 format (.mp4)
Reference :
Part 2 : Final touch with Layer blending mode
The layer blending mode is the option on the layer to moderate the color value to the layers below. You can adjust it on the drop downlist in layer panel
Clipstudio provides 28 modes of layer blending
you can see all example from the official turtorial :
For the light and highlighting I mainly use : Add and Add(Glow)
For the shadow, I mainly use : Multiply, Darker and Linear burn mode
Create a new file
Use the animation preset. I also set the playback time to 1200 frames
The animation time will be 40 seconds for framerate at 30 frames per second
Note : if you’re using the clipstudio paint PRO version, the playback time will be limited to 24 frames.
This preset will give you one animation folder. Just delete it
Import the background and the character to the canvas, goto [File > import > Create file object]
Select both files and [Open]
You can see the character file has a white background
Open the file of the character and delete the paper layer
Then save the file [Ctrl+S]
Go back to the animation scene. you will see that the character now has a transparent background
(Usually ClipStudio will update the file object automatically when saving the original file, but if it’s not updated, you can right click on the object layer > File object > Update file object)
Adjust the size of objects with the [Object] tool
You can see the character pops out from the background.
Blending mode will help add light reflection to the character to make her blend in with the background
Add the ambient light first with new correction layer,
go to [Layer> New Correction Layer > Gradient Map]
Use the default setting, click OK
A new layer appears on the panel, clip it to the character
Then double click on the correction layer thumbnail to open the popup for gradient map
Click on the ^ below the bar to set the color to gradient
Click on the eyedropper icon and pick color from the majority light color of the background
And on the other side, select the darkest color
Set the layer blending mode to [Darken] and adjust the [Opacity] down
The ambient light is done!
Click on the mask that comes with the correction layer and use a soft eraser to reduce the ambient light and create depth for the character.
Then, add highlights to make the character more outstanding
Create a new raster layer above the correction layer and clip it
Paint the highlights with a soft airbrush. Use light colors from background but in lighter tone
Then set the layer blending mode to [Add (Glow)] and adjust the opacity down
Paint more highlights onto the details with a smaller sized soft airbrush
For the shadow, create a new raster layer, clip it, and set blending mode to Linear burn and paint with the darkest color from the background
(reduce the opacity of the layer if it’s too dark)
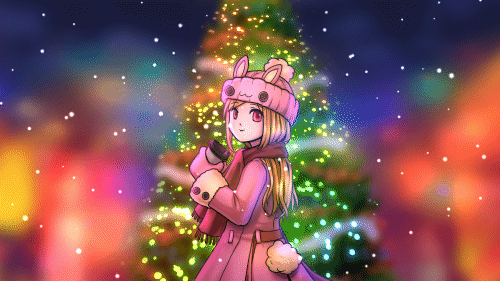
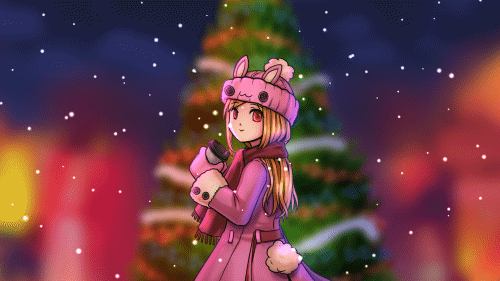
Now the character is standing in front of the background ^_^
Tips: you can also adjust the color tone of the background with the correction layer : Tone Curve
(must select the background layer first, the correction layer will be inserted above the selected layer)
Adjust the tone by dragging on the graph
If you want to change only one color value, you can select the color channel
Part 3 : Add video effect footage
It’s time for more fun!!
Before we start working, let’s put the character layers and background layers into separate folders to avoid confusion
You can drag the layers on the folder icon, or press[Ctrl+G]
We will start with very basic footage : the snowfall

When inserting the footage, it will be an object layer above the active layer and on the current timeline point.
The snow footage will be on the top, select the character layer folder and frame 1 on the timeline
(if you don’t have the timeline panel. Open it with the menu [Window > Timeline])
Import the video footage, go to [File > Import > Movie]
Select the footage and [OK]
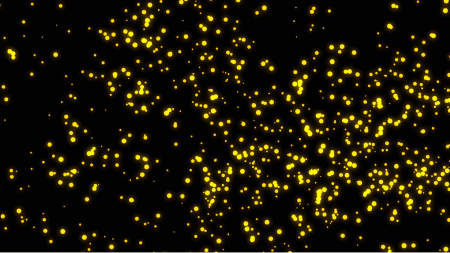
The snow footage will appear on the screen
The video footage is starting from blank, then the snow starts to fall.
I will cut this part out because we just want snow falling.
I seek the frame where the snow fully fills the screen,
(Clipstudio shows the video preview at the frame too)
I will delete previous part and let the scene start with this time point of the video footage
Right click on the screen and [Split clip]
Click on the header bar of the object timeline to select all area
Right click and [Delete]
Then click on the header bar and drag it to frame 1
Now the snow will start with full filling of the screen
Set the blending mode of the video layer to [Add] and TADAA!!
With the [Add] mode, it will delete the dark value of the layer, and totally delete the black background that has black color (#000000)
Let’s add more video footage!
Before we import new video footage, lock the other footage and hide it to avoid accidentally selecting and moving it with object tool
Import the video above the background folder
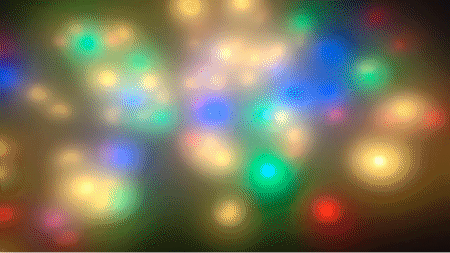
I will only apply this glittering light on the Christmas tree in the background.
Set the layer blending mode to [Add(Glow)] this mode is used for most of the light effect
Use the object tool to transform the shape of the video object
In the tool property panel, set mode to[Free transform]
This mode allow you to move each corner separately
edit the video footage shape to the christmas tree
You can also remove some part of the video with Layer Masking feature
[Right click on the layer > Layer Mask > Mask Selection]
This will create the masking thumbnail on the video object layer
Click on the mask thumbnail to work on masking and use the [Soft eraser] tool to erase the unwanted area
We can also edit the glitter light color with layer blending mode too.
Put the video into a folder and create a new raster layer with [Color] blending mode and clip to the video
Paint the color on the masking layer with [Soft airbrush]
Then select the folder and set the layer mode to [Add(Glow)]
Now the christmas tree has more light colors.
I’ve made this glitter video with 4 images into a 5 seconds loop. It is too short for the timeline.
When the timeline of the video is over, it will disappear from the canvas
Right click on the header bar of the video timeline and [Copy]
Right click on the next frame and [Paste]
Now the video will play another loop, continuing pasting until the end.
And the Christmas light for the tree is done!

You can also make the footage by yourself with your phone camera.
I saw the christmas tree at my apartment lobby is so beautiful
So I asked to borrow the decoration lights to make video footage.
I put the decoration lights on dark T-shirts and recorded the video
I use my transparent folder to create the bokeh effect
You need to use a stand for the camera if you don’t want it to shake
Here is the result :
I returned the lights and said thank you.
Import the video to the canvas(my video is already in the same dimension to the canvas preset, so it fits very well, if it’s too large, you can resize it)
You can simply set the layer blending mode to [Add(Glow)] and done!!
You may see the image is too bright, that’s because the folder filter I made didn’t give a totally black background. When set to glow, every color on the background will glow
To fix that, put the video into a folder and make a new correction layer in brightness/contrast mode
Note : Put the correction layer in a folder, it will only show its effect on the layers in folder
Add more contrast to make a blacker background
Set the blending mode of the layer to [Add (Glow)] again, the light now become more clear
I also masked and remove some parts of the video footage that appeared in the sky and christmas tree
You can see the lights on the scenes have not effected the character and feel a bit unnatural
I will use the same footage to put light changings on the character
Copy the folder and put it above the character folder
On the video layer, click on the mask thumbnail and press [Delete button]
Then on the canvas, paint on the character only with [Soft Airbrush]
(no need to change the color because it will only paint the mask to the video layer)
Reduce the opacity down if it’s too strong (also with the background)
And here’s the result!

Note : the quality of gif animation is dropped for the limitation of the color usage, check my video tutorial for better quality animation
Bonus : lazy background is easy with Clipstudio assets
Here is some tips for using asset to create lazy background I've used in this tutorial
In Clipstudio assets, you can search only specific type of asset by the option in the detail menu
Filter type to [Image material]
In case you don’t have Clippy you can also filter for free assets
Then you can type the keyword to search
Here are materials I use in this tutorial
When you download material, it will appear in [Material panel > Download]
I will make bokeh background for my art (blur on the back) so I only need colorful image that look like festival light
Create a new blank canvas and drag the image material to the canvas
You have to check if the image is a file object or not
If not, you can resize it with free transform [Ctrl+T] or [Edit> Transform> Free Transform]
I want night sky parts, so I insert also the standard material River_night
(you can find it in [Color pattern > Background] folder])
You can see the different between image layer and image material layer
If it’s image material layer, you need the [Object] tool to adjust it
I move the image layer on top and use [Soft] eraser to erase and show the sky parts
Merge the layers (hold Shift to select multiple layer)
Blur it with the [Filter > Blur > Gaussian blur]
I also add a christmas tree because all I want for christmas is you >w<
But you can see that the Christmas tree pops out from the background too much.
Create a new raster layer above and clip it
Use the soft airbrush and paint on the clipped layer with light color of the background
Then change the layer blending mode to [Hard light]
Reduce the opacity, and now the christmas tree is blending into the background more
Merge the layers and apply gaussian blur, and the very easy background is done!!
I hope my tutorial gives you some new ideas on using video features and blending mode as footage for your art!! See you in the next tutorial ^_^
Usuarios a los que les gustó esta publicación


Comentario