
Introduction
Welcome back to the 2nd part of this tutorial on tileable textures.
In this tutorial, I am going to demonstrate the effectiveness of tileable textures and how it speeds up the process of concept art or digital painting to achieve industry-quality results.
What you need:
Two types of Software:
CLIP STUDIO PAINT
Any 3D software.
1. 3D Blocking
In 3D, I usually use just these three basic meshes for quick blocking: Plane, Cube and Cylinder. After this, I edit them for the scene.
The whole purpose of using 3D is to get a suitable composition with texture and rough lighting in order to reduce excess painting work.
Below are the screenshots of the 3D blockout which I did using Blender 3D:
********
Now, if you are not interested in doing lighting, UV mapping, and texturing; you can simply render the mesh with basic colors (or mesh ID pass).
Import that render into Clip Studio Paint and start adding tileable textures using Perspective & Distort Transformation.
Here is a screenshot of Blender 3D which allows us to give random colors to the mesh so that we can easily make a selection in Clip Studio Paint:
********
After completing the blockout, I did a quick Box UV unwrapping (i.e box mapping or plane mapping), adding materials and a basic lighting setup for the scene.
Nowadays, most 3D software has awesome in-built render engines which helps attain stunning results with great lighting scenarios.
Applying volumetric effect, bloom, contact shadow etc. will get the most of the quality from the 3D software as shown below:
I then used the tileable textures from our previous tutorials for this scene.
If you want to know how to make a tileable texture, please check out my "Seamless Texture" tutorial :
After adding textures to the materials for the necessary mesh, I can render the scene before starting the paintover in Clip Studio Paint.
Here are some other angles of the same environment. As you can see you have full access to explore the 3D scene and choose your favorite angle to render it.
2.) 3D Render Image: Paint-over
This is the final render I chose for the Subway:
Since our textures were already hand-painted, they gave the 3D render a painted look immediately.
For the paint over, I am using watercolor and some custom brushes from the Clip Studio Paint Assets store.
(For custom brushes, there are plenty of great brushes in the Asset store. You can download your preferred brushes.)
Now, I can start adding brush strokes and details to give more of a painted element to the background. This also helps the scene look less 3D.
Paint layer mode: NORMAL
To give the backlight feeling to the sign board, I used the “Color Dodge” blending mode to brighten up the text. After this, I used the “Add” mode to brighten and saturate the arrow sign for it to look more believable and finally, the “Vivid Light” mode for the glow effect.
For the graffiti, I used the default Watercolor and Oil Paint brush with “Normal” blending mode.
4. Adding Character
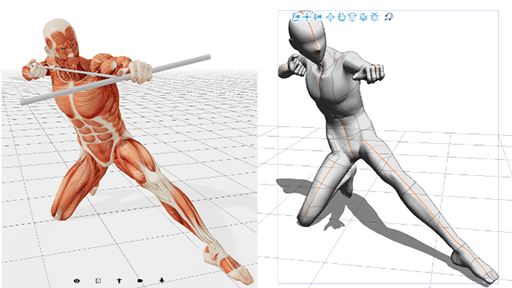
For the character, I used the default CSP character and posed it for the background

The blue lines on the character can be easily disabled in the “Rendering Settings”.
For that,
Click on the "Setting" icon found at the bottom right corner of the "Tool Property"palette.
Select [Preference] -> [Rendering Settings] -> then deselect [Use texture] in the Texture column.
PREVIEW::
You can also edit the light direction according to the scene.
Select [Light source] -> hold and move the cursor on the sphere thumbnail to change the light’s direction
:: PREVIEW::


Then, export the character with transparent background and import it into the Subway background to start adding details on it.
Adding clothes, cellphone, hair etc.
I used the watercolor brushes for this
For the dress, I used the basic Watercolor brushes due to its blending properties. It is quite fast and easy to use for this purpose as shown in the image below:
After painting the cloth, I added rough dots, the bag, the cellphone, and shadows to blend them with the body.
Similarly for the hair, I used watercolor due to its water properties, it’s easy and fast to paint and get a high level of shine easily.
::PREVIEW::
5. Final Pass and color correction
After completing the paintover, and once you are happy with the result, it's time to add depth and some environmental effects (like fixing the image temperature, volume light, color balance etc.) and play with the blending options.
I used the “Z-depth” path for to add depth. However, you can use a soft brush to get the same result.
I used the normal “Z-depth” to have some volumetric light effects and the inverted version to make the foreground darker.
Z-depth is another image that you can render with most 3D software. It’s a very useful pass to give depth to the background
The reference below shows how I used the image and blending options:
Now, any color correction is totally dependent on your artistic style. Based on the theme, you can modify your color scheme easily.
Now, our concept art is ready for the final pass which is done using color correction.
I used a “Gradient Map” for editing the color of the shadows and darker areas.
I then duplicated the complete background, put it into "Soft light" mode, and modified the color values by adjusting the “Levels”.
I specifically added more red to give a warmer feel to the highlighted areas and lesser effects to the darker areas.
Final Background :
GIF Preview:

I hope this tutorial proves helpful to you. Please let me know in the comment section if you require help with any point.
About Me: Surendra Rajawat
My name is Surendra Rajawat and I am currently working as a Concept Artist in the video game industry.
Portfolio:
對此投稿按「讚!」的用戶


留言