
(Author's note : This is an low quality tutorial that i won't recommend if you want to learn about how to draw foods. You can find a similar tutorial from other artist. I'm Sorry for created such a low quality content and called it a tutorial)
Intro
Hai there! My name is Jan Rigel, this is my 2nd tutorial videos!!!
This tutorial is for drawing a delicious, simple, and also Aesthetic foods!
Breakdown
I reviewed tons of food-drawing art, from just a simple candies into a very hard-core like a Wagyu Steak. From what i see, i made 2 conclusions!
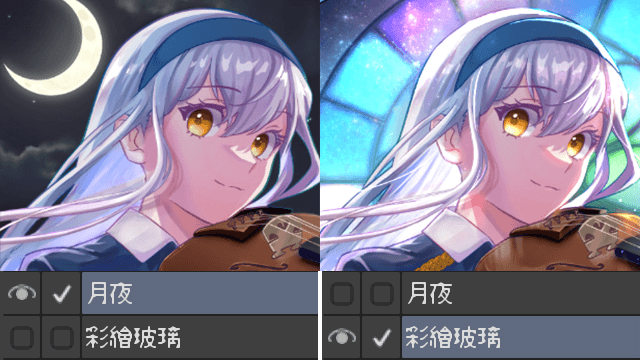
1. Blended line art and Flat colored line art
In my opinion, I'm somehow focused on the left drawing than the right side. I saw a lot of food drawing art that have a blended line art than flat colored line art, why? blended line art doesn't mean we have to delete the line art and just let the color on the artwork, but we re-color the line art with the similar colors near the line art. We do this so the to give people the best impression of what we made.
This give me a better look of the food it self, and made the food looks absolutely beautiful! but that doesn't mean that flat color of line art is bad, if you can control the colors, then surely it will look amazing!
2. I discovered 4 color that you can use in every food drawing
(This is just my Experiment)
I'm honestly see that colors 70% in the food drawing picture that i saw, and i think you can also use that colors for your food drawing art!
The color is kinda unique, because you can use it for just a normal food drawing art or in a food aesthetic art!
Basic Clip Studio Tools (you can skip this)
There are few things that i want to show to you guys and just incase if you new at this drawing stuff
1. Blend and Blur
If you press "J" on your keyboard, there will be a blending tools. usually im only using 2 tools, which is Blend and Blur. Blend is like mixing 2 color so it create another combination color from the original colors, and blur is for blur.
2. Layer Blending Mode
Below the "layer" you can see a box and it written "Add (Glow)". That is Layer blending mode. there a lots of layer blending mode, you can see the difference there.
3. "Clip layer below"
"Why there's a red color on line art color?" because the layer is clipped into the layer below. did you see an icon below "Normal" ? yes that's the icon.
"Clip below" is a special feature because it can only color the line on the layer below. so if you make a shape on "line art" and color it, you can simply change the color without afraid the color will out of the line. "Clip below" can only change all line ON THE LAYER BELOW IT!
Drawing Technique
How to draw sushi?
1. First, make a new layer for sketch and then the line-art
2. Next, make other layer below line-art layer and apply the base color
#Tips
Make the rice's line art look bumpy, not sharp
3. Make a new layer below the line art, on top of the base color, set the layer blending into MULTIPLY, lower the layer opacity into 30-50% and start make the shadow! and then blend/blur it!
4. Make a new layer, set the Blending mode into Screen, add, or add-glow and put it below the line art layer again! make the light spot, and then BLEND/BLUR it!
My blend brush setting is 5 box hardness, 10 color stretch, and 10 brush density
My blur brush setting is density 20
5. Make a new layer, put it on top of line art layer, click the "Clip layer below" and then change the line art color so it blended. look at the picture
roughly, it will look like that.
Now just add details, add more shadow and lights, blend/blur it, and there you go
The OIL EFFECT is quite simple, make an extra Layer, lower the opacity, and draw the oil. make a new layer again, use add glow, and then make the light effect! use any brush that you like! im use my special brush "rough wash" on the realistic sub tool!
Actually, that's it! there's nothing more. All you need to know is just how to pick the right color and how to blend/blur it!
Final Result
Tips and conclusion
1. Dont forget about the Blended line art that i'm wrote on on the break down Heading!
2. Usually you dont need any special brush for this kind of drawing, but if you want to. you can go and try tons of free brushes from clip studio! and there's a special Clip Studio Default Brush called "Rough Wash" on the realistic sub tool. you can use it to create a cool light or shadow effect.
3. I recommend you to watch my video so you can understand the work flow
I hope this tutorial can help you and give you an inspirations for your art and improve it also. i'm sorry if i made an error in this tips, i always accepting an opinion and suggestion so i can improve better!
See you next time!!! xD
對此投稿按「讚!」的用戶


留言