Kaleidoscope on file object

-
 MVP ◆This user has contributed greatly to the management of the community, by posting many great responses to the questions asked. Once every three months, MVPs are determined based on the points earned during that period and will be recognized accordingly.
 -
 New Valuable Player (NVP) ◆These are the next-best contributors to the community after MVPs. This is awarded to users who have not yet won an MVP award, based on the number of points they have earned.
 -
 Official Expert ◆Chosen out of all MVP awardees, who are already proof of excellence, this is a testimony of outstanding correspondence in the community. After careful screening, they are appointed by CELSYS and assume their position.Note: Formally called “Evangelists”
 -
 CELSYS official moderators ◆Moderators are official CELSYS staff members who are fluent in Japanese as well as various other languages. As moderators are not experts on software or creative work, they will not be able to directly answer your questions. However, moderators will provide communication and language support to ensure that everyone can smoothly communicate with each other.
 -
 CELSYS officialThis is the official administrator account.
Animation using file objects
I introduced the animation using the file object before, but this time it is "Mangekyou".
Arranging multiple animations like a kaleidoscope while changing the angle and reversing one repetitive animation
You can simplify the work by making it a file object

File objects may be useful for things that are used repeatedly or for displaying as a dummy (though you may not understand the meaning).
Files that just rotate
I will start immediately
First, create an animation of Perlin noise that makes one rotation in 6 seconds.
New illustration (400 x 400px) and grid display
First, create a 400 x 400px "new illustration"
The unit is (px)
Show the grid
Select "Grid" from the "View" menu
Select "Grid Ruler Settings" from the "View" menu
Check the origin of the grid ruler to "center"
Set the grid setting to "Interval" to (100px) and "Number of divisions" to (4).
This grid will be necessary to create a hexagonal pattern with a height of 400px and a width of 350px.
Adds gradation of new tonal correction layer
If it is left as it is, the capacity of the exported animated GIF will be difficult.
Reduce the number of colors
Select "Gradation" from "New Tonal Correction Layer" in the "Layer" menu.
Set the value of "Gradation number" to (5).
A "Gradation" layer has been added to the "Layer" palette.
- Snap to the grid here
Check "Snap to Grid" in the "View" menu
Add a new "vector layer"
Draw a triangle with the "line" of the sub tool as shown in the attached image.
This triangle has a reason, not an equilateral triangle
It is an isosceles triangle that looks like an equilateral triangle.
The part inside this triangle is displayed by the Kaleidoscope.
Create Perlin noise and timeline
Select "Layer 1" from the "Layer" palette
The layer name is Perlin Noise (no need to force a name)
Select "Perlin Noise" from "Drawing" in the "Filter" menu.
"Scale" (50.00)
"Amplitude" (1.60)
You can set it freely while looking at other canvases.
Because the center of the canvas becomes the center of rotation (the center of the Kaleidoscope)
Shift the "offset" appropriately so that the density changes.
In the attachment, it is (-58)
You can see that Perlin noise is not hazy due to "gradation".
Create a new timeline
Create a "new timeline" in this state
Press the third from the left of the command icon on the "Timeline" palette
"Frame rate" (12)
Set "Playback time" to (6 seconds) and (1 frame)
Rotate the Perlin noise layer once in 6 seconds with keyframes
Select the "Perlin Noise" layer on the "Layer" palette
Press "Enable Layer Keyframes" on the command icon in the "Timeline" palette
Press "Keyframe Interpolation" on the command icon of the "Timeline" palette and select "Keyframe to create: constant velocity".
Press "Add Keyframe" on the command icon on the "Timeline" palette
Keyframes are added to the timeline
By setting the sub tool to "Object", the state of the layer is displayed in the "Tool Property" palette.
Show "Transform"
Here, the numerical value is not changed as it is
Press the command icon "Last" on the "Timeline" palette to display the final fillet.
Enter (-360) for "Rotation angle" in "Transformation" on the "Tool property" palette.
Make sure that (minus) is entered properly
Make sure the keyframe is added to the last frame of the timeline
and
Remove the last frame of the playback range
The color of Perlin noise is dark, so change it lightly.
Not necessary, but I wanted to brighten the color of Perlin noise
Select "Gradient Map" in "New Tonal Correction Layer" on the "Layer" palette.
I made it brighter
The triangular layer remains, but leave it as it is
This completes the "file that just rotates"
Save and close with the name (400x400.clip)

(400 × 400.clip) animated GIF
Create tiling material with file object
Place (400 × 400.clip) as a file object on the new canvas.
New illustration (700 x 600px) and new timeline
Create a 700 x 600px "new illustration"
The unit is (px)
Show the grid
Select "Grid" from the "View" menu
Select "Grid Ruler Settings" from the "View" menu
Check the origin of the grid ruler to "center"
Set the grid setting to "Interval" to (100px) and "Number of divisions" to (4).
Add "New Timeline" in the "Timeline" palette
"Frame rate" is the same (12)
"Playback time" is set to (6 seconds) + (0) here.
Load (400x400.clip) as a file object
Select "Create File Object" from "Import" in the "File" menu.
(400 × 400.clip) is placed in the center of the canvas
Check the layer "400x400" in the "Layer" palette.
Duplicate this and increase it to 6
Give each one a name
"Forward rotation" "Forward rotation 120" "Forward rotation -120" (In the attachment, the name is "forward", which is not well understood, but don't worry!)
"Invert" "Invert 120" "Invert -120"
Check "Snap to Grid" in the "View" menu
Set the sub tool to "Line selection"
Make sure that "Antialiasing" is turned off in the "Tool Properties" palette.
Select the "Forward rotation" layer in the "Layer palette"
Draw a "line selection" along the "triangle" shape displayed on the canvas
Press "Create Layer Mask" on the command icon of the "Layer" palette.
"Layer mask" can be added to the "forward rotation" layer
Make the sub tool an "object"
Select the "Forward 120" layer on the "Layer" palette
Set the "Rotation angle" of the "Tool property" palette to (120).
The canvas layer is rotating
Set the sub tool to "Line selection" and select the triangle on the canvas.
Click "Create Layer Mask" on the "Layer" palette
Make the sub tool an "object"
Select the "Forward rotation -120" layer on the "Layer" palette.
Set the "Rotation angle" of the "Tool property" palette to (-120).
Set the sub tool to "Line selection" and select the triangle on the canvas.
Click "Create Layer Mask" on the "Layer" palette
The remaining three
Make the sub tool an "object"
Select the "Invert" layer in the "Layer Palette"
Press the "Flip Horizontal" icon on the "Tool Properties" palette
Set the sub tool to "Line selection"
Draw a "line selection" along the inverted "triangle" shape displayed on the canvas
Press "Create Layer Mask" on the command icon of the "Layer" palette.
Make the sub tool an "object"
Select the Invert 120 layer on the Layers palette
Press the "Flip Horizontal" icon on the "Tool Properties" palette
Set the "Rotation angle" to (120)
The canvas layer is rotating
Set the sub tool to "Line selection" and select the triangle on the canvas.
Click "Create Layer Mask" on the "Layer" palette
Make the sub tool an "object"
Select the Invert -120 layer on the Layers palette
Press the "Flip Horizontal" icon on the "Tool Properties" palette
Set the "Rotation angle" to (-120)
Set the sub tool to "Line selection" and select the triangle on the canvas.
Click "Create Layer Mask" on the "Layer" palette
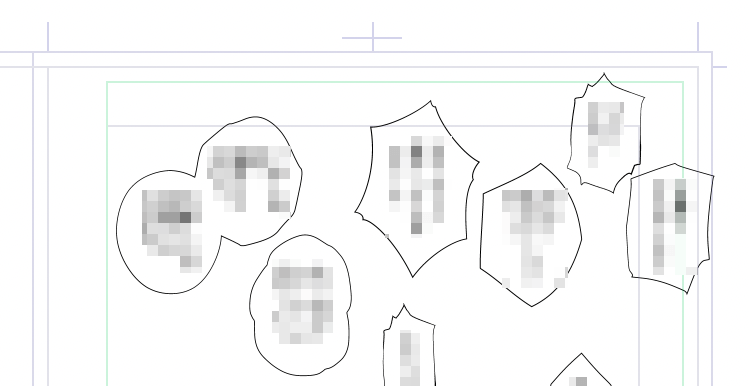
Hexagonal Kaleidoscope pattern is created on the canvas
Save as (700 x 600.clip)
Erase Atari's "triangle"
Even if it is set to the draft layer, it seems to be exported in the file object
Open (400 × 400.clip)
Hide the layer with the "triangle" on the "Layer" palette
"Save" and close
Open (700 × 600.clip)
If the triangle remains
Select "Update All File Objects" from "File Objects" in the "Layer" menu.
It will be rewritten to the saved (400 x 400.clip) state.
If you can confirm that it has been rewritten on the canvas
I put it in one folder of "File Object Layer" on the "Layer" palette.
Rename it to "Central"
Close the folder as it will be annoying if left open

Animated GIF so far
From here, we will make a CLIP file that can be tiling.
It ’s still going on.
Duplicate two folders called "Center" in the layer palette
Name them "right" and "left"
Set the sub tool to "Move Layer"
Place each folder to the left and right of the "center" folder
Duplicate two folders called "Center" again in the layer palette
Name them "upper right" and "upper left"
Place each folder in the upper left and upper right of the "center" folder
Duplicate two folders called "Center" again in the layer palette
Name them "bottom right" and "bottom left"
Place each folder in the lower left and lower right of the "center" folder
Resave (700 x 600.clip)
Close

Animated GIF so far
The explanation seems to be long, but it's not that difficult.
The tiling material to be animated is completed
Tiling and transforming file objects
Tiling a file object with a new illustration (1280 x 720px)
Create a "new illustration" of 1280 x 720px
The unit is (px)
Load (700 × 600.clip) on the canvas
Select "File Object" from "Import" in the "File" menu.
(700 × 600.clip) Load
(700x600.clip) is centered on the canvas as a "File Object" layer
Make the sub tool an "object"
Check "Tiling" on the "Tool Property" palette
The image fills the canvas
Change "Transformation Method" on the "Tool Property" palette to "Free Transform"
Operate the handle of the canvas to give the pattern a nice depth
And export the animation
Create a "New Timeline" in the "Timeline"
Frame rate (12)
Playback time (6) + (0)
Save the file as (Kaleidoscope.clip)
That's it
Kaleidoscope animation

The completed animated GIF
When using an animation file object, you can use animations for children and grandchildren.
If you embed a file object inside more file objects, the animation will not be inherited.
So the contents of (700 × 600.clip) have become difficult.
File objects are playable! !!
it continues
Users who liked this post


Comment