
Introduction
Hi, I'm Sylsur and this time I bring you a tutorial and some tips on how to draw and paint gothic clothes, focusing on details that are more complicated, such as the gathering of dresses and ornaments.
Here I cover certain styles, since there is a great variety of them but I focus on the most classic and elegant designs making at the end an illustration that is in the intermediate style.
Video
In this video you can see the tutorial in detail and the elaboration of the illustration from beginning to end. Remember to activate the subtitles :)
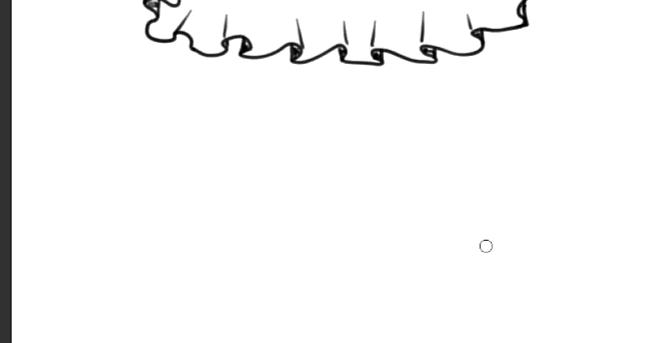
4 Ways to make puckers.
Let's get started!
We will look at these 4 different ruching designs to get an idea of how to do them.
First, the back view and second, the front view.
We begin by drawing something similar to a rhombus and then we join them with a line. Now we draw the same figure up and down and complete it with the interior lines and the external.

We follow the same guide for the other puckers.
It is important to mention that you are not drawing a repeated pattern.
Alternate and merge together various rhomboid, square, tirangular and
round forms to create a satisfying image of frills.

Structure of a ruffle.
Pulling a thread on one side of a fabric and causing it to ruffle is called ¨drawing a gather¨. Gathers scrunch the fabric, creating ruffles and frills.
Puckering forms at the gather. One point requiring attention when drawing ruffles is to keep them varied.


Let's see how to draw a skirt seen from below.

How to make bows
Now we will see how to draw some bows.
This type of bow is made like a pillow, first we draw the center like a bean, then the sides in the shape of a triangle and finally the slats.

For this other design made with a strip, we do the same process, only this time it takes into account that you have to draw the internal part since the strip is flat.
Always remember to make a sketch with basic figures and then the details
How to make roses
Let's see how to draw roses.
Draw a circle or oval depending on the perspective, draw the petals from the outside to the inside, from highest to lowest.
If you can't do it the first time, don't worry, you can if you keep practicing.

How to make Pantyhose
We continue with the pantyhose.
There are several options, I will show you 2 ways to do it.
The first is to apply the skin tone you choose with the tool of your choice, in this
case I did it with the tool - transparent watercolor-, and then make a selection with the tool -Lash-,
then we apply the black evenly until we obtain the desired tonality
with the brush tool, with custom settings.
Then create a new layer and make the ornaments.
There are endless decorations for pantyhose, you can make an original design or copy one
that you like. Here I give you an idea of how to make an original design.
Remember to make the decoration with a tool that leaves the solid color, later if you wish
you can give it transparency in the layer option - opacity -
It is important to make the decoration according to the shape of the body, otherwise
it will look flat.
Use your imagination and try to make rose designs, geometric designs, curved lines, etc.
The second way to make the pantyhose is to use the -lazo- tool and select the area, then use the tool -paint pot- to fill the area with the desired color.
Create a -new layer- and repeat the process. To apply the dark color go to the layer option
-lock transparent pixels-

As mentioned above to apply the dark color use the brush tool, you can modify it
In the tool settings, select -brush shape- and choose -Air Brush-.
On this occasion I used the airbrush to apply the black color but I recommend that you do it with the tool
brush with the settings I mentioned.
We make the last details applying light in key areas, for this go again to the configuration of the
brush tool and select -ink- then enable the -combination mode- view
Then choose -expose brightness- for the lights, remember that when you apply it it will remain the color
that you have selected. For the shadows you can use the option -dark-.
This configuration of the tool -brush- is what we will use for the final illustration.
Dresses
Now we will look at a couple of dresses and apply what we learned.
We draw our sketch on the mannequin.
We start by applying a base, adjust the shadows and do the gathering.
Use the -lazo- tool to make the gathering and then we place the lights and shadows where they correspond.
To be able to paint on the other side of our selection we click on -invert selected area-
These illustrations are quite basic but we will make one at the end in detail.


We continue with the second dress.


Ilustration
This is a summary of the illustration process, if you want to see the complete process I invite you to watch the video! :)
Let's do this!
We already have our sketch and our color palette on a separate layer.
Remember to block the layers that you are not using and work in an orderly way.
It will help to be much more efficient.
The tools that I used the most for this illustration are:
Transparent watercolor
Faded watercolor (custom)
Opaque watercolor
Blur
Fingertip
Color mix
Tie
Symmetric ruler
Here are the lace brushes that I used.
We paint a general base to our illustration to make sure the colors are in harmony.
Remember that you have to choose the direction of the light to apply the shadows correctly.
We give the expression we want to the face.
The eyebrows are a part of the face that define the expression quite a bit, followed by the mouth and the eyes.
We continue painting.
We apply what we have learned previously to make the gathering and also the ornaments.
For the gathering color, we apply the lightest color on the protruding parts
and the dark color in the parts that are in the middle of the highest ones.
Something similar to wrinkles or folds.
You can apply the lighter color in the wide part or in the thin part
It will depend on the style you choose.
We make the floor decoration using the tool -symmetric ruler- and in the number of lines we choose 4.
We choose the center and we begin to draw.
Use the -Figure- and -Curve- tool.
Adjust the opacity of the lines
You can modify any part by selecting with the -lazo- tool
And you choose the -Editing- tab and click on -mesh transformation-
Remember to shadow the knee so it will look more realistic.
A tip for doing hair is not to make too many thin lines
Use the fairly large brush in certain areas.
Remember that to give this effect use the -combination mode-
For the light -expose brightness- and for the shadow -dark-
You can try the other options and find one that is of your preference
We make the decorations ...
In a different layer we make the decoration of the pantyhose, draw according to the shape of the body.
If you dedicate more time and the more details you draw, the better it will be.
For the hands, be careful not to use an -image material- because it will look flat.
You can do it freehand or as in this case, with a decorative brush.
Add the final details.
Make the shadows on the floor
And ready!
I hope this tutorial is useful for you and Thanks for your time.
Usuarios a los que les gustó esta publicación


Comentario