A Helpful Guide to Eyes
In this Helpful Guide to Eyes, I’ll be detailing eye anatomy, useful information to know, handy brushes and settings, step by step tutorials on how to draw eyes from various angles, and how to draw stylistic and anime eyes.
Eyes express an individual’s personality, thoughts, and feelings and can be universally used amongst a wide variety of species. Due to this, they’re often considered one of the most important aspects of a character. Learning the ins and outs of how to draw them is important to assist you in your future artwork.
Eye Anatomy
The first step towards drawing an eye is understanding how it functions and the individual parts that come together as a whole. The eye is an organ which helps perceive light, color, and depth. It is part of the sensory nervous system.
- Upper and Lower Eye Lid ; The upper and lower eyelids open to allow light into the eye and thus vision. They provide a protective layer of skin, and help form the eye’s overall planes and ridges. Eye lashes can be found on the outer edges of both eyelids.
- Cornea ; This is the transparent outer layer of the eye. It is the smooth, moist surface that helps attribute to the visible eye’s gloss. It is a “part” of the sclera as the outer portion.
- Pupil ; The dark opening in the center of the iris which allows light to reach the retina. The pupil can contract and dilate via the iris, to allow for varying amount of light within. Depending on the species, its shape can vary for different vision capabilities.
- Anterior Chamber ; Located between the cornea and the iris, this portion of the eye is filled with a fluid called aqueous humor.
- Iris ; The iris is the portion of the eye whose color varies depending on genetics. It is what changes in size around the pupil to allow for varying degrees of light to reach the retina.
- Retina ; This is the part of the eye that processes light, allowing for vision. It lines the backside of the eyeball on the inside.
- Caruncle ; The rounded redish node found in the inner corner of the eye.
- Tear Duct ; This portion helps to drain tears from the eye. It is found on either side of the caruncle.
- Sclera ; Is the inner portion of the cornea. It is the white covering seen on the eye.
--> The eye is a three dimensional sphere. It has depth and volume, so it’s important to draw and shade it with this in mind.
Life References
Take some time to accumulate life references of various eyes to review while you draw. You can take photos of friends, family, and pets, or search through online references to aid you. Below I have an assortment of reference images I photographed. Feel welcome to use them as well during the following segments.
Front View ; Head Sizing and Placement
Knowing where to place the eyes on your character is important. Below I have drawn a break-down of a realistically proportioned face, and the alignment of where everything goes.
- First ; Draw a circle. Then, break that circle down into equal 1/4 pieces horizontally.
- Secondly ; Draw a second, smaller circle starting at the 3/4th horizontal mark of your first big circle.
Third ; Split the total length of the two circles in half horizontally. You will now have 1/2 pieces for the entire length of the head.
Fourth ; Draw a vertical line down the center of your face, to divide it into 1/2 vertical pieces. Next, break each half into 1/4th vertical pieces.
- Fifth ; Draw the chin and outline of the face around the outside of your two circles, following the above proportions.
Eye Placement ; The eyes are placed on the 3/4th horizontal marker of your first big circle, and within the 2/4th and 3/4th vertical markers on either half of the head. Be sure to leave an equal distance between the middle of the eyes.
The inner corners of each eye will align roughly with the placement of the nose, and lips.
Useful Knowledge
An eye has angles and edges to it; five different lines can make up this shape. The first and fourth line angles should be diagonal from each other.
Refrain from drawing two perfectly round lines for the eye. This doesn’t represent the correct dimensions or shape.
Lashes should follow the curve of your eye, instead of all going in the same direction. You should also note that lashes reside on the outer edge of the eye; this is especially noticeable on the lower lid where the inner plane is clearly visible.
Rather than drawing singular straight sticks for lashes, create varying thickness and curve to give it dimension and the appearance of hair.
Avoid using a direct white base for your sclera. If the rest of your image will be in color as well, you should also avoid using grey-scale shading. In the above example for what to do I have selected some warm colors with an off-white base color. For additional vibrancy, the highlight is done in cyan.
When drawing realistic eyes you should avoid harsh cell shading. Instead, take the time to render your image to blend in the various shades. Strive to create the three dimensional spherical shape discussed in the Eye Anatomy portion of this Guide.
Eyebrows should flow from the center of the face towards the outside and have a degree of curve to them. The shape of an eyebrow can vary greatly, though women tend to have more angular shapes.
Avoid drawing straight up and down strokes for eyebrow hair.
As the eye is a three dimensional spherical shape, the pupil will appear more vertically elongated the farther the eye looks to the side. This is due to the pupil moving along the sphere and shifting in perspective. The pupil itself doesn’t become vertically elongated, it’s merely an optical illusion as the eye or face turns.
An eye seen from the side will still retain its three dimensional form with the upper and lower lids visible.
Take care to provide a space between the eye and the end of the face to leave room for the nose, rather than placing it directly on the nose itself at the edge of the head.
Much like valleys and hills, the eye has planes, curves, and edges which make up its overall form. The upper lid’s inner plane should be shaded as less light can reach it due to the upper lid obscuring it. The lower lid’s inner plane should be highlighted as light can easily reach it.
--> TIP ; The skin between the eyelashes and sclera is commonly referred to as the waterline.
A pupil can alter in size due to the following situations…
- Low or bright light ; The iris expands around the pupil to allow for more or less light to reach the retina.
- Far away or close up objects ; Much like a camera lens, the pupil will alter in size as it perceives an object from varying distances.
- Medications ; As the brain’s reflexes become dulled, so do the eye’s capabilities towards adapting to varying light.
- Emotions and Tasks ; The pupil can alter in size depending on the emotions an individual is feeling, or the task they are performing. Happy or excited emotions can lead to dilated (larger) pupils while shocked or angry emotions can lead to constricted (smaller) pupils. Additionally, the more effort an individual puts into a task, the larger the pupils tend to be.
There is generally a one eye distance between the left and right eyes. You can measure this easily by duplicating one of your eyes, moving it to the center between the two, and insuring it fits in the middle.
Highlights
Highlights are the visible reflection of light off of the eye’s smooth surface. They mimic the lighting present in your scene and because of this can be important in conveying what the surrounding ambiance looks like.
Above I have compiled six examples of varying highlight ideas to get you started. Notice that the eyelashes cast shadows on the highlights at times, creating an interesting surface appearance.
Rather than using a direct white, I suggest selecting a light color matching what the scene’s lighting is. I have used cyan, orange, and pink to showcase this concept above. For example, if your character is outside under the light of the moon, perhaps use a cyan to match the scene’s cool glow. If your character is beside a sunset, a warm orange or red may compliment it.
Pupil Shapes
While humans have round pupils, varying species have different pupil shapes to account for their vision needs in nature. The shape of a pupil can reflect on species instinctual habits and positioning on the food chain.
- Round Pupils ; ( Seen in taller predatory species like humans, big cats, wolves ) Assists predatory animals that are higher off the ground to chase their prey.
- Vertical Slit Pupils ; ( Seen in shorter predatory species like crocodiles, foxes, cats ) Aids predatory animals that are low to the ground, whose eyes need to adapt drastically to low or bright light situations. The vertical slit allows for significantly more light within when it dilates or contracts.
- Horizontal Pupils ; ( Seen in prey species like goats, horses, sheep ) Provide a wide field of view, allowing for easy scanning of surroundings to watch for predators.
- Crescent Pupils ; ( Seen in water living species like stingrays and catfish ) Prevent water distortion and boost contrast.
- W Pupils ; ( Seen in water living species like cuttlefish ) Similar to the crescent pupil, this shape allows for increased contrast and improved distance vision while preventing water distortion.
- Vertical Beaded Pupils ; ( Seen in predatory species like geckos and some fish ) The beads allow for the better perception of distance and adaptation to environments.
- Horizontal Slit Pupils ; ( Seen in prey species like frogs and octopus ) The horizontal shape allows for a wide field of view and the ability to notice the vertical motion of predators. It can alter in size to allow for varying degrees of light during day or night.
Understanding the reasoning for each pupil shape can help you as an artist to create interesting characters, and even incorporate different shapes into fictional characters to suit their needs.
Do you have a mermaid character? Perhaps try using a crescent shape pupil to help them in the water.
Realistic Eye Shapes
In life, there are 6 commonly seen eye shapes, with these shapes being normal, wide, or close set on the head in distance and either normal, deep, or protruding in depth. Which eye shape you give your character can influence the perceived personality that they exhibit.
-1 Almond ; (Seen in celebrities such as Anne Hathaway and Gwen Stefani) Those with almond eyes have an iris which touches the top and bottom eyelid when looking straight ahead.
-2 Round ; (Seen in celebrities such as Katy Perry and Ashley Olsen) This eye type has a slight degree of visible sclera to separate it from the top and bottom eyelid when looking straight ahead.
-3 Monolid ; (Seen in celebrities such as Lee Su-Hyun and Onew) Distinguishable by a lack of crease in the lid.
-4 Hooded ; (Seen in celebrities such as Emma Stone and Jennifer Lawrence) The crease of the eye is obscured by a layer of skin. Commonly noted due to age, it can also occur naturally.
-5 Up Turned ; (Seen in celebrities such as Taylor Swift and Rihanna) This eye shape is notable by the outer corner of the eye turning upwards.
-6 Down Turned ; (Seen in celebrities such as Marilyn Monroe) Seen when the outer corner of the eye turns downwards.
-7 Deep Set ; (Seen in celebrities such as Jennifer Anniston and Kristen Stewart) The eye is positioned further into the skull, giving a more prominent eyebrow ridge and causing the eyes to potentially appear smaller.
-8 Protruding ; (Seen in celebrities such as Emmy Rossum) Gives the appearance of protruding and more apparent eyelids.
Brushes and Settings
For realistic artwork, I prefer to use softer brushes that can blend easily as I paint to reduce time spent on rendering. Below is the assortment of all brushes I have used in the following tutorials, and links for where to find those provided in Clip Studio Assets for download.
- SAI風厚塗り主線
The primary brush I use in much of my work. It provides a soft stroke that can be blended easily by adjusting the settings.
- Seen in all of the “Painting the Eye ; Step by Step” and “Painting Quarter View Eyes ; Step by Step” segments of this Guide. Adjust the brush settings to achieve softer or harder lines for blending.
To make any brush an eraser as well, simply select the Transparent option on your color pallet.
- Seen in Step Seven of “Painting the Eye ; Step by Step”
- てんSAIブラシ
The brush titled (ぼかし塗り) in this pack is great for adding sharp highlights, with adjustable softness.
- Seen in Step Nine of “Drawing Anime Eyes ; Step by Step” for applying highlights.
- 主線も水彩も厚塗りも一本でやる怠けものブラシ
A great brush for adding sharp yet gently tapered highlights.
- Seen in Step Nine of “Drawing Anime Eyes ; Step by Step” for applying highlights.
- Soft Eraser
Gently erases harsher lines, for smooth blending and soft edges.
- Seen in Step Nine of “Drawing Anime Eyes ; Step by Step” and step Twelve of “Painting the Eye ; Step by Step”
- Blur
Creates soft edges with a feathered effect.
- Seen in Step Nine of “Painting the Eye ; Step by Step” and Step Six of “Drawing Anime Eyes ; Step by Step”
- G – Pen
Provides clean lineart with easily controllable pen size due to added pen pressure setting.
- Seen in “Stylized Eyes” segment to achieve the clean lineart.
Symmetry Ruler
Drawing front facing portraits with eyes of equal size and shape can be difficult. Luckily, Clip Studio offers a Symmetry Ruler function to speed up productivity on this step while getting perfectly equal eyes and distances every time.
To activate the Symmetry Ruler...
- Step One ; Select the “Ruler” option on your left side panel and click “Symmetrical Ruler”
- Step Two ; Select the “Set Showing Area of Ruler” on your bottom right layers panel. Select “Show in All Layers” to be able to see the ruler even when drawing in your new eye layer. Select “Link Guide to Ruler” to enable the Symmetry Ruler to function.
- Step Three ; To insure the Symmetry Ruler is turned on, make sure “Snap to Special Ruler” to enabled on your top tool bar.
- Step Four ; To get a perfectly straight vertical or horizontal line, hold SHIFT and drag your ruler vertically down the center of your character's head.

Painting the Eye ; Step by Step
Now that you know the basic anatomy and useful knowledge of eyes, we’ll be going over the steps on how to put this information to work.
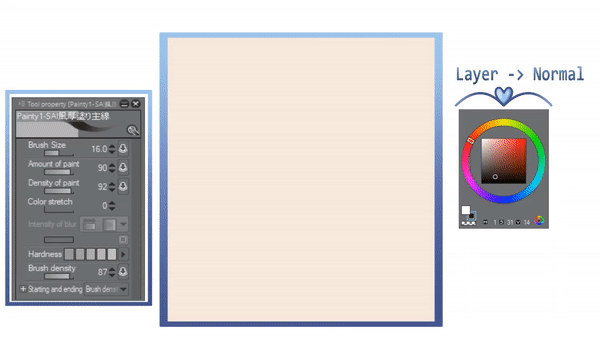
- Step One ; On a new layer, draw the outline of your eye. This can be as rough as you want, as it’ll be painted over and added onto later in the following steps.
- Step Two ; On a new layer below Step One, select an off-white color for your sclera and begin filling in the outline. Next, click “Lock Transparent Pixels” on this layer, decrease your brush hardness, and begin shading and highlighting keeping in mind the three dimensional spherical shape.
-> TIP ; Building up your darks and lights gradually and blending them out over time can help prevent your image from looking flat.
-> TIP ; Don’t use all of the same color for shades and tints. Rotate your color wheel slightly when shading or highlighting, to add diversity.
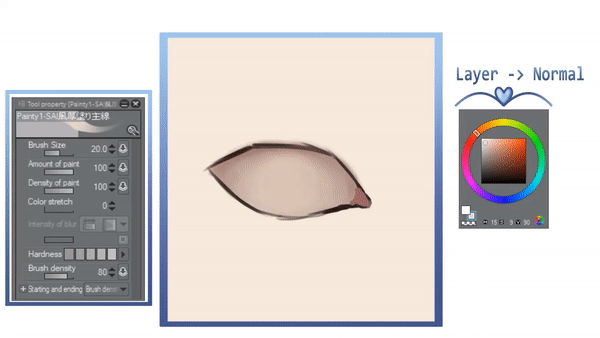
- Step Three ; Draw in the lower waterline on your Step One outline layer. Afterwards, I blend in the caruncle a bit so that it transitions smoothly into the sclera.
- Step Four ; Adding lashes. Following the curve of the eye, I gradually begin to add in lashes. The outer corner of the eye generally appears to have longer lashes, as the middle sections are partly hidden by perspective. I use a harder brush setting for this step to give it a sense of sharpness.
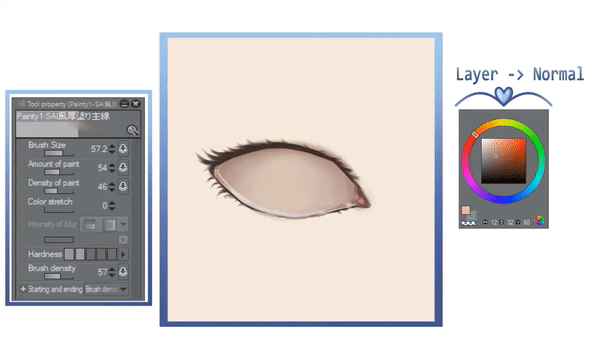
- Step Five ; On the layer for Step Two, I select a dark skin tone and fill in the overall placement of the upper and lower lids. I then proceed to gradually lighten this. Doing a dark color first can help you to visualize where the highlights will go.
- Step Six ; I begin defining the brow bone, nose contour, and blending in Step Five’s upper and lower lids gradually.
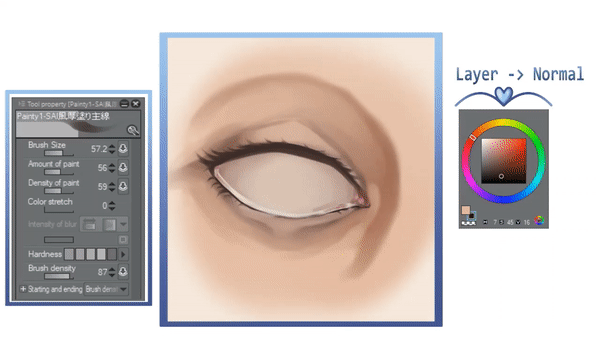
- Step Seven ; Eyebrow time! What hair color does your character have? Select that color, and darken it a little bit to achieve your eyebrow color. Eyebrow hairs all go in the same direction; towards the outer edges of the face. The eyebrow is generally less thick on the outer edge of the face.
- Step Eight ; Increase brush size and hardness to get your iris shape. Place the iris on a new layer, above Step Two and below Step One. Select “Lock Transparent Pixels” on this layer and begin shading by making the outer edges of the circle darker.
- Step Nine ; On a new layer above Step Eight, select a dark (but not directly black) color. Place it towards the center of your iris. As it is on a new layer, you can now edit its sizing or placement to get it right where you want it. After it’s at the correct spot, grab your Blur tool and gently blur around the edges to blend it in.
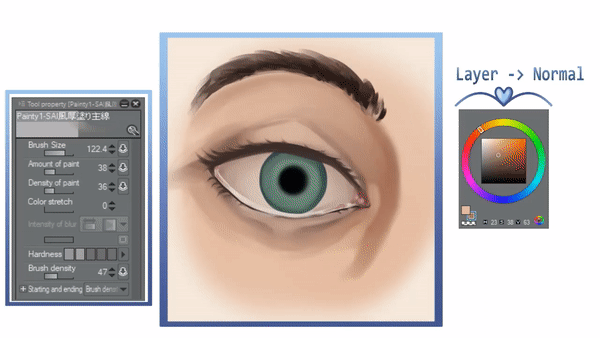
- Step Ten ; On the same layer as Step Eight, I grab a brownish color to contrast against the green base of the iris and lightly paint it around the pupil. Next, I select a darker green-blue color and start to paint in the iris texture. To achieve this textured look, I use squiggly and semi-straight dull lines, gradually building up in shadows. After base shadows, I obtain a brighter green tint to add the textured highlights.
- Step Eleven ; Make a new layer, above Step Eight, and set it to multiply. Click “Clip to Layer Below” on your layer panel, so it won’t go outside of your iris. Now, start darkening the shadows to refine the separation between lights and darks.
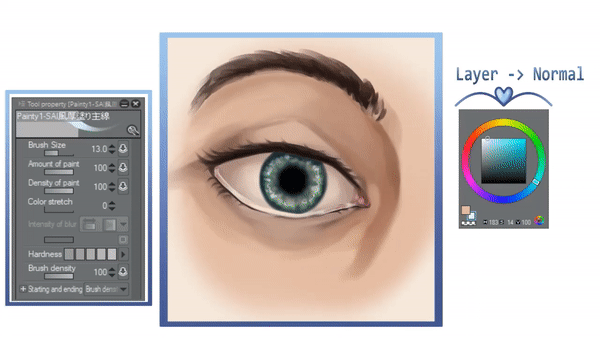
- Step Twelve ; We’re nearing the end! On a new layer, grab a very light color that isn’t a direct white to begin adding final highlights. Here, I paint in a rough rectangle shape to indicate that my light source is in that form. Switch to your Soft Eraser and gently erase the upper edge of your highlight rectangle. This will give it a more curved appearance, as if shadows are present. Switching back to the SAI風厚塗り主線 brush and making the pallet color transparent to turn the brush into an eraser, I start creating lines at the top edge of my highlight to indicate eyelash shadows.
Add additional gloss where necessary, such as on the skin or sclera, to give it a dewy texture.
- Step Thirteen ; On a new layer above all else, I grab a skin color, set my layer to Multiply, and begin adding final shadows to darken things up a bit. Then you’re done!
Painting Quarter View Eyes ; Step by Step
Keeping in mind the prior tips of eye shape and placement seen in the “Front View ; Head Sizing and Placement” portion of this guide, to achieve a quarter view you merely alter the horizontal and vertical planes to match the angle of the head.
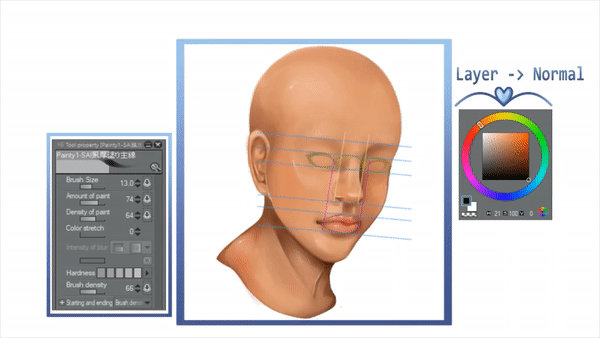
To begin, I suggest drawing out measurement lines to insure everything is properly positioned. This should help prevent you from placing one eye higher or lower than the other to an unrealistic degree.
- Step One ; Draw the outline of your eyes on a new layer.
- Step Two ; On a layer below Step One, select an off-white color to fill in the sclera and a redish color for the caruncle. Then, select “Lock Transparent Pixels” on this layer and begin shading and highlighting by making the outer edges of the sclera darker, and the center lighter to indicate a spherical curve.
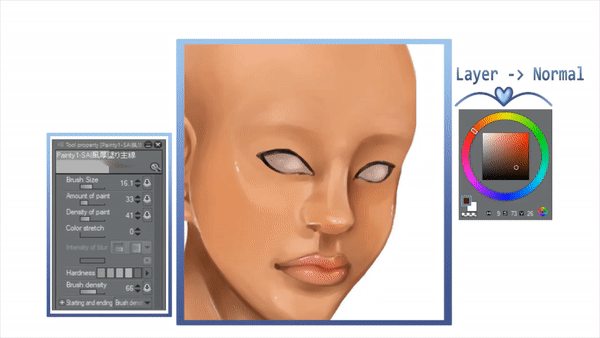
- Step Three ; Eyelids and waterline! We’ll start drawing the top and bottom eyelids now, in a darker skin tone for shading. Decrease brush opacity and blend in the edges a bit so it doesn’t look too disconnected from the rest of the face. Next, insuring you’re using either the layer for Step One or a new layer on top of Step One, select a light color and begin marking the eye’s bottom waterline.
--> TIP ; You may notice me flipping the canvas horizontally often. This is to check for any inconsistencies that I may not notice otherwise. To do this, go to Edit -> Rotate/Invert Canvas -> Flip Canvas Horizontally
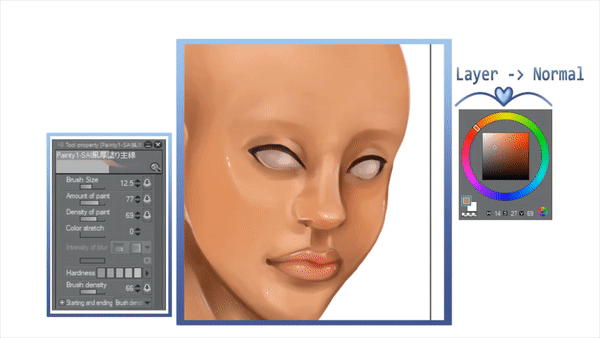
- Step Four ; Using harder brush settings, begin painting in the lashes on the same layer as Step One. Keep in mind lashes curve with the eye.
- Step Five ; Grab the color for your iris, adjust the brush size so that it’s roughly the size you want the iris to be, and place it down. It may help to place it on a new layer so that it can be resized with ease. Next, fill in the space for where the pupil will go with a dark, near black (but not direct black) color.

- Step Six ; On a new layer set to “Multiply” go in and darken where the lashes and spherical curve of the eye will cast a shadow on the iris and pupil.
- Step Seven ; On another new layer set to “Overlay” grab a light color and start defining the iris and eyelash’s texture.
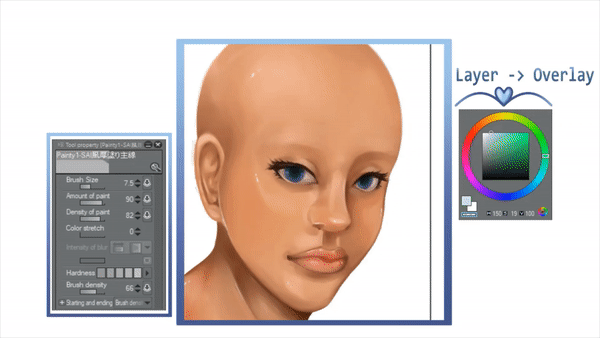
- Step Eight ; Using a shade that is the same or slightly darker than your character’s hair, begin defining the eyebrows. Set your brush setting to “Normal” for this step, as there is a minor error in the gif. for this step.
- Step Nine ; Selecting a light but not direct white color, start adding the highlights in a new layer. To achieve a window appearance as a highlight, I draw a square and then erase a vertical and horizontal line across it. Now you’re done!
Stylistic Eyes
After you’ve learned the rules and tips of how to draw realistic eyes, you’re able to get wild and break away from some of that knowledge with stylistic shapes. You may notice that some stylistic eyes you see entirely disregard certain realistic eye rules, which is okay. Ultimately it all comes down to what looks best in your art.
Below I have drawn some examples of different stylistic eye shapes. As anime and cartoons tend to drastically exaggerate the initial six eye shapes commonly seen in realism, you have a lot of leeway for creativity. The eye shape you choose for your character will ultimately portray their personality.
- Shape One ; ( Upwards angled eyes ) You may be familiar with seeing this eye shape on villains. The sharp angles make the character appear more intense, while the slant of the eye may appear aggressive even during a relaxed state.
- Shape Two ; ( Downwards angled eyes, with droopy lids ) This droopy shape is great for relaxed, passive characters. In this example especially, the rounded edges give a sense of softness to the face. The character may seem perpetually sleepy or calm, even when angry, due to the added droopy lids.
- Shape Three ; ( Downwards angled eyes ) Without the droopy upper lids, these downwards angled eyes often appear on innocent or passive characters, or those that are typically calm.
- Shape Four ; ( Extra thick lashes ) When applying lots of makeup, an eyelash will increase in thickness. Drawing especially thick lashes on a character can give them a flirty appearance, or be the representation of heavy makeup having been applied.
- Shape Five ; ( Round Eyes ) The round eye is commonly seen in innocent, naive, or bubbly characters. The extra-large iris and pupil can give the character a cuter appearance, with the round curves and lack of sharp edges making them seem easily approachable and gentle.
--> TIP ; Softer edges and curves are often associated with more gentle characters, while sharp angles and edges give the character an aggressive appearance.
Drawing Anime Eyes ; Step by Step
- Step One ; Start off by drawing two C shapes. Notice that when drawing quarter view eyes, the farthest eye may appear slightly smaller in width.
- Step Two ; Begin to add in the iris outline, upper lid crease, and eyebrow outline. Once again, the iris outline appears to look like a C.
- Step Three ; Grab your Elipse Tool, and on a new layer so that it’s easy to reposition as desired, make the pupil.
- Step Four ; Selecting an off-white color for the sclera and a blue for the iris, I color them in on a new layer below Step One and Step Three.
- Step Five ; Setting a new layer above everything to “Multiply” I go in and start to add shading. As the eye is a three dimensional sphere, I follow the curve of the upper lashes for the inner eye shading, instead of drawing a straight across horizontal line along the iris and sclera. I then make two ( ) shapes on either side of the pupil to give it definition.
- Step Six ; Using my Blur tool, I soften the edges of my shadows.
- Step Seven ; With a new layer set to “Overlay” I select a light color and begin to add inner eye highlights. This step will give further depth to the eye and make it come to life.
- Step Eight ; Using a soft brush, I go in with a new layer set to “Add Glow” and add an extra glow around the pupil and cheeks. This contrast with a lighter tint surrounding the pupil can allow it to better stand out.
- Step Nine ; Next, I lock my original lineart layer and give it a softer color with a lighter upperlid line. Finally, I make a new layer for my highlights, gently erasing some edges of them with the Soft Eraser.
Gradient Transitions on Lashes
An easy way to incorporate lighting and interest into your eyelashes is to apply a gradient to them.
To do an eyelash gradient, lock your eye lineart layer. Next, select your Gradient Tool set to “Foreground to Transparent.” Drag the gradient down the eyelashes and wow! A quick and easy method for making them stand out.
--> TIP ; To get a perfectly vertical or horizontal line for equal distribution of color, hold SHIFT + Drag the Gradient
End Note
Thank you all so much for reading! I hope this guide was indeed helpful for you and that you were able to learn something new while browsing it.
As always, I greatly appreciate any likes, comments, or follows if you happen to enjoy my content. Please look forward to more helpful guides in the future! (❁´▽`❁)✲゚


留言