Drawing clothes and fabrics
In this tutorial we’ll do a quick overview on drawing clothes and folds. We’ll also go over different ways to paint or add texture to fabric and the easiest way to approach them having in mind their properties.
Drawing clothes: tension points
The first relevant part is to recognize the tension points in the fabric. These will help to guide and give shape to the different clothes since the tension points are basically any force applied to the fabric, so either if you pull, stretch or bunch up the material, it will create tension points.
For example, think of it as if you were pulling a piece of fabric with a thread. The place where the thread connects would be the tension point and it will shape the way the material falls.
In general, tension points will generate all sorts of folds and wrinkles and a piece of clothing can have multiple tension points.
Also, keep in mind that there are many variables that can affect the look on a piece of clothing, it doesn't matter if the tension points are the same, such as the material properties (sheer, thickness, how slippery it is, weight), cloth abundance, the body type of person who’s wearing it or even If it's dry or wet.
Folds and Wrinkles
There are different types of folds that can appear in the cloth. Recognizing them can make it easier to draw them and simply apply them to the clothes you are drawing.
Knowing this can also give you a good idea on how to render or paint each of them.
Pipe Fold
The pipe fold is the most basic of them all. It essentially creates a tube or cylinder, generated by excess fabric bunching up.
⬤ You can draw this type of fold by starting with undulating C shapes that alternate each other. That would be the base of the fold.
⬤ Next, you can use lines to emulate the tubes following the base lines.
This is the type of fold that can be found in skirts, capes, decorative ruffles, etc.
Since these shapes are cylinders, they can be rendered as such!
Drop fold
Similar to the pipe fold, the drop fold generates a conic shape instead of a tube. This is because the tension point is only one and all the cones radiate from it.
It always falls freely.
⬤ You can draw it by using the same method as before, either starting by the base shapes or from the tension point to have more control on the way the fabric falls.
⬤ The base shapes have an S or Z shape, and they tend to be sharp and overlap each other constantly.
You can find this type of fold in drapery, sashes or scarves, cravats, capes, sleeves, skirts.
Diaper fold
It generates between two tension points. You can think of it as a fabric bridge that goes from one tension point to another.
Usually has an U shape that repeats itself either very loosely or in a tighter pattern.
⬤ To draw this, I would recommend finding at least one of the tension points first. If you have one, you can use it to create the other one.
⬤ If you have two tension points already, you can just join them with a line and you'll have the first shape.
⬤From there, you repeat the original shape.
The amount of fabric and the thickness of it can have different results, so have that in mind.
You could find it in scarves, cloaks, hoods, drapery, capes, ornamental elements, loose shirts or dresses, etc
Spiral fold
It can radiate from one or more tension points.
It's basically the pipe fold but with a twist or spiral pattern, it is most commonly caused by external forces like the movement and twisting of the body, someone squeezing water out of a piece of fabric or a rolled up sleeve that pushes the fabric up.
⬤First find the tension points, especially if the fold is created by movement. From there, you can draw lines that beam up from the tension point and cross most of the cloth.
⬤If the cloth is bunched up, you can sketch tiny undulations around the object or body part and then connect them.
⬤ If the force applied is bigger, the spiral will get more defined.
Zigzag fold
This fold it's usually created by applying pressure to a piece of clothing and it's a softer version of the spiral fold and will result in a series of zig zag patterns with geometric/sharp figures in between each crease.
⬤First dictate the direction the fold will follow and how far it will go. Then you trail along with it a zigzag shape.
⬤The sides of the zigzag will wrap around the body or subject. This fold generates very defined planes, which will make it easier to render.
You can find zigzag and spiral folds in pants, shirts, sweaters, long socks, etc.
Half lock folds
Generated by stretching and compression of the fabric. It's also called a bending fold.
The cloth tends to overlap on itself and will produce a thin U crease that will repeat itself next to each other.
If the cloth is tighter on the subject, the U shape will be smaller.
⬤ You can draw this by establishing the orientation the stretch is happening, and then drawing the U shapes radiating from the compressed part.
⬤In case the fabric it's tucked into something, you'll first draw the diaper folds that escape the tension point, then you'll find spots where the fabric overlaps, that's where the halflock will appear.
It's more common for these folds to appear in sleeves, pants (bending points), very loose capes, skirts. places where the fabric it's tucked or pressed down by something, like a belt or a satchel, or pants tucked into boots.
Inert folds
In essence they are what happens if you throw a piece of fabric to the floor: a mix of the previous folds, wrinkles plus planes and defined shapes. It always gives the impression of stillness.
For this type of fold I always recommend to use reference, since they are pretty much random depending on the way the fabric is sitting.
⬤To facilitate drawing them, find the bigger planes, it will help you to overlook details.
⬤Go for parts and simplify the most complex shapes to geometric figures.
⬤It can have huge visual contrasts while rendering: on one side there could be soft shadows and delicate creases but very sharp hard shadows and folds too.
Fabrics and materials
I’ll try to give a quick overview on some fabric properties and a few ways to paint them.
I decided to do groups with fabrics of similar characteristics that would render in a similar way. I added other traits that can be useful to know and that would help to draw them and how they would affect the piece of clothing.
So usually while drawing or painting clothes, I tend to adopt three different ways depending on the art piece and what it needs.
▶A painterly approach:
literally painting the fabric from scratch. This is what I use the most, since usually you don't need huge details in the fabric, especially from a certain distance.
But even with then you can create incredibly detailed materials/fabrics only by painting, it all depends on the amount of hours you spent on it.
▶Overlapping textures:
when you need a highly noticeable pattern or texture on the cloth that can be harder to achieve via painting, you can overlap in another layer the texture or pattern on top of the already rendered cloth (the blouse in the sample has the pattern applied this way). I recommend using it for rougher textures needed in a short amount of time, or that won't need high detail or for patterns.
▶Matte painting:
this implies that you take photographic elements and directly use them in the cloth, just slightly modifying it and taking care of the perspective. It is actually quite tricky but can help you simplify the process a lot if you need some HIGH textured pieces like chainmails or lace or if you have a close up of a character and need more noticable textures, this is the easiest way.
As a general rule, it tends to have a more realistic look to it.
Smooth, thin and soft fabrics
✪ Thin fabrics ✪
Thin clothes will create all types of folds and creases, but generally allows to do smaller and softer folds
Lot of movement
Tend to be on the flexible side, but there could be exceptions
-Examples: silk, crepe, cotton
✪ Smooth/Slippery ✪
A smooth fabric will usually be really shiny.
Some will be reflective as well
It will create delicate and soft folds
Slides almost like water
-Examples: silk, taffeta, satin
✪ Stretchy ✪
Usually won't have room for big folds, but can create creases and spiral folds that involve the body
Can be both shiny and matte
-Examples: lycra, spandex
How to paint this type of fabric?
What most of these fabrics have in common is their general smoothness and softness. Since they will practically lack texture, you can render them just the same.
Also have in mind:
-While painting, think of this technique as if literally working with traditional paint.
-It works by slowly adding layers of color and blending.
-Patience its required.
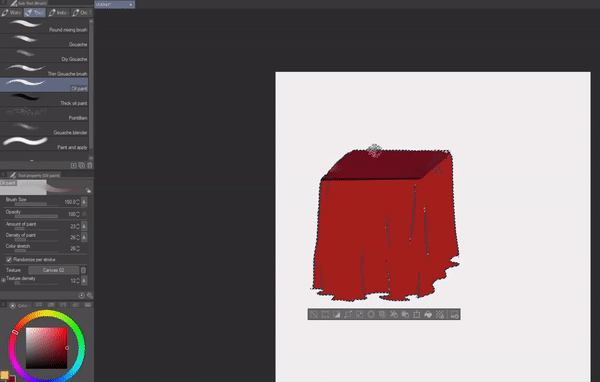
First, you'll take your piece of fabric and will apply color to it. Then you can add some simple shadows.
As you can see, these type of fabric its creating pipe folds, so I'm following the path of the cyilinders.
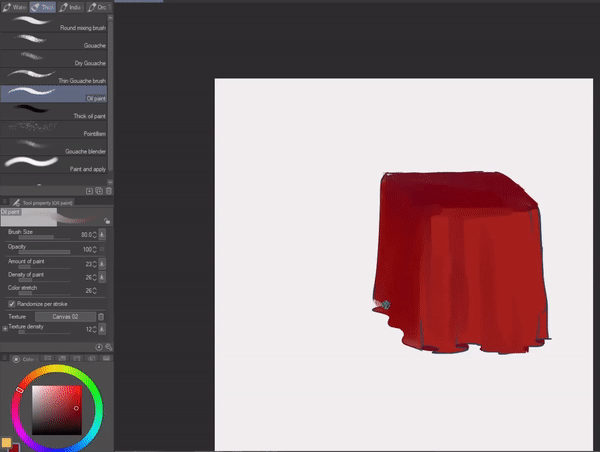
Intensify the shadows and place some highlights.
I usually just apply some color or paint with the G-Pen or the Pencil brushes and then with the Oil paint brush I start to mix it.
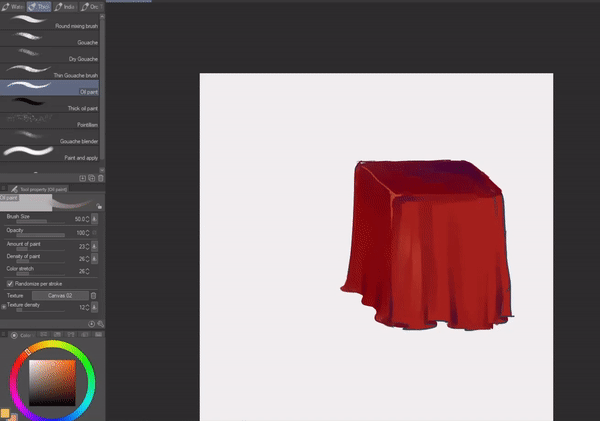
Since we are slowly building our colors, we’ll try to make our shadows stronger by adding a dark purplish color.
You can use the resulting hue to color pick and work all the other shadows.
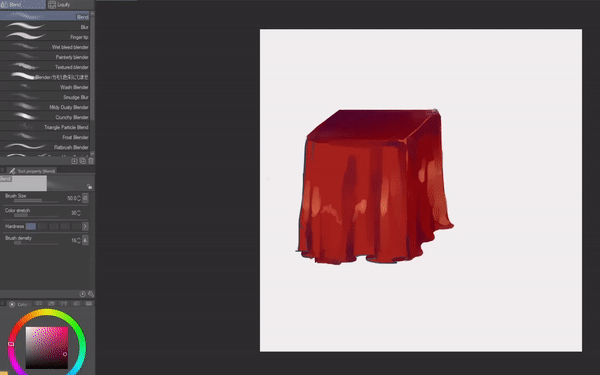
To blend or soften the brush strokes, you can either use the color pick method:
Color pick -> brush in low opacity -> apply a new brush stroke -> pick the new color produced -> repeat process until the colors are blended to the level you wanted them to be.
You can also use the Blend tool, and since we are looking to get a smooth polished look, I recommend the Blend, Smudge Blur brushes to softly drag colors or the Blur brush for a more aggressive blending (be careful with the blurring tho, it can give a very airbrushed look that can look a little bit too artificial if used too much)
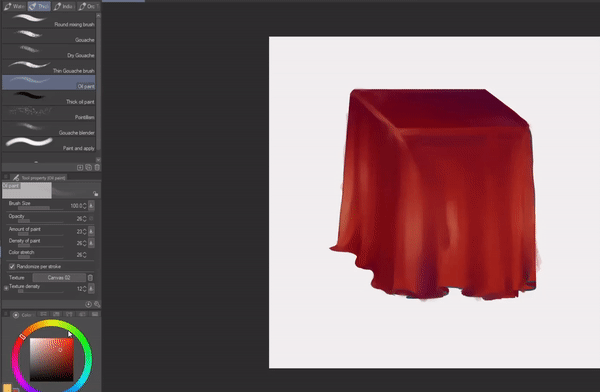
In this part, I'm also using the Finger Tip brush in the Blending tools, that allows me to drag the paint without mixing it. It's truly helpful to create nice small creases and folds.
Then all you have to do is add a little bit more light to the fold to define it even more.
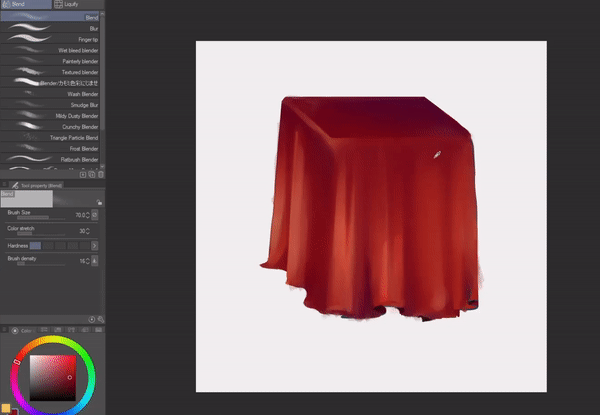
Remember that if you are not satisfied with the colors, you can always modify the contrast on your cloth.
There is also the different layer blending modes that can help your colors stand out. In this sample, we are using Color Dodge to make the lights even sharper.

If you need a silkier, smoother look, you can increase the contrast, exagerate the highlighs and with a BLUR or BLEND brush (Blend tool) softly try to ease the folds, just to make them a little bit more subtle.
Stretchy fabric
Usually won't have room for big folds, but can create creases and spiral folds around the subject's body.
Can be both shiny and matte.
-Examples: lycra, spandex
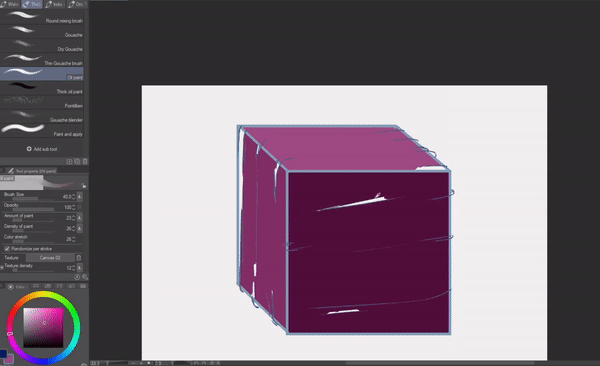
So we'll just start the same way, applying the base shadows to our already colored fabric.
When we are dealing with darker hues, what matters the most it's the light and the colors from the environment and not so much the shadows. So in the darker area, we apply the lighter color to start creating the creases.
Since these are usually pretty smooth fabrics, we'll just follow the same rendering process than before and slowly layering colors on top of each other and blending after.
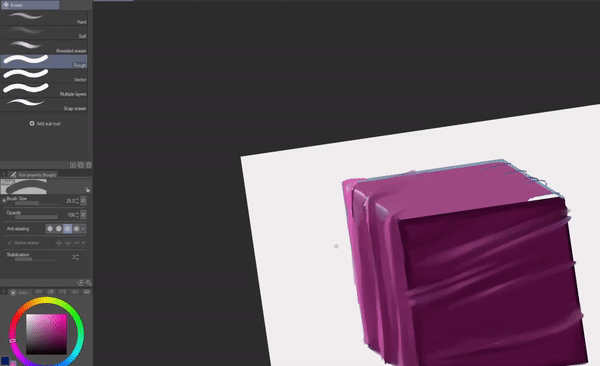
Also as an important note, sometimes the creases or folds can wrap around the subject's body but also they can be created from seams or other external elements like buttons.
Definitely use the Finger Tip blend tool for this type of cloth, it will facilitate to paint all those creases.
Rough/stiff/thick fabrics
✪ Texturized fabrics ✪
Textured fabric will be on the matte side of things.
So it generally won't reflect that much light nor environment colors.
It’s not a strict rule, but it's common for texturized material to be thick and less flexible as well. There are exceptions though.
-Examples: denim, cashmere, crépe
✪ Thick materials ✪
Thick fabric will tend to create bigger folds but in less quantity.
Will be heavier and lack movement
More commonly found in winter outfits
-Knitwear, denim, wool
✪ Stiff fabrics ✪
Will create big geometric folds.
Just like the thick fabric, the quantity of the folds will reduce.
Generally geometric and sharp planes
-Examples: horse canvas, crinoline, plastic fabrics.
How to paint this type of fabric?
Generally, even with their particularities, all of these fabrics share a certain amount of characteristics, so I decided to group them for the next sample.
For thick and stiff fabric there is really not much difference in how to render them, the only thing to have in mind are the folds since they can be painted as smooth fabric too.
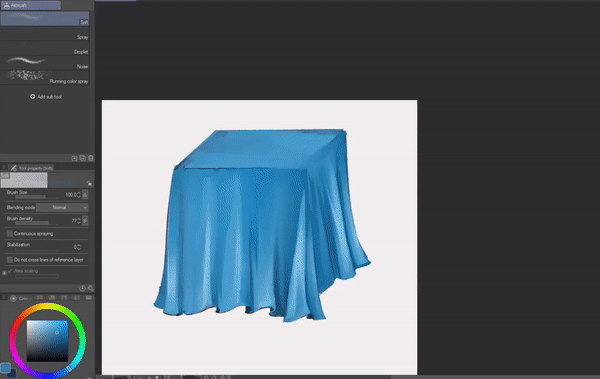
And as you can see below, we are drawing only big triangular folds on each corner of our fabric cube.
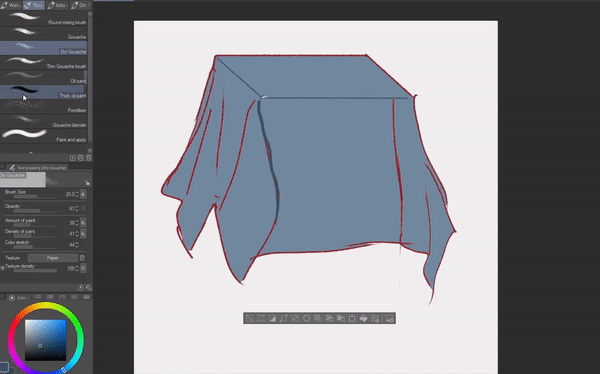
Textured fabric on the other hand will take most of our attention. Since we are going through a painterly approach first, remember that the amount of detail and texture can be added with a lot of patience, but generally just suggesting that the fabric has texture is enough for the mind to make the association and understand that there is texture all over the material.
Part of the charm in painting is simplification!

So, just like before, we start by adding the shadows and lights to our already colored fabric. We’ll have less reflection on this fabric, so the shadows will play the most important role.
We an also start suggesting some subtle creases.
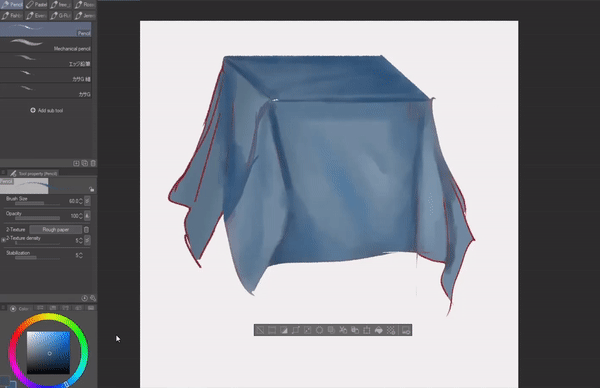
To paint this, we don't have to worry about it being perfectly smooth, quite the contrary.
I'm using a Dry Gouache Brush, since it already has a nice texture included. Also, besides using strokes to apply color, you can paint with soft taps, just to make the texture even more pronounced.
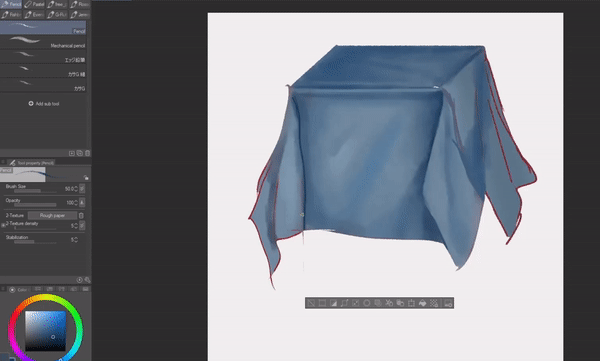
You can also use a bigger brush size, it will make the texture pop out.

To blend, once again you can color pick, (this time, use taps instead of brush strokes) or use the Textured Blender or Triangle Particle Blender brushes in the Blend tool.
The technique won't change, try to stick to using the soft pen pats even with the blending tool.
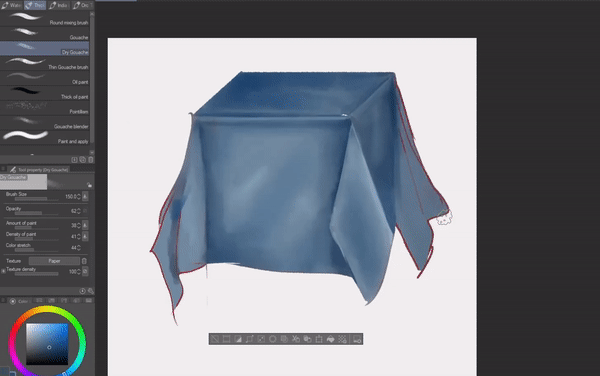
Pay attention to the type of fabric you are painting. They are all pretty different and sometimes their particularities can help the viewer to identify them.
So for example in this one, Denim, the deep blue shadows are one of its characteristics, so we have to make sure they are present.
Velvet
Velvet is a weird exception. While it is usually a thick textured material, it also looks as a smooth shiny and high contrast fabric.
Different from other shiny materials, velvet’s highlights tend to be a saturated version of the color, while its shadows are almost black.
Does not reflect that much color from the environment.
You can easily emulate Velvet by increasing the contrast on a textured fabric:
Edit -> Tonal Correction -> Brightness/Contrast
Finally, accentuate the textures and paint over the lights with the same color of the fabric, just make sure you are using the most saturated hues, which tend to be on the top right of the color square.
Sheerness/Transparency
-You can easily see the object behind
-If it accumulates at a certain point, it becomes less transparent
-Even though they tend to be on the soft and flexible side of things, there could be exceptions.
-Examples: chiffon, organza
You can render them as a normal piece of fabric and then lower the opacity on the layer.
You can also just paint it with a low opacity brush.
As you lower the opacity, you can add highlights and soft shadows (the exact same color as the fabric) on a top layer: the light plays the most important role when we are painting a really transparent piece of fabric.
Dry vs Wet
-Wet clothes will stick to the skin.
-All the excess fabric will accumulate in long thin folds.
-There will be smaller creases all over the cloth, particularly in places where the fabric is stretched, but they could be everywhere.
-If the material is thin and of a clear color, it will show some of the skin or clothes beneath and create a pattern.
-Gains weight and loses movement.
To paint wet clothes just follow the anatomy of the character or the shapes of the object.
You can also use their skin color to paint over the parts where the cloth is sticking to their body.
Add some extra highlights!
Vinyl/Latex
-Highly reflective and shiny.
-Creates very defined and white highlights
-You can use the reflected colors on the environment.
-Can be very stiff.

You can start with a softer version of the color. In this case, for example, we use gray instead of black, just to give us room to start building colors.
Then, as always, proceed to add some lights and shadows.

Here, we are using a slightly blue gray tone to suggest the environment colors, before jumping to add the high contrast lights.
To render/paint this, you can use the same method we used for smooth fabric.
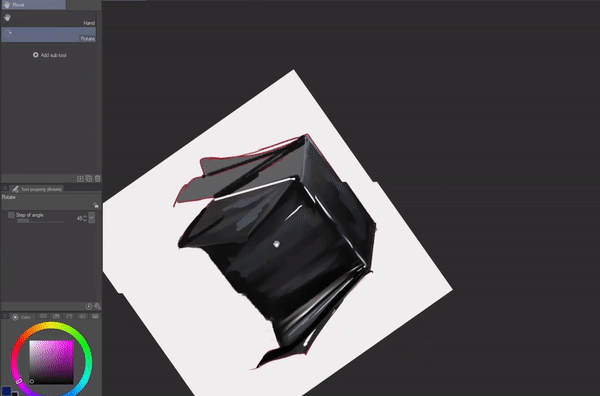
Use the highlights and darkest shadows to esculpt the shape.
Also and the most important: let them be sharp and highly defined. Thats the most important characteristic of these materials.
Leather
-Stiff material. Texturized.
-Ideal for belts, boots, vests, armor and jackets.
-Can be reflective but generally speaking, it won't be by much.
-The costures tend to be really visible.
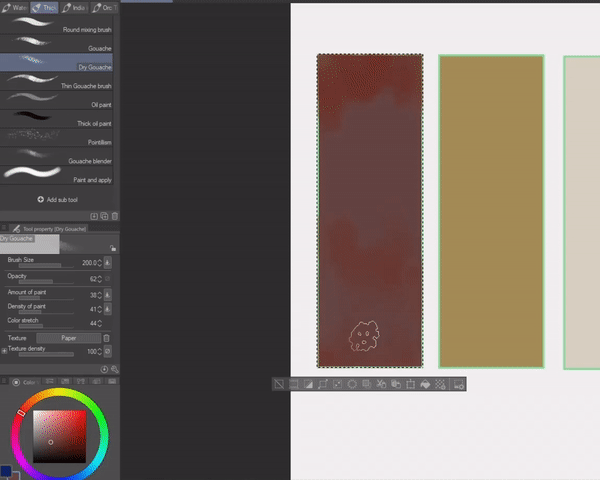
Leather usually has some color variations so you can start layering them with a textured brush.
You can also add some textures by adding creases or spots and then blending them with a textured blending tool or brush.
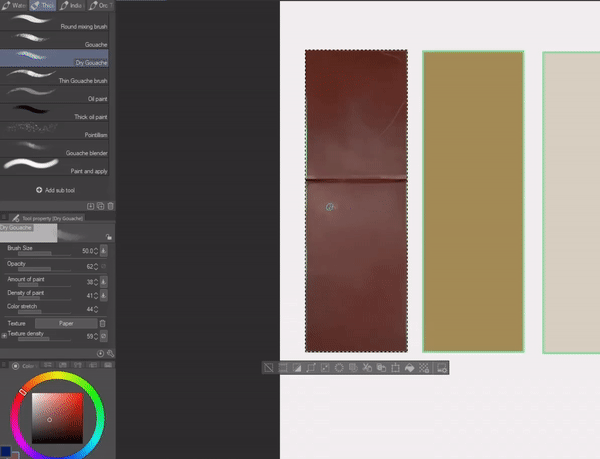
It's quite an irregular material, so to paint it use the tap technique.
Metals
-Highly reflective, but it depends on the smoothness of the material.
-Either metallic fabric or literal metal pieces used to decorate the outfit.
-Armors

It can be quite simple to just add all the colors you need and then blend them together. On top, you can add the same highlights and shadows but each time more defined.
It has high contrast, so don't be afraid to modify the contrast if you are not convinced of the end result.
For a tarnished look, use the technique for textured materials and soften the highlighs.
Fur
-Very soft and texturized
-Generally a thick type of fabric
-Used mostly decorative or in winter outfits.

Use the brush to add the different colors the fur will have, you can place them almost at random, but try to think of them as light and shadows, so if the light is hitting from a certain angle, it will have the lighter color there.
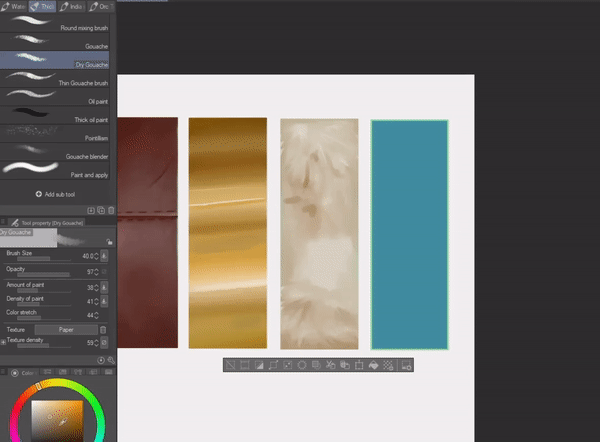
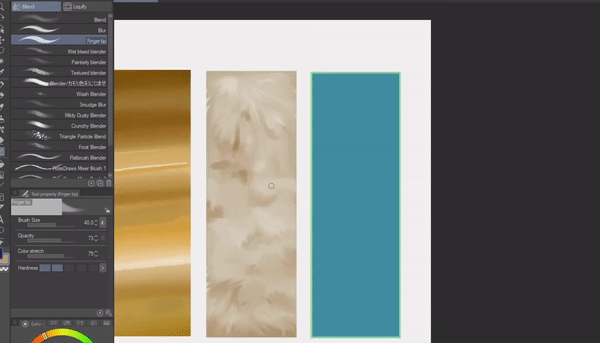
You can use a blender tool like finger tip to drag small hair strands of one color on top of another, but don't ever do it.
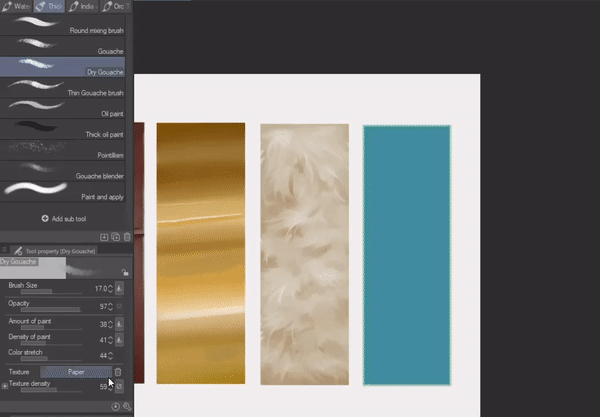
As mentioned in the textured fabrics, you don't need to draw every single hair. suggesting the texture will make the brain understand the material.
So at the very end, intensify the shadows where they are needed and give a finishing touch by adding some highlight strands with a thin brush in a lower opacity.
Sequin
-Fabric with this texture tends to be on the stiff side.
-Very reflective and high contrast
-Once again, you just need to give the.impression of texture, you don't have to draw each individual piece.
First, color your fabric and add a soft gradient, then randomly use dots in the darker tones and also add some highlights dots.
Repeat a lot, this doesn't have to be perfect, there just has to be a noticeable texture.
You can also add some other colors, for the reflective effect.
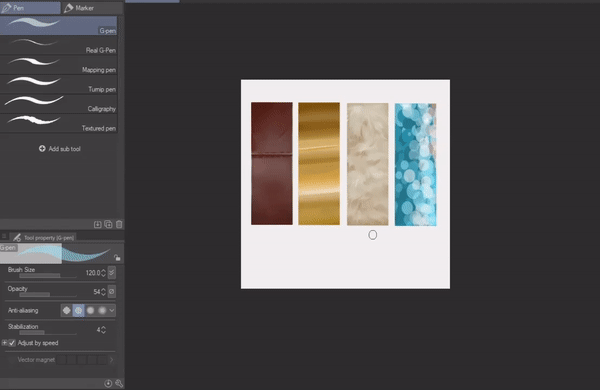
Softly blend with the Triangle Particle Brush to give a more uniform texture. Then add some highlights on top.
Since it's very probable that it will lose some contrast, you can adjust it later.
So, for the most textured fabrics and materials you can use a similar method to the last two.
Likewese, you dont need to paint the whole cloth using exactly this method, but use it to suggest the texture and then simplify the rest!
Overlapping texture
Finally, we'll go over the two last methods, they are pretty similar so it will definitely be quicker.
And just a reminder, I recommend using these two if you need highly detailed and defined textures all over the cloth.
For this, first, you'll need an already illustrated piece of cloth and a photograph of a fabric texture.
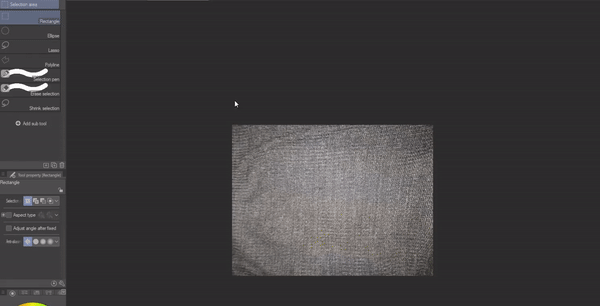
I know it can be quite hard to have a texture library if you are just starting, so I just randomly took some photos with my cellphone of textures I could find. It doesn't need to be a perfect or extremely high quality photo, you can definitely make do with whatever you have at hand.
Adjust the contrast, curves and lower the saturation of your photo, we need the texture to stand out and at the same time we dont require to have a particular color in our texture.
Then cut some of the texture.
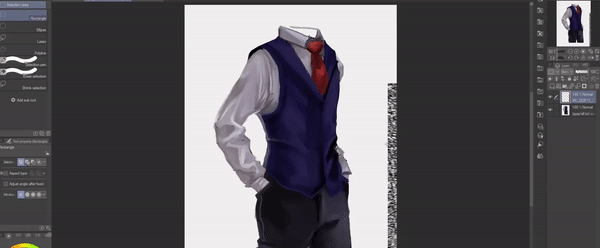
Paste the texture on top of your cloth and lower the opacity.
Use the transformation tool and Liquify to adjust it to the cloth.
Change the blending mode on the layer. Usually, for light clothes you'll use a Multiply blending mode, for darker clothes maybe Lighten or Screen. Play with the different modes until you find one that fits the cloth correctly.
So, as you can see, the final texture is pretty visible and yet subtle enough.
You can use the eraser to soften and do adjustments to the texture where it might not look correct, for example, underneath the vest flaps, the texture normally would disappear since the shadows would cover it so now it looks slightly out of place.
Generally, you can use this method to apply patterns to the cloth as well.
Matte painting
Photobashing or matte painting will just require to place the picture of the texture on top of the cloth.
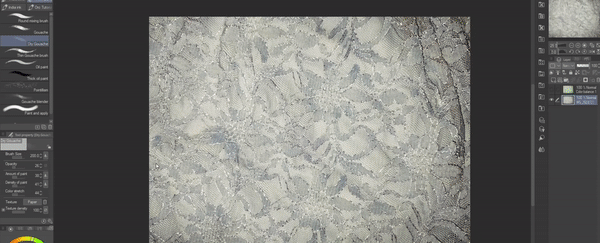
We'll follow the same procedure by slightly editing our photograph to bring out the texture. Then move on to cut and paste on top of our clothes taking care in how we place it.
Dont be afraid to rotate, over lap and bend the textures.
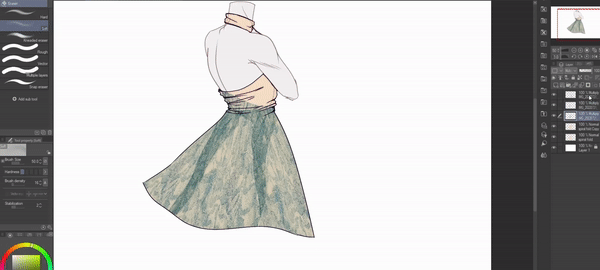
Erase the parts you don't need and slightly lower the opacity (you can also try some blending modes).
Then blend delicately the places where the textures intersect.
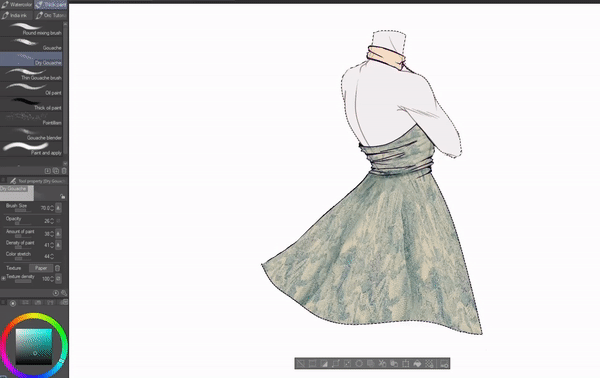
With a textured brush add lights and shadows.
Try to only use blending modes like multiply and color dodge to do this, so the textures stay intact.
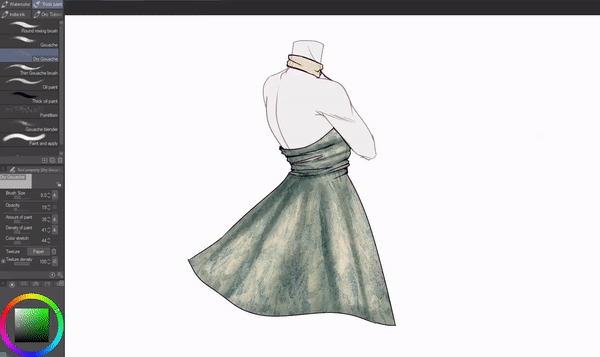
Finally on a top layer, paint over the lines or other parts that need to be adjusted.
This might look like the quicker method, but it can be really time consuming to properly adjust every cloth piece to a photograph and making it look realistic.
So these are a few tips to draw clothes and some fabric types. Hope it's helpful to someone!
EDIT: I noticed that I forgot to link the triangle particle blender, so here is the set of textured blenders by Saturns_day's.





Comment