
Drawing shape
Sketch and shape
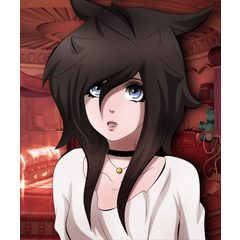
For this part we first did the actual drawing while removing the sketch layer to have a clearer image and we wanted to proportion the characters well and decorate them.
Step 1 (coloring)
At this stage we go to the automatic selection tool in the toolbar then we click on consult current layer while reassuring that we are on the tracing or inking layer
Step 2 (coloring)
Then we click outside or all around our illustration which should make dashes appear all around our drawing, then we go to the menu bar just at the top and we click on selection zone* * and subsequently on invert the selection area.**
Step 3 (colorization)
at this step we take the fill pot in the toolbar with any color of our choice we click on our drawing and we create a new layer which should give a mass of this color do not be afraid everything that What you need to do is pass this new layer below the inking layer to be able to visualize the different lines of your drawing
steps 4 (colorization)
seeing the different ones we are going to create a new layer this time in clipping mode which should make a pink band appear next to this layer, so we now move on to coloring different parts of our drawing, and subsequently to the shadows we create a layer in clipping mode which we configure in product mode at the same time which will allow us to put shadows on our drawing and thus finalize our drawing with the layer configured in overlay mode to finally have areas of light to modify our drawing at any time we can go to editing - color correction while being on the layer itself and modify the contrast, light and many others as we want
Users who liked this post


Comment