

WARNING: THERE ARE STRONG FLASHING IMAGES IN THIS TUTORIAL
Introduction
This tutorial will show you how to make objects glow or shine in dark scenes. We will use monitor screens in this example but the effect can be applied in many ways such as flames, light bulbs, neon lights, and so on. Finally, we will explore how to create an animation with changing lighting to perfect the look of a flashing monitor in our example. Have fun!
Coloring Our Scene
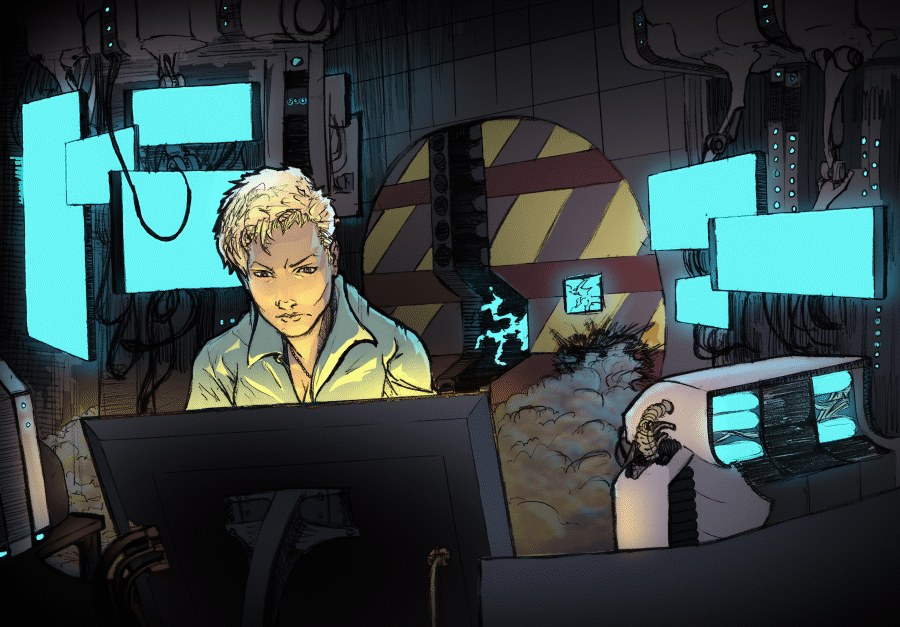
You will need an image with finished line work and flat colors for this project. You should make the "flats" using the actual color (typically called the "local color") of the objects in your scene (for example: skin color on skin, brown for hair, green clothes, et cetera). I created the following image for this tutorial and would suggest using it to follow along until you understand the processes. Feel free to download it and use it if you would like to, I even included the flats and linework seperately if you wish to use them as layers (don't forget to convert brightness to opacity on the lines!).
We begin by creating a layer filled with a medium blue and set the layer property to color to make the entire illustration look like a dark night scene. This will also unify all the colors in the image and make them appear more realistic.
Lighting Our Character
Next create a new layer and fill it with a strongly saturated color of your choice. This will be the light coming from the screen directly in front of the character so I chose a saturated yellow. Change the blending mode to "Add Glow" (you can play around with other modes later). It may look a little odd right now but keep reading. Add a mask to the layer and click on it to make sure it is selected. Next, use the fill tool to fill the entire mask with the transparent color. Your layers should look like mine below:
Now, with the mask still selected, choose a brush, select white
(or another color), and start painting on your character to add the lighting to their forms. Feel free to mess around with the opacity of the brush or use different kinds of brushes to get the effect you want. I decided to go simple and use the airbrush and the selection tool.
Create a second masked color layer for the back lighting that comes from the other screens and repeat the process to get what you want. I chose to use a slightly different color (still strongly saturated) for a better effect. Paint the lighting on the character again using the same technique until you are satisfied.
Making the Screens Glow!
In the "flats" color layer, use the select option "Select Color Gamut" and click on the pinkish color and the cyan color; this will select all of the screens, the little buttons, and the sparks in the back. Now go to your back lighting layer's mask and fill the selection with white using the button in the selection menu. You should immediately see your scene light up in the color you chose. Deselect the screens and switch to the soft air brush on normal mode with white still selected. Still in the mask, lightly brush around the screens to add a soft glow around them. Finally, you may brush on some lighting on the other objects in the scene; pay attention to how the lights will hit the smoke or the sides of the computers.
Select the back of the screen in front of the character using the "flats" layer. Invert the selection using the button in the selection menu and grab your airbrush with white again. Click on the "front lighting" layer's mask and add a glow around the screen like you did with the others. You may also wish to brush on some lighting to objects that are close to it like some of the smoke or the computers on either side.
Making it Better
You may have noticed that the room still looks like it is lit by a bright white light with little depth. To fix this, go back to the "flats" layer and select the back screens and the character. Invert the selection and then create a new layer. Select the gradient tool and choose the "foreground to transparent" option. Add some dark gradients to the edges of the room and angle them as your please. You may notice that the room gets darker, the glows from the screens become a little less fake looking, and the screens and the character appear to pop out.
This looks pretty good, however, the character still doesn't draw enough attention, so we may want to add some more shading to the scene. Select all of the light sources and the character using the flats, invert the selection, and then use a large soft air brush with black to add some more darkness around her.
Finished!
Animation!!! (^U^)
If you don't have the animation window up, go up to "Window" and make sure "Timeline" is checked. In the Animation window, create a new timeline and create a new animation folder; then fill that folder with several (I decided to do 20) sub-folders. Go up to the "Animation" menu and select "Edit Track." You should see an option called "Batch Specify Cels." Make sure you use that option and change the "End Number" to 20 (or however many folders you may have). Finally, cut the two masked color layers and move them into the Animation, "1" folder. Now copy the same layers and paste them into each numbered folder. Make sure to change every folder to the "Add Glow" blending mode including the animation folder or your lighting will look like flat colors. Your layers and animation timeline should look similar to mine below:
Try to pick the same color you used for the front lighting layer and select the same layer in folder "2," change the hue of your selected color very slightly in any direction you want and use the fill tool anywhere on the page to change the color of the front lighting (warning: make sure you aren't on the mask of the layer). Repeat the process with all the subsequent folders and change the color a little each time. Play the animation and watch the lighting of the scene change colors!

You can do the same thing to the back lighting layers but I would suggest making the changes more subtle or at least different to make sure it doesn't take focus away from the character. I may go back and try to improve it later on, but I decided to leave the back lighting alone to avoid utter chaos like the image below:
WHOA! That's flashy... Where do I look!? Anyone else have a headache?
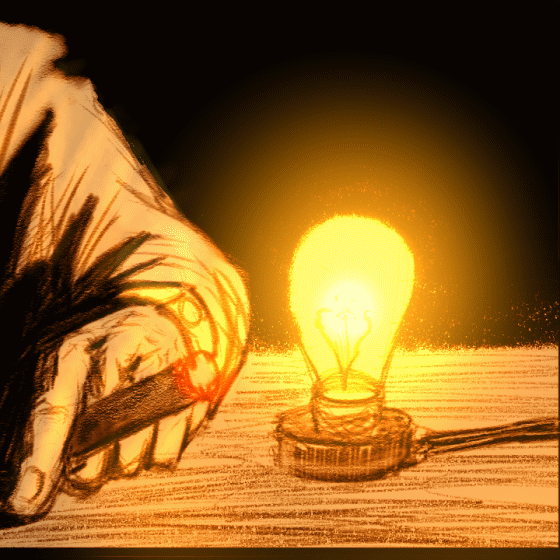
If you want to, you can try to change how fast the colors change by making more drastic differences between cels, make it look smoother by adding more cels, and even mess around with some of the other blending modes. You may also play with changing the saturation and brightness of the colors to create different effects such as dimming, bright flashing, or even flame-like lighting. As you can see by the lightbulb example below, the techniques we covered can be used in numerous ways so try to see how else you can apply them.
If you have any questions, don't be afraid to ask (^v^)
Have fun!
Users who liked this post


Comment