
What Are Layers?
Quite simply layers are like transparent pieces of paper that allow you to separate parts of your work. For instance in comic making you can have colours on one layer and inks on another.
If you are coming from traditional media then think of layers as a sense of watercolour or alcohol markers. You “layer” your paint or pens to create shadows, tones etc. Digital layers are just the same but they have more versatility to them.
Layer Tool Panel Explained
When you first begin a painting you will have a layer named “paper” & a starting “layer 1”.
You can change the colour of your paper by doubling clicking the layer. This brings up a colour box to choose from. We never draw directly on this layer as we can ruin our base “paper”. Think of it as a piece of paper can only take so much erasing or painting before it begins to tear or get muddy etc.
Layer 1 is simply a layer with nothing on it ready for you to draw. The “100% normal” you see refers to the opacity (how opaque it is) being at 100% and the blending mode being set to normal. We will go more in depth with these in a moment. The little thumbnail is a preview of your layer. If you were to draw on the layer you would see this within that thumbnail. The grey and white squares are just a preview of a blank, momentarily (until you draw on it) transparent layer.
You can also double click the name "layer 01" in this case, this will highlight the text meaning you can type in whatever name you wish to have for your layer.
You see the eye next to each layer. This is to mark the layer as visible. To say switch it on or off. Clicking the eye will shut the eye thus turning the layer off. Click it again to turn back on.
Let's Look at the Buttons Above - Row 01
Show Layer in Two Panes ~ This button is to show your layers in two panes which simply splits the layer panel in half to show you the layers you have in two separate panes (but the same layers in each panel.
Add New Raster Layer ~ A raster layer is a blank layer ready for pixel art as opposed to vector art. This is perfect for painting, sketching & inking. What you would consider your basic everything layer
If you are new to the concept of raster & vector then here’s a real quick breakdown. Pixel art/Raster does not scale up well at all. Vector art scales up & down without change & can be edited after drawing with points. You cannot edit a raster layer with points, only eraser & re-paint/sketch etc. so to speak.
New Vector Layer ~ This creates a new vector layer. This layer type has rules. You can’t use the paint bucket tool (fill) on this layer. Ink work is great on this layer especially when paired with the vector eraser tool. You can edit your work using points & scale with ease. You can even re-thicken or narrow any line art using the line width corrector tool.
New Layer Folder ~ This is purely a tidy tool. If you use many layers then it can be a bit messy. Just like your files on your computer you can use folders to tidy things up.
Transfer to Lower Layer ~ Quite simply transfers whatever is on the layer selected to the layer below leaving behind a empty clear layer
Merge With Layer Below ~ This with join your layer that is selected to the one underneath. So instead of two separate layers with artwork you will have one layer with all the artwork from the two layers.
Create a Layer Mask ~ This is a very handy tool. This creates a mask on the selected layer. You can use the eraser to erase parts of this layer you don’t want. But instead of erasing it will simply be hidden. If you want to show what you masked at any time you just selected the mask and then paint over where you want to show the parts hidden.
Apply Mask to Layer ~ This will get rid of the mask so if you have hidden parts of your art, it will erase them and you cannot re-show them. Only use this button if you are absolutely sure you will not be un-masking any part of those hidden artworks.
Delete Layer ~ This simply deletes your layer from existence. Anything on this layer will be gone.
Row 02
Clip To Layer Below ~ This option will lock the selected layer to the artwork on the layer underneath. So if you have a circle on one layer then add another layer, clip this layer to the layer below. Anything I draw on this layer will only show inside the circle but nowhere else no matter where I draw.
Set as reference layer ~ This sets the selected layer as a “reference”. This is an option used for many of clip studio paints awesome tools. It doesn’t effect your artwork on this layer in any way.
Set as Draft Layer ~ This option is for allowing you to remove the selected layer from any references (which are used for many tool options such as fill etc.) but still allows the layer to be shown. It also won't print or export.
Lock Layer ~ This is considered a safety feature for some of us. This locks the layer preventing any art, movement, scaling etc being able to be done to this particular layer. This can come in very handy at stopping you selecting the wrong layer to paint on.
Lock Transparent Pixels ~ This is a option to lock the transparent pixels. So if you have not painted yet on this layer you would not be able to with this turned on. If you have painted something and then turn this function on, you will only be able to continue painting on the parts already painted. You won’t be able to paint anywhere else on your canvas. Similar to the clip to layer below function but all in the same layer.
Enable Mask Drop Down ~ This is an option that will be greyed out unless you already have a mask on your selected layer. Once you have a mask you then have this drop down section to further how you see the mask. You can tick or untick if you want to enable the mask, that is switch it on or off. You can also tick whether you want to show the mask area. This will show the mask as a highlighted colour. this can be handy in some tricky situations whilst masking.
Set Showing of Ruler Drop Down ~ This is again one that will be greyed out unless you are using the ruler tools & functions within clip studio paint. If using the rulers, you will notice this box is now usable and gives you some more options just like the mask version did for masks. The drop down consists of four options. You can turn on & off whether you want to show the ruler in all layers. That is to have the ruler set only on a specific layer or to see them in all the layers. You have an option to turn off & on whether to show the ruler in the same folder. This only applies if you have organised your layers into folders. You can toggle to show only when editing target. This means the ruler will not show unless you are on the specific layer & drawing on that specific layer. Lastly you have an option to link the guides to the ruler. The guides are a pull down ruler different to the ruler set of tools. But you can link them all together if you wish to.
Change Layer Colour ~ This is a alternative to changing colours of a selected layer. You have the option to change the colour of the layer selected to layer colour or to your sub colour. You can use the small arrows to show the drop down menu so you can choose the layer colour & allow the colour pop up to show for you to set the colour. As an example of why you might use this option, say you have a rough sketch. If you like to draw in black say but you want to change the colour so you can see better when you refine you can just hit this button rather than manually changing the colour & opacity etc.
Row 03
Change Palette Colour ~ This drop down menu allows you to mark your layer with a colour. It does not affect your layer in any way but is a useful organisational tool. You have pre-set colours as well as setting your own within the drop down.
Blending Mode ~ Another drop down menu allowing you to choose your blending mode for the selected layer. More on the types of blending modes below.
Opacity Slider ~ You can slide along the bar or set the number to a preferred choice by clicking & typing it in or clicking the arrow keys up and down. This allows us to control how opaque our layer is. For instance a layer is pure black at 100 percent opacity. But if you slide it down to say 20 we get a “overlay” of black which with white paper behind would look more grey. Changing the opacity will show the layer underneath. Unless multiple layers below have different opacity's then all the layers would be visible to some extent..
The Right Click Menu & The Layer Menu
Actually one & the same, if you right click anywhere within the layer tool panel then you will bring up the same menu as the layer menu below.
I won’t go through the items I’ve already mentioned but I will explain the additional options that we haven’t yet crossed.
New layer : here you can see we have more options…
Gradient ~ adds a layer with a gradient applied ready for editing the colours, opacity etc.
Fill ~ will first pop up with a colour box asking you to select a colour. You will then get a layer filled with this colour (and a mask ready for use in case you need it)
Tone ~ is for adding tones to your art. This is great for comics. You will get a pop up box where you can set the frequency, density, shape, angle, size & factor. Again your layer will then appear with the tone set and a mask ready for use should you need it.
Frame Border Folder ~ this creates a folder for comic frame borders. It is essential the same as starting straight off with the Comic Border Tools in Clip Studio Paint as they automatically create this kind of layer.
3D Layer ~ this creates a layer in 3d space. You can from here add 3d models to this one layer or alternatively when you drag in a 3d model this layer will be created automatically for you.
Paper ~ use this option to create another Paper layer like the one you have when you create a new painting.
Clip Studio Share ~ this is an option for the people creating comic books and ebooks. It is a way to share your multipage works with others via a URL for groups working together.
New Correction Layer: again more options...
These options are for making adjustments directly to the layer selected.
Brightness/Contrast ~ for altering the layer to be brighter/darker/more or less contrasty.
Hue/Saturation?Luminosity ~ for altering the colours tone. shade & vividness.
Posterization ~ For creating an effect called posterization on your art. A tool worth trying out for its retro effect it can give if used on the right kind of art.
Reverse Gradient ~ This will reverse any gradients you have used on this layer, ultimately swapping the colours to the opposite ends.
Level Correction ~ used for contrast and controlling how dark the blacks are & how light the whites are.
Tone Curve ~ similar to above but giving you more control but using points along a graph and moving them to manipulate light & dark areas.
Colour Balance ~ This allows you to manipulate certain tones within the layer so you can for instance calm the blue hues or increase the yellow tones.
Binarization ~ will convert al tones to pure black & pure white. You will ave a pop up box with a slider to adjust more black or more white.
Gradient Map ~ this option will create a pop up box with options to create and customise different gradient maps. A gradient map is a gradient of tones set to the tonal range of your art. This can be a really nice effect if used right and a great way of colouring quickly if you have used grey tones to paint your art.
The Right Click Menu & The Layer Menu Continued
Create Folder & Insert Layer ~ This is an option if you have selected one or more layers, then right click & select this option to automatically place the selected layers in the new folder.
Ungroup Layer Folder ~ This will remove all the layers from the folder they were once in.
Duplicate Layer ~ this will create an exact duplicate/copy of the layer selected. Leaving you with two layers with the same painting/art in each layer.
Layer Mask ~ this will show all the options but only two I have yet to explain which are masking inside a selection or outside a selection. If you have used the selection tools & want to mask using your selection this is a great method.
Ruler Frame ~ Again many options most of which I have already covered but you also have the option to create a selection from your ruler, create a perspective ruler as well as a divide equally & combine options for comic border frames.
File Object ~ this opens a few options which are self explanatory but make no sense if you don't understand what a file object is in the first place. A file object is a layer type. For instance if you import a image or a video the layer type it imports as is a file object. It cannot be directly edited within clip studio paint (unless the layer type is changed such as rasterizing). But a normal clip studio paint layer can be converted into a file object layer, this is to say that you can save that layer as a separate file on your computer outside of clip studio that can be re-edited in clip studio anytime separate from the whole document you are working on.
Selection From Layer ~ a menu to help you create selections from layers themselves. You can create the selection of just the artwork of the selected layer, add to the selection with other layers, delete selections from other layers & select overlapping areas.
Rasterize ~ this is to convert a layer the to a raster layer. You can change a file object such as an imported image or a fill layer, vector layer etc.
Convert Layer... ~ this will bring up a pop up box allowing you to choose more options on converting a layer. You can convert to a Raster Layer, a Vector Layer or a Image Material Layer. You can set the colour space, blending mode & name too.
Convert To Lines & Tones ~ generally this option is for creating art that is either black through grey to white or one used for extracting line art as best we can. You will get a pop up box with multiple options for you to test out best to suit your artwork.
Merge Visible Layers ~ an option to merge any layers that are visible into one single layer.
Merge Visible to New Layer - any layers that are visible will be merged onto a new layer leaving the original ones where they are.
Flatten Image ~ this is used to flatten all your layers into one single layer, all merged & they will no longer be able to be edited seperately.
Blending Modes Explained
Blending modes are great with how they help us achieve certain "effects" to certain layer.
Blending modes are modes that change how a layer "blends" with the layer underneath. Changing between any of the blending modes does not effect your art on the selected layer at all. Just how it is perceived so feel free to try different blending modes on your layers to see what result you get.
Below I have created a chart to show you how colours behave with each other for each blending mode.
Now let's look at the general rule of thumb to help you decide quicker what type of blending mode you need.
We tend to group these blend modes into different kinds.
The Normals ~ Normal & Through
Normal doesn't change anything in how your layer blends with the other layers. Through is used for a layer to pass through. For instance if you have a folder with layers, you would set the folder blend mode to through. This means layers outside of the folder with different blend modes can interact with the layers in that folder.
The Darks ~ Darken, Multiply, Color Burn & Linear Burn
This group mainly effects the darker tones of a layer but leaves the colours alone or darkens them a little. White is left alone.
The Lights ~ Lighten, Screen, Color Dodge, Glow Dodge, Add & Add (Glow)
These effect the lighter areas of a layer. These are often used if you have a layer with a white background with a colour part. Using these blend modes can hide the white, showing the colour & the underneath layer. Black is left alone.
Contrast ~ Overlay, Soft Light, Hard Light, Vivid Light, Linear Light, Pin Light, Hard Mix
These often increase the contrast, but also can help with certain patterns or placing art over a layer in a more opaque way whist adapting contrast.
Comparative ~ Difference, Exclusion, Subtract, Divide
These create a difference between two layers. Often giving a interesting result.
Colors ~ Hue, Saturation, Color
These work on the colors. Often used to change the appearance of colours or to color over black and white.
Layers In Use
I wanted to show you a few screenshots with some explanations of different ways I use layers to my advantage for different projects.
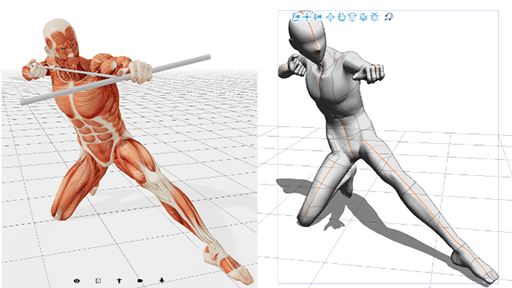
Creating Comics
Creating comics often means I am using all sorts of layers. Rulers, Borders, reference images, perspective 3d guides, inks & colours. I often keep things super tidy with folders & use the lock layer feature to prevent me from painting effects on the wrong layers such as the ink.
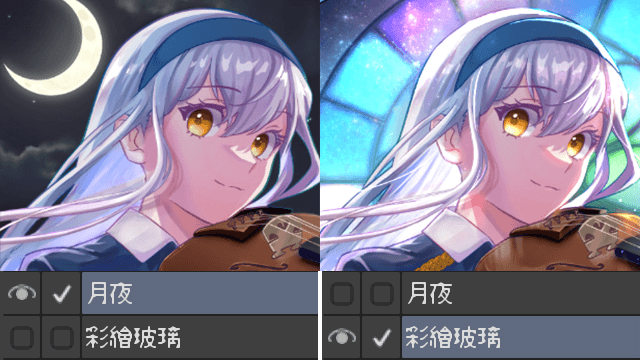
Creating Digital Art
You can see here, keeping everything I can on different layers can be really handy. I can create multiple clipping layers for shadows, highlights & details that won't effect any other part of my final image. This may look messy and often you have many many layers, but actually keeps everything really neat within the artwork.
A traditional painting version in digital format
Not all projects suit using multiple layers. For this painting I am currently working on, I have the background on one layer, the sketches on others & the paint all on the one layer. I am using a lot of blending so all being on the one layer helps me in this instance.
Tips & Tricks
Utilise Keyboard Shortcuts ~ you can edit these in the shortcut settings (in the clip studio paint menu). I have set mine up to be able to create new layers, duplicate layers etc. These are awesome shortcuts.
Experiment ~ Never be afraid to press buttons, try new things & just set aside time to enjoy learning new things within Clip Studio Paint.
If unsure always utilise a new layer, you can always merge it down later.
Try not to use flatten. It will make for a smaller file to save but you will never be able to edit your layers ever again.
If you want to keep your layers when saving, always use .clip format or .psd.
If you save as jpg, png etc you will lose access to your layers and have a flattened version of the artwork.
Name your layers as you create them. This saves so much time in the long run. After creating many layers and then realising you forgot to name them can create chaos when trying to find a specific layer.
對此投稿按「讚!」的用戶


留言