
Intro
In this tutorial I will show you apply very quick lighting to an image using the lasso tool and a soft brush. This is perfect for when you're short on time and you need to render things as fast as possible.
Sketch
As usual, just start with a simple sketch, it can be as rough or refined as you want, whatever works best for you. I do prefer to work with rough sketches and thick lines.
The next thing you want to do is add a dark colored layer under it, which will work as our midtone.
The reason why I like to use midtone is so I can apply the lights with the soft brush. This will give you a great range values.
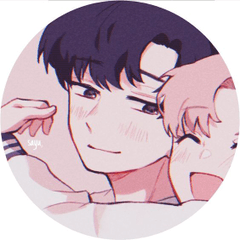
Light setup
Next thing, is to set up your light sources. I've attached an image showing how I set them up.
In this case, the main light source will be a cold blue light, while the secondary light will be warm. You don't need two or more light sources every time, this is just one way to do it. There's many ways to approach this so choose what kind of light work best with your drawing.
Select and Paint
Now, I select large areas with the Lasso Tool, and then paint them with the default Soft Airbrush at 36% opacity.
For the colors, you can use a palette of your liking. Personally, I prefer using the color wheel. I add the colors with light strokes, as well as color pick some of the light and integrate it to the the main color.
Keep filling every area with color, always mind where light source is, and press harder on the areas closer to the light!
I did the darken the background a little, for more saturation and contrast. But this step is entirely optional.
At this point the general lights have been set up and it's time for rendering with other brushes.
Rendering
Now, this step may be subjective as the brushes you can use for this is up to your liking. However, I've attached my dry paint brush below. It's entirely free and it's one of the brushes I used the most for this picture.
For this step I still use the lasso tool sometimes.
For fine hair details, I like to use the selection pen with pen pressure. As you can see, in this step just we just paint the details over everything else. Refine and render to your liking always minding the light sources.
After finishing the refining process. I simply merge everything to a new layer and separate the character from the background. And then paint the background behind him.
Color Correction
Once you're done painting, if you want to add some light adjustments, it can be easily done with correction layers or on the layer itself (Top menu: Layer>New Correction Layer>Brightness/Contrast or Top menu: Edit>Tonal Correction> Brightness/Contrast) , in this case I added more contrast to the picture. Then, I painted some very slight color atmosphere with the soft airbrush.
Timelapse
A short timelapse of the process
Thanks
I hope this tutorial helped you somehow, so best of luck in your artistic endeavors!
If you like my work ,you can follow me on IG
Users who liked this post


Comment