Customizing your 3D space -Ver.2.0-
A new feature for customizing 3D space has been added to Clip Studio Paint Ver. 2.0.0.
1. Creating a 2-point perspective in a 3D space
When you look up or down in a 3D space it results in a 3-point perspective, but this can be changed to 2-point perspective by adjust a setting under [Lens] in the [Sub Tool Detail] palette.
Changing to 2-point perspective makes all lines perpendicular to the ground parallel.
You can adjust this setting under [Lens] in the [Sub Tool Detail] palette when selecting a 3D layer with the [Object] sub tool.
Tap [Straighten] to switch the 3D layer display to a two-point perspective.
3D layers with [Straighten] turned on can also be converted to lines and tones allowing you to create even more variation for comic scenes.
You can revert your image by tapping [Reset adjustment].
2. Changing 3D camera position without changing the angle
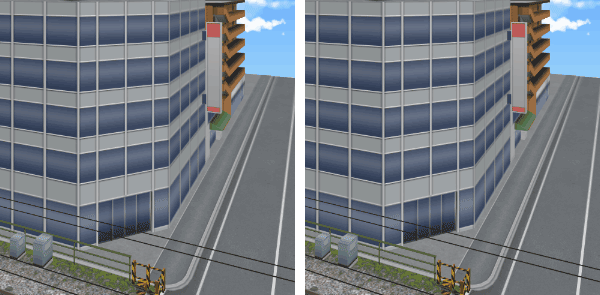
You can use [Lens shift] in the [Lens] category of the [Sub Tool Detail] palette to change the position of the 3D camera without changing the angle of the 3D object.
This is useful when you want to change the 3D layout while maintaining the [Straighten] setting.
On the left image below, the camera is moving vertically. On the right side, the lens shift is moving vertically.

3. Creating a sense of distance
You can add depth to a 3D space with the settings under [Fog] in the [Sub Tool Detail] palette.
With Fog, the further away an object is from the camera, the more it becomes blurred, creating a sense of depth.
To create Fog in your 3D space, tap [Enable fog].
You can select the fog type to Depth fog or Distance fog.
With Distance fog, fog is applied spherically relative to the distance from the camera. When the camera angle is wide, a more natural effect can be achieved. Generally, we recommend using Distance fog.
Depth fog applies the fog flatly, relative to the direct distance from the screen. The effect is the same as previous versions.
TIP:
When set to Distance fog, you will not be able to edit the 3D layers in versions before Version 2.1. Set to Depth fog in order to make edits in earlier versions. Also, if “Save in compatibility mode” in Preferences is set to “Do Not Save,” or version compatibility information is not saved during saving, you will not be able to edit the canvas in versions before Version 2.1.
When Opacity is on, you can adjust the opacity for the entire fog.
You can adjust the intensity of the fog using the Start point and Depth settings. Start point applies the fog from a specified distance from the camera. Depth specifies the position at which the fog will be thickest relative to the distance from the Start point.
TIP:
When Opacity is set to under 99, you will not be able edit 3D layers in versions before Version 2.1. Set it to 100 in order to make edits. Also, if “Save in compatibility mode” in Preferences is set to “Do Not Save,” or version compatibility information is not saved during saving, you will not be able to edit the canvas in versions before Version 2.1.


Comment