
Hello! My name is Liz Staley and I’m a long-time user of Clip Studio Paint (I started using the program back when it was known as Manga Studio 4!). I was a beta-tester on the Manga Studio 5 program and for Clip Studio Paint, and I have written three books and several video courses about the program. Many of you probably know my name from those books, in fact. I write weekly posts on Graphixly.com and on CSP Tips, so be sure to come back every week to learn more Clip Studio Tips and Tricks from me!
\
With the launch of Clip Studio Paint Ver 3.0 there comes some exciting new features that I’m really looking forward to exploring to see how they can be incorporated into my workflow. Let’s check out one of these features this week and see how it works!
\
In this article we will cover the following topics:
Using the Color Match Feature
\
Let’s get started!
Using the Color Match Feature
The Color Match feature can use either gradients or images to apply a new color scheme to your image. There are some images already loaded into CSP when you purchase the 3.0 license, but I also wanted to try some images that didn’t come with the software to see how those do.
To find images I like to use the website unsplash.com which is full of royalty-free images that you can use for reference or as stock images. I’ve used lots of images from this site for reference for paintings and there’s just about everything there that you can imagine! I did a search for a few keywords and then downloaded images that I liked the color palette of before continuing. You don’t have to do this if you want to use a gradient set or one of the images that come with CSP already.
Of course we’ll also need some artwork to do our color match on. I chose an image of mine and put a simple background from CSP Assets behind it. I feel like the color of the character and the background don’t go well together, so let’s see if we can make them look more cohesive with the Color Match feature!
Anything that you want to do color match on must be on one layer. Since I want to do the character and the background, I am going to merge my layers to a new layer so that Color Match can be done without changing the original layers.
With the layers you want to merge visible, click on Layer - Merge visible to new layer. This will copy and combine the visible layers without getting rid of the existing layers.
You can see in the Layer palette below that I now have a combined layer that I’ve named “Color Match” and then all my original layers are still shown below that layer.
Now let’s start using the Color Match option. You’ll find this under Edit - Tonal Correction - Color Match.
The Color Match options window will appear. It will default to “Image” in the Source settings and has six images pre-loaded already.
Clicking on the Gradient option in “Source” at the top of the Color Match window will bring up your installed gradients. You can choose between different gradient sets in the dropdown below the gradient bar, then choose a gradient from the window below. So long as the “Preview” checkbox is checked the image will update automatically to show the results according to the current settings.
Let’s head back to the Image options and load some custom images to try out. In the Image source options, click on “Select from files” at the bottom of the window, marked in the red square in the screenshot below.
Choose an image to load from your hard drive, then click on Open to add it. At the time of this writing, you can only add one image at a time to the Color Match image window, so continue this as many times as needed.
Now you can click on an image in the Color Match window and see the results on your layer.
Unchecking the “Maintain Brightness” option will color match while ignoring the brightness of your drawing. In the image above and the image below I am using the same color palette image for both, but notice how much darker the one below is because CSP is no longer keeping the brightness.
We can also adjust the color match results by changing the Intensity slider. Lowering the value of this option will bring back more of the original colors.
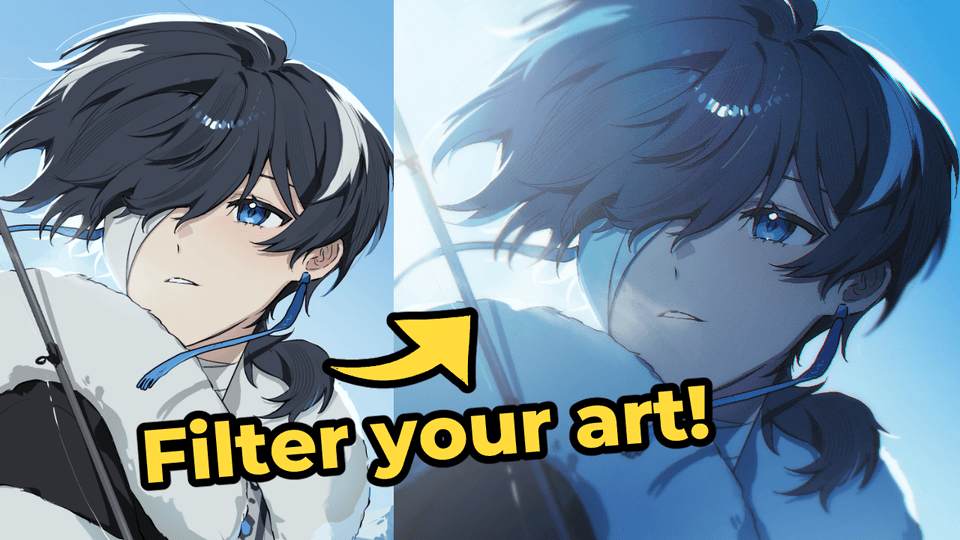
You can change the image and the brightness and intensity settings as much as you want until you like the results. These are the settings I ended up using for the image for this article.
Below is the original image on the left and the color match image with the above settings on the right.
I also played around with another of my illustrations, this time keeping the Intensity at 100. The original is to the left, the middle is a sunset gradient, and the right is a rainbow gradient. Personally, I really like the sunset version!
Conclusion
I really like this new feature and feel like for those who have trouble with creating cohesive color palettes it will be a huge help. I had fun playing around with different combinations to see how my image could look and the different feelings each color scheme portrayed! I hope you’ll try this out to see how it can help with your workflow.
For more information on CLIP Studio Paint, please visit https://www.clipstudio.net/en or https://graphixly.com
Users who liked this post


Comment