
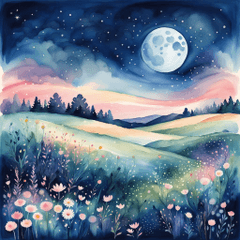
A tutorial on how to create a watercolor-style illustration in simple mode.
It uses a minimum number of brushes and textures, and follows as simple a process as possible.
There is also a video version of the process at the end of the article.
About the brushes and materials used
The brushes and materials used can be downloaded for free here.
CLIP STUDIO ASSETS has many brushes and textures, but it can take time to find ones you like, so for now I created two simple brushes.
They're not suitable for full-scale production, but they may be useful until you find a good brush.
Rough Edge Watercolor is a brush that overlaps colors with each stroke, with watercolor fringe, no texture, and no blending.
Blurred Water is a brush that does not color, but blurs and blends colors on the canvas. If you turn on watercolor fringe, you can also create an effect like dripping water.
For textures, we have prepared three types of Wpaper which adds paper grain, and Water color tex which adds watercolor bleeding.
Paste them from the material palette and use them in a blending mode such as overlay.
I created this with the idea that by dividing the roles of painting, blurring, and texture into separate parts, it would be easy to understand and paint.
Basically, you apply color with Rough Edge Watercolor under a layer with Wpaper and Water color tex, then blur with Blur Watercolor, and paint repeatedly.
making
I'll be creating this in CLIP STUDIO PAINT PRO for iPad in simple mode.
I chose the preset square canvas (1668x1668px).
I didn't think about print resolution, just wanted to be able to draw easily.
First I drew the rough sketch, draft, and line art with chalk from the pencil category.
From the material palette, adjust the size of Wpaper_np and Water color tex and paste them, then set them to overlay.
For now, set the opacity to around 30% for Wpaper and 80% for Water color tex.
I also lock the layers to avoid drawing over them by mistake.
All that's left to do is create a layer below this texture layer and draw on it.
undercoat
Create an undercoat layer above the line art layer and set it to Multiply.
From here, I'll mainly use Rough Edge Watercolor and Blurred Watercolor to paint.
First, I'll apply a light color to the whole thing, then blur it and apply the undercoat.
Here, I turned on the Blurred Watercolor Border.
After blurring, the color is still too dark, so I lowered the opacity of the undercoat layer a bit.
Overall painting
Once I've finished the undercoat, I create another Multiply layer and paint the main colors with Rough Edge Watercolor.
The colors overlap with each stroke, so the result is uneven, but I don't mind; I actually paint so that the result is uneven.
After roughly painting the color, blur it with Blur Water. Here, I turned off the Watercolor Border of the Blur Water.
When blurring, rather than blurring everything evenly, I leave a moderate amount of unevenness, edges, and unpainted areas.
Also, if there are any small areas that go beyond the paint, I leave them rather than erasing them.
This creates the feel of analog watercolor work.
I'll add a multiply layer and continue painting.
I'll paint the whole image by creating a multiply layer, applying color, and then blurring it.
I use the blurred watercolour border by switching it on and off when I want a particular effect.
Shadow painting
Once the entire image is colored, paint in the shadows.
In the same way, create a multiply layer, add color, and then blur it, and repeat the process.
When painting the shadows, instead of simply making them darker, change the hue to create a sense of transparency.
The shadows were too strong, so I lowered the opacity of the shadow layer.
Highlight and texture adjustments
Once you've finished painting all the shadows, create a layer in normal blending mode above the line art and use a pen or pencil to draw in white highlights.
Next, unlock the two texture layers you created first and adjust the opacity while checking the overall texture strength to finish painting.
Overall color adjustment
Finally, we'll adjust the overall colour, but as adjustment layers and filters cannot be used in Simple mode, we'll use the layer blending mode.
Press and hold the "+" to add a layer and select "Add merged layer".
A merged layer is a layer that merges the layers displayed on the canvas into a single layer.
You can adjust the contrast and saturation by changing the blending mode and opacity of this layer.
Here, we created two merged layers and darkened the colours with Multiply at 10%, and increased the saturation and contrast with Overlay at 10%.
Once you're happy with the results, add your signature and you're done.
The method I described in this making-of only uses a few brushes and can be done by simply repeating the same steps, so I think it's a painting method that doesn't require too much thought.
From here, you can develop your own expression by using different brushes and changing the layer blending mode.
postscript
Added 2024/05/08: An example of a painting created using the same steps as the making of the above, with effects added using the preset brushes Splash Watercolor and Splash, and the blending mode Dodge (Glow).
movie
Timelapse
Commentary and making of video
This video was created based on the above making-of content.
Users who liked this post


Comment