Auto-Colorize mit AI-Technologie in Clip Studio Paint
introduction
Today I will show you how you can automatically color your sketches and lineart with AI technology in Clip Studio Paint, for example as the basis for a painting that you want to build on further or Color Sketch to play through a few color harmonies.
Video of the article
requirements
Your Clip Studio Paint version should run at least at 1.8.4 and an internet connection must be available, because the data required by the AI is uploaded to a server, where it is interpreted by it.
preparation
It is a prerequisite for the automatic coloring to define the contour of your motif.
It can be helpful for the Ki to close them as far as possible, but smaller gaps are recognized and closed - you shouldn't work too dirty within the contour either.
In theory, you can now have the entire drawing automatically colored.
To do this, we define the lineart layer as the reference level by selecting the level in the level menu and then clicking "Set as Reference Layer" in the level menu
Alternatively, you can do this in the main menu under the tab "Layer" -> "Layer Settings"> "Set as Reference Layer".
Auto-Colorize options
Under “Edit”> “Colorize all” generate some basic colors within the linework that could work quite well as flesh tones.
However, it is much more interesting if you create a "hint layer". This means a level that the AI should give information about how it can fill the composition.
To do this, we first create a raster layer and roughly insert a few colors at the intended locations. I am trying to work with the light to medium tonal values of the colors, because I only want to add the darker ones in the next step.
Now I choose “Edit”, “Colorize”, “Use hint image and colorize” and after a short calculation time we have a very reasonable result.
The colors often bleed through the contour, so that colored areas on the edges are somewhat blurred.
If you take offense that the softened edge of a color surface protrudes beyond the contour of the drawing, you can fix that quickly by using the automatic selection and then selecting these positions on the hint layer.
Press the remove button once and the outer edge is clean!
And if the tool does not recognize everything, there is still manual action via the Select Tool.
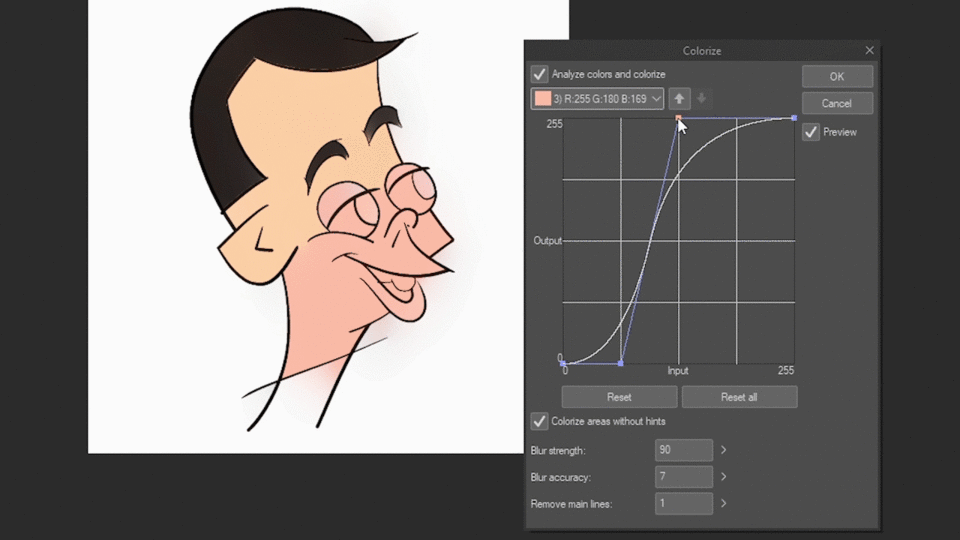
The degree of the softened edge can also be influenced by selecting under edit> colorize> use more advanced settings, which opens the almost cheeky-looking Colorize box.

If you select the "Analyze colors and colorize" function, you can then take the so-called Tone Curve, which lets you regulate the output of a color.
You can also calibrate the amount of blur that defines the area of the blurred area. There is also the Blur Accuracy parameter, which specifies. becomes how smooth the transitions are.
Possible uses
How could you use this function now?
On the one hand, you can quickly get a base color for your painting and build on it.
As a test, I continue to work on the current example, add shape and drop shadows, render details and hard and soft edges.
And this is what the result looks like :)
You could test super smaller color sketches and color harmonies before spending a lot of time in a composition
This would also be a great tool in the area of color scripting for animated films or comics.
I hope this was helpful - have fun trying it out! :)


Comment