
Hello, it is a pleasure to greet you, this time we will see how to make a walking animation with perspective.
Only the act of animating is quite difficult and takes a lot of time and effort and even more if you want to animate a walking person, but with effort and dedication and a lot of patience you can achieve. Let's start.
Aspects to consider to animate a walk
Animating a walk requires producing two extremes, or key positions, and inbetweening them in a logical way.
The main action in a walk stems from the legs and lower body so we wiil begin by concentrating on these parts. Basically, a walk is a continuous series of steps.
We have to take into account that the body of the character has to be in balance and that in the step position it will move upwards since the legs will be more stretched.
Like the movement of the waist, the shoulders will sometimes move in the opposite direction, one leaning to the left and the other to the right.
The most important thing to remember in all standard walks is that if the left leg is forward, the right armis forward to counterbalance it.
References
To see what it is like to walk naturally, we can see ourselves in front of a mirror or take video of a friend while walking. In this way we will have an idea of how to make our animation, we can also use the video for the animation, extracting the key frames, it is known as Rotoscopy.
In the following link you can see an example.
Concept art
First, we make the concept art of our character, where we will establish the features of our character.
Key Frames
Then we sketch the key frames for our walking animation.
The selected frames will be the number 1, 9, 17 and 25.
We consider the perspective that we have decided to apply.
They will look like this once the line art is finished.
Now that the passing position is complete, the inbetween must be put in, generating the 30 frames per second that we need.
New blank file
Select the menu [File] >> [New] Animation, with the following parameters:
We will use a larger blank space at the bottom and on the left, to accurately place the last frames.
Background
Using the symmetric ruler we place the guides. We will use them to make that our character increases in size as it approaches the front.
We decide the angle depending on how far we want the walk to start.
This is the first frame:
And the penultimate frame:
In this way we can easily place a 3d background and edit it, to match the perspective lines.
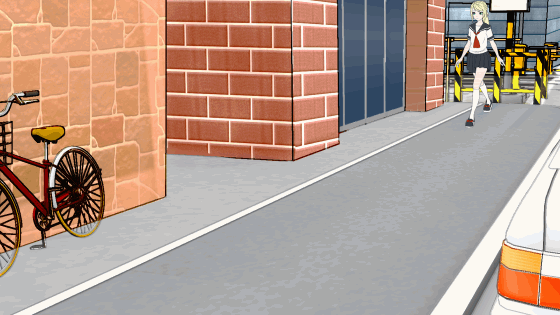
We will use the Near railroad crossing-Ver.2
Using the controls we will put it in the desired position.
We will add some objects to make it look more interesting. These will be a bicycle and a car.
We will edit it to make it look "less 3d".
Placing the frames
Use multiple layers as a single cel.
1. On the [Layer] palette, select a layer specified as a cel.
2 Select [Layer] menu→[Create folder and insert layer].
All layers stored in the “1” layer folder are designated as cel “1” in the [Timeline] palette.
3. Click [New Raster Layer] on the [Layer] palette to create a fill layer in the “1” layer folder.
A layer folder with the same name as the selected layer will be created, containing the selected layer.
Two layers, “Lineart” and “Color” can be used as one cel.
Refer to the following tip for a more detailed explanation:
With the [New Animation Cel] command you can create a cel with the same settings as the currently selected cel.
Create a subsequent animation cel and it will be created with the same structure.
We need 31 frames with a layer for color and another for the line art.
We import the first frame with the color layers and the line art, and place it in the initial position.
Deactivates the background and leaves only the layer containing the line art visible.
We also activate the onion skin.
This will help us to better position the next frame.
Guiding us with the previous frame, it looks blue, we place the second frame matching the foot that is in contact with the ground when taking the step, in this case it is the left foot.
We must also make the next frame bigger by guiding us with the perspective guides.
For this we use the transform tool. (Ctrl+T)
We follow the same procedure until we finish with frame 31 in which the support foot is the right one.
We right click on the animation layer and choose duplicate layer.
This will give us a copy of the 31 frames, which we will move on the timeline at the end of the first one.
Overlapping frame 31 and 1 of the second animation folder to use as a guide, then we move the second animation folder to the end of the first.
We place the frames in the desired position as we did before and repeat this step until our character goes off camera.
We must make sure that the paper and the background cover up to the last frame.
This will take 6 animation folders of 31 frames and and one of 7 frames.
So our animation will last 7 seconds.
Animation without audio
And this is the end result without audio.
Adding audio
There are many sites where you can download audio files without copyright.
In this animation we will use three different sounds: the sound of the steps, the street environment and the humming of our female character.
To create an audio layer we click on the timeline, menu → new animation layer → audio.
We right click on the timeline of our audio folder and select import audio file.
In the animation curve editor we set the volume to what seems most appropriate, I will set it to 40 for the enviroment sound.
We repeat the same steps for the humming sound, create a new audio folder and import the sound.
In the animation curve editor we put a key in the first frame and in the last. The first key will start at a volume level of 5 and will increase to a volume of 25 in the last frame.
So the sound will be in accordance with the animation.
Finally we will add the sound of the steps.
The sound file that I will use corresponds to the one step, so I will place it in the frames where the feet start to touch the ground.
The frames where the loudest sound of the step should be heard will be the following:
(0 + 13) (0 + 30) (1 + 17) (2 + 4) (2 + 21) (3 + 8) (3 + 25) (4 + 12) (4 + 28) (5 + 15) (6 + 2) (6 + 19)
We will add a key to change the volume level in each step, so the first will have a volume of 5 and we will increase it by 1 each time until we reach the end, which will have a volume of 16
This is how we end our animation.
Thanks for watching this tutorial, I hope it works for you !
See you next time.
Usuarios a los que les gustó esta publicación


Comentario