6. Painting the Character: Skin & Hair

-
 MVP ◆This user has contributed greatly to the management of the community, by posting many great responses to the questions asked. Once every three months, MVPs are determined based on the points earned during that period and will be recognized accordingly.
 -
 New Valuable Player (NVP) ◆These are the next-best contributors to the community after MVPs. This is awarded to users who have not yet won an MVP award, based on the number of points they have earned.
 -
 Official Expert ◆Chosen out of all MVP awardees, who are already proof of excellence, this is a testimony of outstanding correspondence in the community. After careful screening, they are appointed by CELSYS and assume their position.Note: Formally called “Evangelists”
 -
 CELSYS official moderators ◆Moderators are official CELSYS staff members who are fluent in Japanese as well as various other languages. As moderators are not experts on software or creative work, they will not be able to directly answer your questions. However, moderators will provide communication and language support to ensure that everyone can smoothly communicate with each other.
 -
 CELSYS officialThis is the official administrator account.
In this part, I’ll explain how I paint the character’s skin and hair.
[1] Painting the skin
This is very similar to how I paint other parts, but with the following differences.
Skin painting layers
① Base color, ② Multiply, ③ Multiply, ④ Multiply (dark shadows),
⑤ White highlights, ⑥ Eye whites, ⑦ Irises, ⑧ Color dodge
■ Line art on the face
I make the color lighter around the inner eyes, center of the mouth, and nose.
However, if all the lines are faint then the character loses some expression, so I leave some darker lines.
■ Shading
The skin is a focal point of the illustration, so I slightly increase the saturation of the shadows to create a more vibrant effect.
For darker shadows, I paint blue-toned shadows and reduce the saturation. (Step ④)
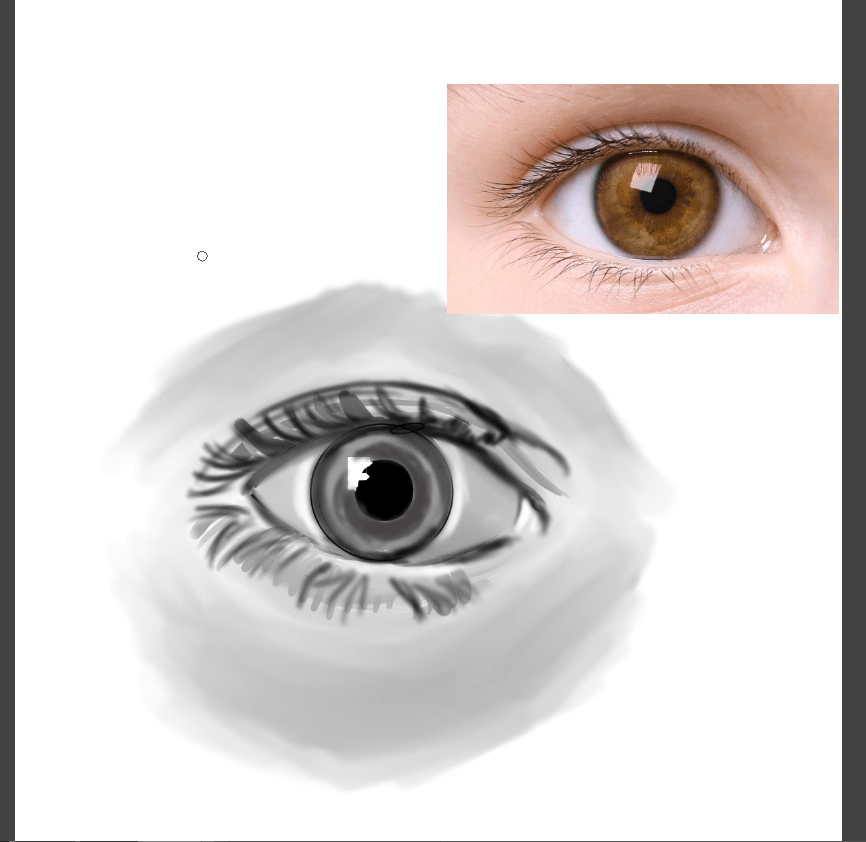
· Eyes
The eyes are the only part I don’t paint by stacking and masking fill layers. Instead, I paint directly on a single layer.
As I mentioned previously, I wanted to make the character look slightly unnatural, so I decided to make the eyes red to add a pop of color in the face.
[2] Painting the hair
I paint the hair in almost the same way as the skin and clothes. I use the following layers.
Hair painting layers
① Base color, ② Multiply, ③ Add color:
I’ll increase the brightness of the hair later in steps ⑧ and ⑨ with [Color dodge] layers, so I use a darker color for the base color and shadows.
Long hair can look a bit flat if the shading is all one color, so I add a gradient of a slightly different color (③).
Sometimes I also add a gradient on the base color.
④ Gradient + Multiply: In order to increase the depth of the color, I add some soft gradients in places to emphasize the movement of the hair.
⑤ Multiply 2: I add another darker level of shading to make the color richer.
⑥ Reflections: I lightly add this around the edges of the hair and at the tips, and lighten some of the color in the shadows.
I add the reflections in a slightly different color to add a new tone. (For example, if the hair is blue, I use purple or blue-green reflections.)
⑦ Reflections 2: I add reflections on the tips of the hair around the face. For the light reflected from the face, I use a color that has a little bit of the skin tone blended in, such as a brown if the hair is a warm tone, or a low-saturation blue if the hair is a cool tone.
⑧ Color dodge: This is the first color dodge layer. For most parts, not only the hair, I first paint with slightly dull colors, then use color dodge to brighten up the parts where the light hits.
⑨ Color dodge: This is the second color dodge layer. On this layer, I brighten up the hair in a smaller area than the first color dodge layer.
I use between one to four color dodge layers depending on what I’m painting. I typically use two layers.
When painting dark hair such a black or brown hair, I also add a highlight layer to make the hair look shinier.
Now I’ve finished painting the character.
In the next part, I’ll add some final touches to the character.
Users who liked this post


Comment