

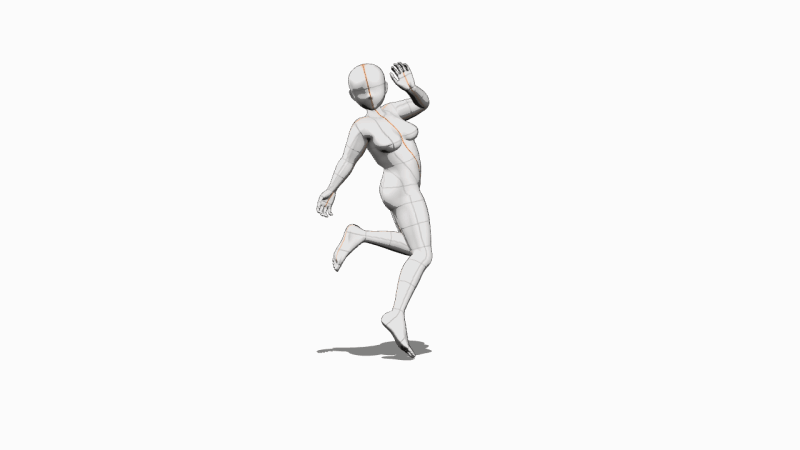
I'll show you here how you can create a tracking shot around a character as an animation. A concept that shows a character from all sides makes it more lively and also gives us extra information, e.g. about profile views and back of clothing.
Clip Studio Paint offers practical possibilities.
This tutorial is quite complex, but is also suitable for beginners. However, you should be familiar with the basic functions of the program.
All of the materials in this tutorial are either standard part of Clip Studio Paint or available for free from Clip Studio Assets.
Have fun moving!
planning
It's worth having an approximate plan of how the animation should look before. We need
Reference material: sketches, photo for poses, approximate color palette
For the camera movement: 8 views at 45 ° intervals
Output format should be GIF.
Create illustration with motion
Select File> New> Illustration with Motion, 8 frames, 6 fps
I put the file in 16: 9 format, if I use the animation later than video, e.g. wants to upload to Youtube. One standard is 1280 x 720 pixels.
The figure should be seen from 8 different angles, so we need 8 pictures.
Speed: Since we are only going to paint 8 pictures, select the smallest value 6 pictures per second, so that the animation does not move too fast.
ClipStudio Paint automatically creates a document with an animation folder containing 8 blank animation cels. (We do not consider this folder for now.)
Tip for beginners
If you have never worked with the 3D figures before, you should first familiarize yourself with their handling. Try out how to rotate, scale and position them.
This tool is needed when working with the 3D figures:
Object Selection to activate the 3D figure.
Customize 3D character
Select a standard 3D character in your document and place it in the center of the canvas.
Activate the character and click on the palette in the lower right corner. This will open "Sub-Tool Details". Here you can change the figure as a whole and also in detail. the active mode is displayed in blue.
My figure is a bit round and has comic proportions, so a slightly larger head. I adjust the body shape until it is right for me.
Tip: Save body shape
If you want to use this body shape more often, save it as a material. Click here
A dialog box opens. Enter a name and save the body shape in the corresponding folder. You can also select a matching image by clicking the folder icon next to "Images".
Determine pose and position
Let's see if it's possible to scan the reference pose ...
Choose your reference picture
The result ... not quite perfect, so something needs to be improved.
Optimize the pose carefully. Select the individual body parts and position them with the 3D handles (the colorful ellipses), not by moving the limbs at you. So you have more control.
That's good
Now select the camera angle with the complete frontal view from the specifications and rotate the figure so that the face is completely visible. (Make sure that you actually rotate the figure and do not move the camera.)
Adjust light
To have clearly defined shadows later on in the illustration, go to the render options in the subtool palette> Assign and set "Method" to "Toon"
If necessary, you have to balance out the different light sources so that the figure and body shape can be clearly seen from every angle and the shadows look interesting.
There are 3 light sources that you can work on separately: ambient light, parallel light 1 and 2. In ambient light, you can only change the intensity and light color. In the case of the parallel lights, also the light position. Light color you can leave white everywhere.
Here you can see my settings. I have arranged the parallel lights on different sides of the figure, so that the back is not completely in the shade.
One picture per position
We need the 8 figure views on a transparent background, so disable the visibility of the paper plane.
Activate the 3D-figure plane and select the frontal view from the template palette and go to the layer palette and click on "Combine visible layers". Give the newly created layer a meaningful name, e.g. "1/1" or "frontal".
Then disable the visibility of this layer.
Activate the 3D-figure plane again and select the left view from the templates. Again, create a new layer from this view on "Combine Copy of Visible Layers" and give it a meaningful name. B. "L 1/2". Disable the visibility of this layer.
Repeat this process for all other views: right profile, right and left three-quarter view, rear view.
Now missing the right and left quarter view, but unfortunately there are no requirements.
After a few tries I found it easiest and quickest to position the camera by eye. (Since every image is only fractions of a second, it does not have to be mathematically exact, only credible.)
It is important that you move the camera here, not the figure itself. We rotate the camera around the figure in this animation. The figure does not move.
Animation test run
Create a separate folder for each layer in the animation folder. "Create folder and paste layer" or cmd / crt-G
Move the different views of the character in the correct order into the folder of the respective image: Frontal view in Folder 1, 3/4 Left view in Folder 2 etc.
If the Timeline panel is not open, open it now.
Your workspace should now look something like this. At the bottom of the timeline, you can play your animation.
Color and shade
Duplicate each of the 8 figure views in the animation folder. These levels will later become the shadows.
Set the duplicates to multiplication, visibility to 30%, and lock the layers so you do not accidentally work on them. Disable the empty layers in the animation folder.
I copy my color palette from the reference file to a new level. (Making sure she does not end up in the animation folder)
I always like my palette directly in the document. (You can also create color patches if you prefer to work differently)
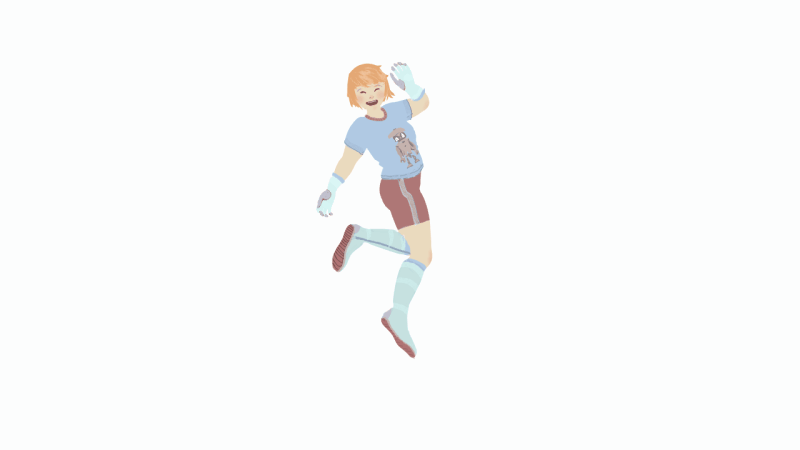
Now you can work out the 8 views of the character. Erase the drop shadows on all levels and fix the transparency.
My character wears a futuristic outfit with boots and gloves. I roughly color the basic shapes with the lasso-filling tool. The lines on the figure help me with the orientation.
When you have determined which part has which color, duplicate the colored layer and move it to the side as a reference for the other views.
Color each view roughly. Through the grid lines, you know how the clothes fall over the body. You do not need to paint light or shadows, that will come later. Test the animation. (I experimented with windy hair here)

Paint details
Time for details. Unlock transparency on the front view layer to define hair and clothing. The clothing of my figure is tight fitting, but has dimension. (Here it is helpful to make the shadow layer invisible in between so that it does not irritate you.)
I am now using the Curve tool to adjust the lines nicely to the body shape. Again, I do not go too much into detail, but first wants to bring each view on the same level.
If I am satisfied with the frontal view, I continue with the left profile. I have recopied the front view layer as a reference for the details. I do not want a realistic drawing that looks like 3D animation, but a handmade, loose look.
Optional: more details
If your character still gets some extras, use the still empty layers in the animation folder. Put it on as a clipping mask so you do not paint outside the figure, and drag it under the shadows. Also block the already colored layers, then nothing can be destroyed at the base design.
Times for each view z. B.
with airbrush:
some pink on the facial features, knees and elbows.
with fineliner, marker and covering brush:
hair details
textures
seams
ornamentation
The grid on 3D figures helps with orientation.
When you are satisfied, reduce the detail levels and the colored figure planes to a level.
Finish all views in this way and export as a test ever a GIF
Enter the desired size and set Loop Count to "Unlimited" if you want your animation to play as an infinite loop.
How does it look like? For a simple "flat" look you could stop here.
Or continue with shadows and a few effects.
shadow
Unlock the layers you created under Color and Shadow.
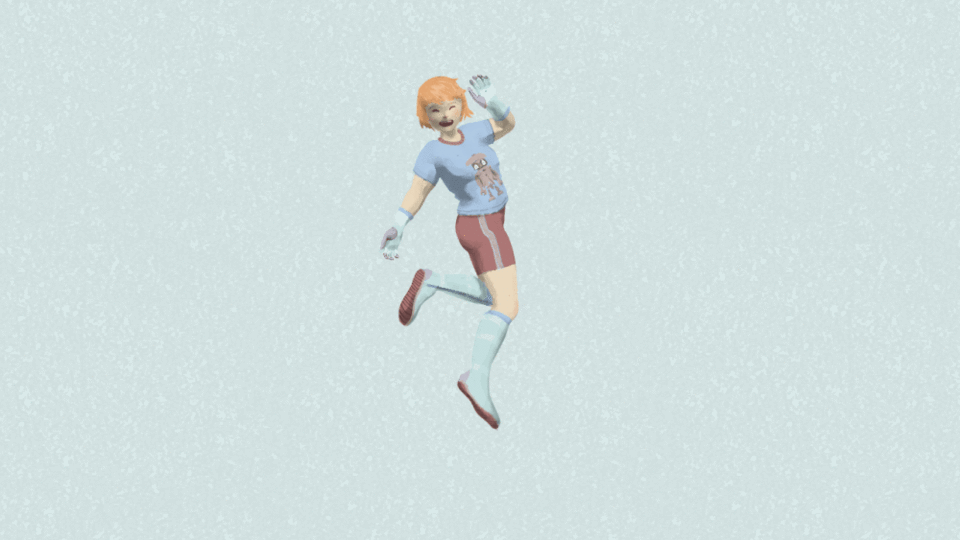
To get clearly defined shadows and get rid of the gridlines, I use a handy feature of Clip Studio under "Layer Properties". I set the expression color to "monochrome" and adjust the knobs until I like the kind of shade. I do not want outlines and in some places not so intense shadows. Depending on the setting, the drop shadow may disappear. (I've made it disappear for this tutorial so it does not get too bulky.) Attention: "Reflecting level" must be disabled, otherwise the layer will be rendered 100% opaque.
Now go to "Convert Layer" and set Audruckfarbe to "Color", because in the next step we need intermediate tones.
Adjust the opacity of the shadow layers so that the shadows look good. Do this for all shadow levels. Also, set all Shadow Layers as a clipping mask to the layer below. Your animation folder should now look something like this.
You now know where the shadows are about. Now it's getting creative: choose a brush to blur and run the paint, e.g. "Wet" under the watercolor brushes.
Wash the edges of the shadow until they look like painted. In some places like the edge of the t-shirt I need extra shade. I paint it then simply with a water color brush in black.
(You only need the color black for the shadows.)
The figure gets a relaxed expressive style.
You do the same for all Shadow Plains.
You can now give your animation a colored background and some texture.
Export a GIF in the same way as before. Finished!
Thank you for reading and trying out!
Users who liked this post


Comment