Let's move illustrations with Live2D! ~ Separate character parts with `` CLIP STUDIO PAINT ''

-
 MVP ◆This user has contributed greatly to the management of the community, by posting many great responses to the questions asked. Once every three months, MVPs are determined based on the points earned during that period and will be recognized accordingly.
 -
 New Valuable Player (NVP) ◆These are the next-best contributors to the community after MVPs. This is awarded to users who have not yet won an MVP award, based on the number of points they have earned.
 -
 Official Expert ◆Chosen out of all MVP awardees, who are already proof of excellence, this is a testimony of outstanding correspondence in the community. After careful screening, they are appointed by CELSYS and assume their position.Note: Formally called “Evangelists”
 -
 CELSYS official moderators ◆Moderators are official CELSYS staff members who are fluent in Japanese as well as various other languages. As moderators are not experts on software or creative work, they will not be able to directly answer your questions. However, moderators will provide communication and language support to ensure that everyone can smoothly communicate with each other.
 -
 CELSYS officialThis is the official administrator account.
This section introduces the concept of dividing parts for moving characters in Live2D and how to actually separate parts using "CLIP STUDIO PAINT".
Explanation: MUGENUP Inc.
This article is based on "alive 2019-a place where dreams can be found-| Live2D Creators Conference" session "Basics of moving and separating single layer illustrations with" CLIP STUDIO PAINT " .
- This article is in Japanese. Machine translations are available for non-Japanese sites.
When creating a new illustration for Live2D
To create a new illustration for Live2D, make the following preparations.
-Separate the line drawing layer and the fill layer for parts that may move.
・ Costume design will be based on the design of parts.
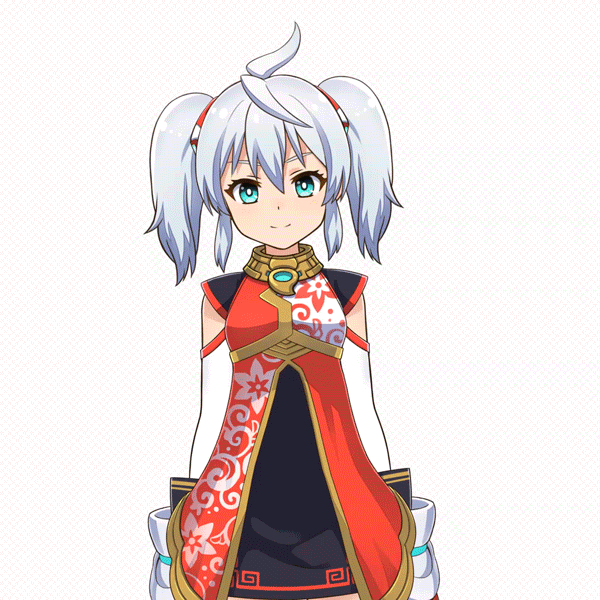
If you are going to use Live2D from the beginning, you can create a character while thinking about dividing the parts as shown below.
The characters in this image are sample images for reference only, so this is a very simple example. From the beginning, it is designed to be easy to move.
For example, in this sample the hand is peace signing.
The gripping finger and the extending finger are cut into different layers so that they can be easily moved as parts.
The hair is divided on the assumption that it moves at the base of the twin tail.
The awkwardness of the joints is not noticeable because the ribbon parts overlap the base.
The arm is divided into the upper arm from "shoulder to elbow" and the forearm from "elbow to wrist".
Each part has a design that can be moved by the rotating deformer.
When creating Live2D images from existing illustrations
As mentioned above, when creating on the premise of moving from the beginning, the design and parts division are smooth, but there are also cases where "I want to move one JPG image." There is.
In such a case, it is necessary to perform "part division".
This time, we will introduce the preparation for moving a character illustration with a line drawing layer and a fill layer as a Vtuber.
How to separate parts?
If the original image is a single JPG or a PSD with layers combined, it is necessary to not only cut out the parts, but also add the background.
Separating parts in detail is a difficult task, but considering the movement when using Live2D, the finer the parts, the better.
Therefore, it is necessary to divide the parts as finely as possible and add and paint in consideration of movement.
■ Check the time and work required for parts division
When separating parts from a single JPG or an image in which layers are combined, it is necessary to reliably add and repaint.
If the method of painting is unique or has a complicated pattern, it takes time to work, as well as skill as such.
■ Determine the quality line
It is important to decide what you want to do and how much you want to move. Then, you will understand that "I want to move like this, so I need to add here."
In order to "do not divide more than necessary, do not increase the number of parts", let's clarify where it is absolutely necessary to cut out.
What you want to check in advance by dividing parts
■ Division of face parts
Even if you say "I want to run as a Vtuber", the necessary parts will change depending on how you want to use it.
If the talk is the main and only the face up is used, there is no need to divide the parts below the neck.
When the face is mainly up, the impression of the character depends on the facial expression.
As in real life, eyes are very important in Vtuber.
Especially in Live2D, the division of the eyes is very fine.
In an actual Vtuber, the upper part of the screen is often displayed on the screen, and the upper part of the neck is often important.
[Points for adding movement with Live2D]
As a point of Vtuber, be careful not to hide your face by shaking your hair.
In the illustrations, you can draw the hair so that it does not overlap the eyes and mouth, and there are many characters that can see the eyes from the gaps of the bangs, but in the case of Vtuber, the hair moves in real time.
For this reason, care must be taken when moving the hair so that the hair does not overlap the eyes.
■ Part separation of joints
Depending on the Vtuber, the whole body may be reflected.
As introduced in the first "Creating a New Illustration for Live2D", it is difficult to move if there are patterns (net tights, checkered patterns, etc.) in the joints.
Also, it is difficult to design such that transparent materials overlap, even if it is not a joint.
If it is drawn in a single picture, it takes a lot of time to reproduce the appearance.
↑ In this way, it is easy to move if it is a plain and simple joint
■ Parting of shaking objects
Consider how to separate the shaking object, considering whether to cut the picture as it is, moving the elongated band or belt into multiple joints, or rewriting it to a different shape, etc. need to do it.
For example, in a single picture, if the chains are undulating or the strings are fluttering, they are drawn in a bent state. However, it is very difficult to straighten a bent shape, so it is better to draw a straight chain, string or band once and then move it.
Parts separation process using "CLIP STUDIO PAINT"
This time, we will use this character as a Vtuber and divide the parts so that the face and upper body with many needs can be moved.
I will explain the work of the face part as a sample with a screenshot of the actual "CLIP STUDIO PAINT".
The data this time is in a state where the "line drawing layers" are combined into one.
"Fill layer" is similarly combined into one. Since the line drawing layer and the fill layer have been combined, the special layer function is indispensable.
For parts division, if the data contains multiple layers, it is necessary to select multiple layers for both line drawing and fill and repeat the same process.
In such a case, "CLIP STUDIO PAINT" is convenient.
"CLIP STUDIO PAINT" can be selected across multiple layers and cut out as it is. If you've ever done parts, you'll know how convenient it is to be able to separate layers while retaining layers.
Even in the case where layers are combined to some extent like this time, the function is active.
■ hair bundle
First, split from the hair.
We work from the hair because it is located in front of facial parts, such as facial contours, eyes, ears, and mouth.
In particular, since the outline is easily hidden under the hair, cutting the hair first will make the work more efficient.
And in the case of this character, the two hair bundles that protrude from the top of the head are particularly noticeable in the hair. So-called ahoge.
These bunches are the first to work because the movement is conspicuous in the first place and is located closer to the hair than the entire head.
This character has two hair bundles, but it is quite unnatural for the two hair bundles to move at the same time, so we cut them into separate parts.
First, cut the front side of the hair bundle.
The big point here is that you select "line drawing layer" and "fill layer" at once. Select a little outside of the line drawing and cut it out.
In addition, if you use functions such as "Quick Mask", you can work faster.
After cutting out the front side of the two hair bundles, the next one is to work on the back hair bundle.
In the same way as before, use the "CLIP STUDIO PAINT" function to select and proceed with the line drawing layer and the fill layer.
You have now separated the two tresses.
The hair bundle on the near side is located on the near side of all other parts, so there is no need to add or paint after cutting.
However, the hair bundle on the back side has a part hidden behind. I will add the missing parts so that there is no problem with the animation.
This is a screen shot when the small window on the upper right is cut off. Specifically, it is the base of the back hair bundle.
At this time, if you add a shadow color to the part that goes around to the back to add a sense of incongruity, you can add a natural impression.
■ Bangs
Next, cut the bangs.
This time we cut the whole bangs into one big part, but depending on the condition of the original illustration and the quality we want, we may cut the bangs into multiple parts.
Then, when the bangs are cut, apply the bangs.
As shown in the figure below, the part where the hair bundle on the near side is cut off is a hole.
Gradients are applied to the entire bangs, and lines that flow through the hair are drawn.
In this way, if the area is wide, use the [Eyedropper] tool or [Airbrush] tool to apply the color so that it does not float from the original picture.
Of course, add lines that were not drawn behind the hair bundle.
■ face
When the bangs are over, the next step is to cut out the face parts.
We will cut out the eyes, eyelids, eyebrows, mouth, etc. The important part here is the shadow parts.
How to separate the shadow around the face depends on the assumptions and specifications of the animation, but this time it was included in the expression parts.
By dividing eyelashes, white eyes, pupils, irises, etc. into fine expressions, it is possible to create detailed expressions such as blinks and stunning eyes.
After cutting out the bangs and facial expression parts, add the parts that have holes to them as shown below.
As you can see from the comparison, the outline is also added.
When adding holes in the head, paint the shadow color of the falling shadow, assuming that the bangs swing.
This time, the bangs were cut together, so the shadow of the bangs is also a part. If you want to move richly, you need to divide the bangs and shadows of the bangs finely.
[About layer composition mode]
If you use the layer composition mode [Multiplication] when classifying shadow parts, it will cause discomfort such as darkening of the part where each shadow overlaps. For this reason, in part division, the composition mode [Normal] is basically used, and division is performed while adding the shadow color that is visible.
Re-arrange the facial expression parts that have been cut out, and add the parts that were hidden behind the hair.
By rearranging at this time, it becomes easier to check whether the shadow color used for the facial expression part is invisible and separate from the shadow of the bangs.
Recently, in order to clip on the Live2D side in accordance with the movement of parts, it is increasing the number of cases where it is better to add a shadow that is slightly larger than the outline.
■ Sideburns
Next, cut out the sideburns on the left and right.
It is difficult to understand because the sideburns and bangs have been cut out, but it is necessary to add the ears.
The figure below is an enlarged view of the ear.
It is easy to forget to separate the smaller parts and smaller parts.
In order to prevent this from happening, it is important to make sure that there are no missing parts by overlapping with the original picture after cutting.
Add the missing parts and add paint to the cut sideburns.
When you add a part that is largely hidden by other parts, make sure to add it with awareness of the point of origin.
This time, I supposed to fill the upper part of the ear, but if you only add the hidden part and add it shortly, it will look like hair growing from the cheek at the time of animation It may become.
■ Twin tail
Next, cut out the twin tails on the left and right.
Draw and add to the carved twin tails.
The hair knot parts are in close contact with the head, so we assumed that they would not move significantly, so we applied about half of the hair and split the hair.
■ Finish
The face and body are cut in the same way, and the completed parts are shown below.
I tried to move it like Vtuber using these parts.
When producing with multiple workers
When working with multiple people, such as a client, a worker who separates parts, and a Live2D worker, coordination is important.
When cutting out a single JPG image or a PSD with layers combined, it is absolutely necessary to add and repaint.
Depending on the situation, parts that were not originally drawn may be created.
However, resources are limited, such as time and staff. You must minimize the number of parts and parts to be cut with the minimum effort and the highest quality.
The decision on what kind of movement you want to make, what parts are important to separate, or where you can omit it depends on the client's purpose and purpose.
It is important to coordinate what the Live2D worker should do with the worker who separates the parts, taking in the wishes of the client.
About Live2D
Live2D is a unique expression method that allows 2D images, such as illustrations, manga, and animations, to be moved three-dimensionally while maintaining the unique shape and style of 2D.
Experience
Purchase
Users who liked this post


Comment