
*NOTE: All the pictures are from me*
The Basics of a Hand
Introduction
When it comes to drawing hands for character illustration, design,... It can be very challenging.
Hands are very complicated, but I hope this guide will help you learn how to draw them. I'll share with you what I believe are the most important things to learn when you want to draw hands.
Hands are complex because they have many bones, muscles, and tendons. They're also incredibly expressive; they can be used to communicate a wide range of emotions. With a little practice, you'll be able to draw hands that look natural and lifelike.
So let's get started!
Here are the three most important things to know when drawing hands:
The anatomy of the hand. This is essential for understanding how hands work and how they move.
The proportions of the hand.
The gesture of the hand. This is what gives hands their expressiveness.
The overall hand’s shape
Normally, the hand can be divided into two equal parts. However, the fingers can sometimes be longer than the palm, or vice versa. For the sake of simplicity, we'll start by drawing the hand with both halves the same size.
- Start with simple proportions: Just draw one line along the hand (use it as guidelines for the hand proportion), and one line between to separate the fingers from the palm.
- These two components of the hand are the most important in terms of proportion.
When you’re just starting to draw the hand, it is easier to see it like a collection of shapes and you draw those simple shapes first.
There are two types of shapes that you'll need to consider: organic shapes and geometric shapes.
Sometimes when drawing you can’t just use only a geometric shape, because that will make your art too stiff but it is a great way to start.
On the other hand, drawing an organic shape is harder when you’re just starting.
So it is better to combine them.
Geometric shapes are great for starting out because they're easy to draw and they give your art structure. However, if you only use geometric shapes, your hand drawing won’t look natural. Organic shapes are more difficult to draw, but they add a sense of life and movement to your art.
A good way to combine geometric and organic shapes is to start with a geometric shape and then add organic elements to it. For example, you could start with a square and then add curves to create a more organic shape.
Experimenting with different combinations of geometric and organic shapes is a great way to draw hands.
Tips for combining geometric and organic shapes:
Use simple geometric shapes as a starting point.
Add organic elements to the geometric shapes to soften them.
Use lines to create a sense of movement.
Experiment with different combinations of shapes and elements.
The palm of the hand is an organic shape, which can be difficult to understand at first.
A simple way to think about it is to compare it to a slice of bread. The palm is roughly the same shape as a slice of bread. This comparison can help you to understand the palm in a more simplified way.
When you break down the palm shape, it is better to simplify it as much as possible.
GIF Ex.
Starting out and practicing with a shape that is like a palm can help you with drawing hands in many different positions.
Hand’s parts
In the previous step, we separated the hand into two shapes. Now, we're going to break down the fingers into one or two shapes.
By only drawing one or two fingers, you can indicate the direction in which the hand is pointing. This can help you understand the position of your hand drawing and the pose it is making. You can then add more fingers later.
Tips on how to draw it:
Start by drawing a simple shape to represent the palm of the hand.
Then, draw two or three shapes to represent the fingers.
The shapes should be simple and abstract, but they should still be recognizable as fingers.
Fingers don't point randomly, they have a direction and a flow. When you analyze a lot of references, you'll start to see the similarities between different hand poses. 1 or 2 fingers will be the main direction-givers, and the other fingers will follow along.
Ex. Where the fingers point
When you break down hand references into their most basic shapes, you'll notice that they all have a triangular shape in the fingers. This is because the fingers are naturally arranged in a triangular pattern. Once you understand this, you can start to see how different hand poses are just variations on this basic shape.
Ex. Triangular flow
The thumb
In any pose, the fingers will always have some kind of triangular flow to it. You can use the triangular shape as a guideline for the hand pose and fingers.
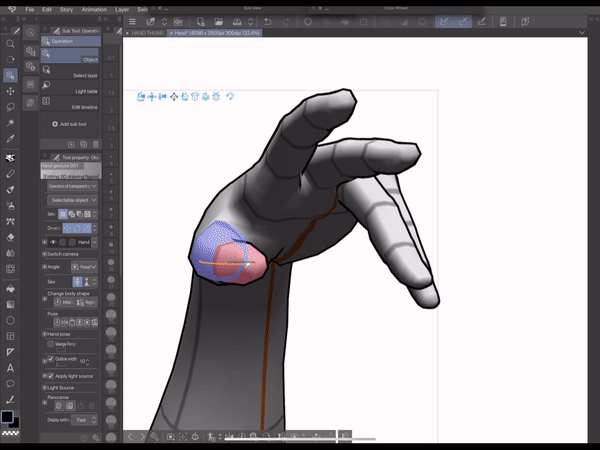
Now let’s move on to the meaty part of the thumb. Again, we can combine different shapes to draw this part. You can use a round or a rectangle shape whichever you find easier to draw or whichever you think looks better in the context of your drawing. Personally I like to use a rectangle outside and a rounder, softer shape on the inside.
Rather than drawing a complex thumb shape, you can think of the thumb as a slice of lemon. But that can only work for a limited number of poses.
If you want to draw the thumb in more complex poses, you can also think of it as a round triangle. This will help you to understand the 3D shape of the thumb and how it changes as it moves.
The shapes you see here are part of the thumb. The technical name for this area is the thenar eminence, or the thenar muscles.
The thumb is made up of three simple shapes:
Round triangle
A cylinder
A rectangle with rounded part inside the palm
You can draw these shapes simplified or manipulate them to fit your drawing reference. For example, you can stretch the cylinder to make the thumb look longer or squeeze it to make it look shorter.
Tip: You can manipulate the shapes, to stretch it or squeeze it
Once you're comfortable drawing the three basic shapes, you can start combining them to create more complex poses.
Try drawing some simple hand gestures at first to get a feel for how the shapes fit together. Then, you can start placing the shapes in the palm of the hand. This will help you to get a better sense of the proportions of the hand.
Combine all
Now that we understand the single shapes that make up the hand, we can now combine all the techniques.
The proportion of the palm, thumb, and fingers should be accurate, but you can draw the fingers as simple shapes, such as boxes or lines, if you think that is enough to convey the direction.
As for the fingers, you can draw it as a box or just a line if you feel that line is enough to be understood.
The proportion of the palm, thumb, and fingers is important when drawing a hand.
One or two fingers can be used to indicate direction.
Tip: You can use this as a sketch for your hands drawing.
Hand Anatomy
The proportions and bones
We are going to focus only on 3 main parts of the hand:
Fingers (Phalanges)
Palm (Metacarpus)
Wrist (Capus)
The fingers are the longest part of the hand. They are made up of three bones each, called phalanges. The thumb only has two phalanges.
The palm is the middle part of the hand. It is made up of one bone, called the metacarpal.
The wrist is the base of the hand. It is made up of eight small bones, called carpals.
Tip: For the wrist, we can group up all the small bones and shape it like a half circle.
Take the distance from the wrist to the end of the middle finger and divide it in half.
This marks the end of the metacarpus, at the knuckles. To find the three finger join, divide in half and again. From there, divide it into smaller parts, divide the middle finger into 2 same length parts.
Ex. The proportion on an adult
Ex. The proportion on a teen
Ex. The proportion on a child
The back and the palm of a hand have different proportions for the fingers. On the back, the fingers appear longer. As for the palm, the fingers look shorter.
So, fingers appear longer when we look at the back of the hand and shorter when looking at the palm.
The muscles
There are three types of muscles that you need to care about:
- Thenar eminence: Thumb mass on the palm side.
It’s the biggest muscle mass on the palm. It’s like a chicken drumstick. It changes shape as the thumb moves.
Hypothenar eminence: The pinky muscle mass
And finally, the first dorsal interosseous. (It is shaped like a triangle).
The thenar eminence muscles are responsible for the movements of the thumb. They are located in the palm of the hand, at the base of the thumb.
The thenar eminence is the fleshy area at the base of the thumb, and it is made up of three muscles. the abductor pollicis brevis, the flexor pollicis brevis, and the opponens pollicis.
When these muscles contract, they produce the following movements of the thumb:
When you abduct your thumb (move it away from your other fingers), the abductor pollicis brevis muscle contracts. This makes the thenar eminence bulge out on the side of your thumb.
When you flex your thumb (curl it down towards your palm), the flexor pollicis brevis muscle contracts. This makes the thenar eminence bulge out on the palm side of your thumb.
When you oppose your thumb (touch it to your other fingers), the opponens pollicis muscle contracts. This makes the thenar eminence bulge out on both sides of your thumb.
So, the way your thumb is positioned affects the way the thenar eminence muscles look. This is because the position of your thumb determines which muscles are contracting.
The hypothenar eminence is the fleshy part of your palm that's located on the side of your little finger. It's made up of four muscles that help you move your little finger.
When the fingers or the palm bend down, it puts pressure on the hypothenar eminence muscles. This pressure causes the muscles to bulge out, which is why the hypothenar eminence is more pronounced when the hand is in a flexed position.
The hypothenar muscles are responsible for a number of movements, including:
Opposition of the thumb to the other fingers
Adduction of the little finger
Flexion of the little finger
Wrinkling of the skin of the palm
The degree to which the hypothenar eminence bulges out will depend on the amount of force that is being applied by the thumb. If the thumb is applying a lot of force, the hypothenar eminence will bulge out more. If the thumb is applying less force, the hypothenar eminence will bulge out less.
The first dorsal interosseous muscle is a small muscle in the back of your hand that helps you spread your index finger away from your other fingers.
It's located between the first and second metacarpal bones, and it's innervated by the ulnar nerve. You can feel this muscle in the web space between your thumb and index finger.
A bump will appear when you slide your index finger away from the middle finger, in the web space between your thumb and index finger. The first dorsal interosseous muscle, or triangle muscle, is that one.
The fatty pad between your fingers is what bulges out when you bend your hand.
The knuckles
The knuckles of the hand form a curve that peaks at the middle finger knuckle.
This curve can be seen in all hand poses, even when the knuckles overlap.
It can be helpful to think of the knuckles as four ball shapes set into the palm. This will help you to visualize the curve and to draw the hand more accurately.
The skin
The skin on the hand is the final detail to consider. The webbing of the palm extends beyond the knuckles, about halfway to the first joint. The skin between the thumb and index finger also overlaps slightly.
Fingers
Finger proportion
The lower parts of a finger are usually the same length. The upper part is a little shorter than the other two.
A finger can be divided into three parts, but it's often easier to draw only two of these parts.
Tips for drawing finger proportions:
Use a reference photo or drawing to help you get the proportions right.
Start by drawing simple shapes to represent the bones and muscles of the finger.
Guidelines for fingers
You can control the direction of the finger by drawing guidelines first. This will help you to ensure that the finger is drawn in the correct position and that it is pointing in the correct direction.
Tips:
Draw guidelines first. This will help you control the direction of the finger.
The guidelines should be simple lines. You don't need to add any details yet.
Once you have the guidelines drawn, you can start drawing the finger.
Follow the guidelines as you draw the finger. This will help you keep the finger in the correct position.
Once you have the finger drawn, you can add more details. This includes things like knuckles, fingernails, and skin folds.
Additional tips:
Use a light pencil to draw the guidelines. This will make it easier to erase them later if you need to (If you draw traditionally).
Draw the guidelines in different colors. This will help you keep track of which guideline goes with which finger.
Always keep in mind the finger's knuckles and the bones that make up its structure.
The bones in the fingers are what give them their shape and allow them to move. The knuckles are the joints where the bones meet, and they are an important part of the hand's expressiveness.
When you're drawing hands, it's important to remember the bone structure of the fingers. This will help you to draw them accurately.
Tips for remembering the bone structure of the fingers:
Study a real hand or a 3D model of a hand to see the bones.
Look at photos or drawings of hands to see how the bones are positioned.
Practice drawing the bones in different poses and angles.
Ex. Fingers as boxes
The finger can be drawn as a box, allowing you to depict it from a variety of angles, but it won't really look like a finger. Therefore, one option is to draw something that looks more organic.
For example, you can add curves to the edges of the box, or you can add bumps and bulges to the surface of the box.
- Draw boxes first then draw a more organic shape over the boxes.
Two forms combined to form the finger: a cylinder and a round triangle.
The cylinder represents the main body of the finger. It is long and narrow, with rounded ends. The round triangle represents the tip of the finger. It is short and wide, with a rounded top.
When these two shapes are combined, they form the basic shape of a finger. The cylinder provides the finger with its length and strength, while the round triangle provides the finger with its width and flexibility.
The proportions of these two shapes can vary depending on the individual finger. For example, the index finger is usually longer and thinner than the pinky finger. However, the basic shape of the finger remains the same.
Tips:
Start by drawing the cylinder shape.
Then, draw the round triangle shape on top of the cylinder shape.
Adjust the proportions of the two shapes to match the finger you are drawing.
One way to draw organic finger shapes is to start with a simple 2D shape and then add depth and volume. For example, you could start with a basic triangle and then add a third dimension by extending the sides of the triangle. You could also add curves to the shape to make it more organic.
Once you have the basic shape of the finger, you can start adding details, such as knuckles, fingernails, and skin folds. You can also add shading to create the illusion of depth.
Tips:
Start with simple shapes. Don't try to draw too much detail at first.
Add depth gradually. Start by adding a third dimension to the basic shape, and then add more details as you go.
Use shading. Shading can help to create the illusion of depth.
To create a 3D effect, draw the gesture first, then add a line that shows additional planes. Then add more planes to the finger's nail and knuckles.
How to draw a 3D finger gesture:
Start by drawing the gesture of the finger. This is the overall shape and movement of the finger.
Add a line that indicates more planes for a 3D effect. This line should follow the contours of the finger and should be slightly curved.
Add more planes on the finger, like the nail and the knuckles. These planes should be smaller and should be located in the areas where the finger bends.
Add shading to the finger to create depth. The shading should be darker in the areas where the light is hitting the finger less.
The fingers all flow to the middle finger. And fingers are not straight.
The fingers of the hand are not all the same length. The middle finger is usually the longest finger, and the other fingers tend to fan out from there. This creates a natural "flow" of the fingers, which can be used to create a sense of movement and gesture in a drawing.
When drawing the fingers, it's important to pay attention to this flow. The fingers should not be drawn as straight lines, but should instead be curved to follow the natural flow of the hand.
Tips:
Start by drawing the middle finger first.
Then, draw the other fingers fanning out from the middle finger.
Pay attention to the curve of the fingers.
The flow of the finger follows the structure underneath.
The finger flow/gesture is rough with many ridges and bumps, and it follows the structure underlying.
The main idea about this is that the structure underneath the finger can affect its shape. It causes the finger to look rugged.
Detailed explanation:
The structure underneath the finger is made up of bones, muscles, and tendons. These structures are not smooth, so they cause the finger to have a rugged appearance. The flow of the finger follows these structures, which is why the finger looks rugged.
The flow of the finger also comes in and out repeatedly three times. This is because the finger is made up of three phalanges, which are the bones in the finger. The flow of the finger follows the shape of the phalanges, which is why it comes in and out three times.
When drawing the finger gesture, you should add varieties to it.
Put curves only when you feel like it will help the gesture of that part of the finger. And put a straight line of gesture if you think it’ll help the gesture.
When drawing finger gestures, it's important to add variety. Don't just draw straight lines or curves all the time. Instead, try to use a combination of both to create a more dynamic and expressive gesture.
For example, if you're drawing a finger that is pointing, you might want to use a straight line to represent the main shaft of the finger. But you could also add a curve to the tip of the finger to give it a more natural look.
The amount of curve or straightness that you use will depend on the specific gesture that you're trying to create. But in general, it's a good idea to experiment with different combinations to see what works best.
1. Variety
2. Gesture flow through the whole finger
Start with a a gesture (That’s the flow)
Add curves depending on where you want to show more bending.
Tips:
Pay attention to the curves of the hand. The fingers are not straight lines, so be sure to incorporate some curves into your drawings.
Don't be afraid to exaggerate. Sometimes, exaggerating the curves or straightness of a finger can help to create a more expressive gesture.
The basic shape that all fingers share
The tip of the finger is made up of a triangular shape, but it's not a perfect triangle. The tip is slightly rounded and softer, which gives it a more natural look.
Draw three points around the tip of the finger (These points should be arranged in a triangular shape), so that the tip of the finger is in the center of the three points.
Then, you can connect the points with curved lines.
Ex. The triangular finger shape
Another way to draw fingers is to use triangles. The triangular shape of the fingertip can be used to create the basic shape of the finger. The body of the finger can also be made up of triangles. By stacking or overlaying two triangles, you can use this method to draw a simple triangle.
Drawing nails
Ex. Nail variations
Variants for the nails: short, long, moderate
The nail bed is the soft tissue that lies underneath the nail. It is responsible for giving the nail its shape. The nail bed curves slightly at the tip, which is why long nails tend to curl down.
Nails can be shaped in many different ways, but what I think are the most common shapes are oval, rectangle, and triangle.
How to draw it:
Start with the basic shape. The nail is basically a curved paper, so you can start by drawing a simple oval shape or a rectangle
Draw more curve into that shape
Pay attention to the proportions. The nail should be about one-third the length of the fingertip.

Ex. Gif process of drawing nails
- I start with drawing a rectangle, the line I draw curve towards the tip of the finger.

- Then I draw a rectangle inside the finger and change its shape to match the length of the nail.
3D hands figures
What kind of figures should you use
Which kind of figures should you use to draw hands?
Ex. Real hand figure
Ex. 3D hand figure
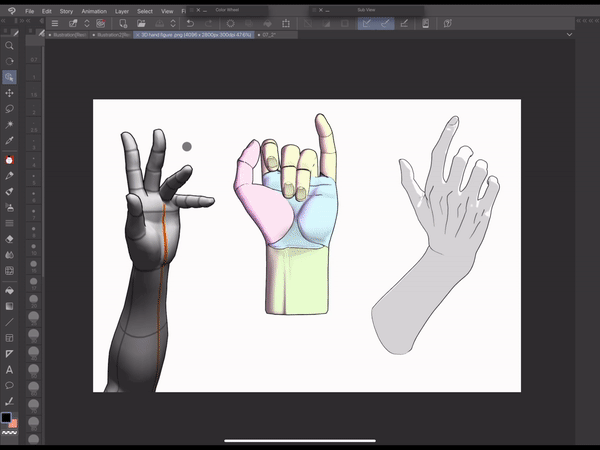
3D figures: There are many 3D models of hands available online. These models can be a great way to get the proportions and angles right.
The best kind of figures to use depends on your individual needs and preferences.If you prefer to look at a real object to reference when drawing, then real figures are the best option. However, if you’re looking for a more convenient and versatile option, then 3D figures are a great choice.
Here are some additional tips for choosing the right kind of figures to use for drawing hands:
Consider the pose or angle you want to draw. If you're not sure what pose you want, look for a reference photo or drawing.
Think about the level of detail you want. If you want a very detailed drawing, then you'll need to use real figures or high-quality 3D models.
Think about how much money you are willing to spend before buying a real or 3D hand figure.
Where can you get 3D hand models
You can get it in Clip Studio assets, and several other websites run by third parties.
LINK: https://assets.clip-studio.com/en-us
Another way to find Clip Studio assets:
Click on the Clip Studio icon in the upper left corner. In the menu that appears, select "Open Clip STUDIO."
There, you can find Clip Studio Assets in the left.
You can search up 3D model here:
After opening the “Detail” menu in the right upper corner, you can select the option “3D object” to make it easier to search 3D hand models.
Another way to search is just to type in the keywords.
Clip Studio Assets has a wide variety of hand models and references that you can use for free or paid.
You can also find 3D models of hands on third-party websites, such as Acon3D.
Here are some of the 3D hand models you can use:
- Free:
- Paid:
When choosing a 3D hand model, it is important to consider the following factors:
The quality of the model: The model should be high-resolution and accurate.
The price of the model: The price of the model will vary depending on the quality and features of the model.
The licensing terms of the model: The licensing terms will determine how you can use the model.
Once you have found a 3D hand model that you like, you can download it and use it in your projects.
How to use it
I will use Clip Studio Paint 3D model as an example:
To find the material menu, simply go to the Menu Bar → Click on Window → Material → And click anything in the yellow box.
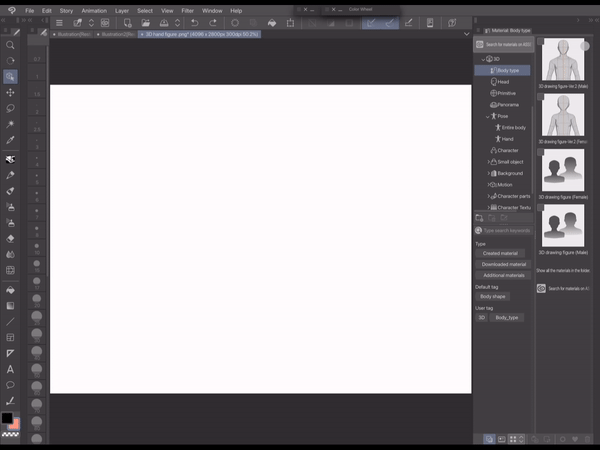
Simply drag in the material.
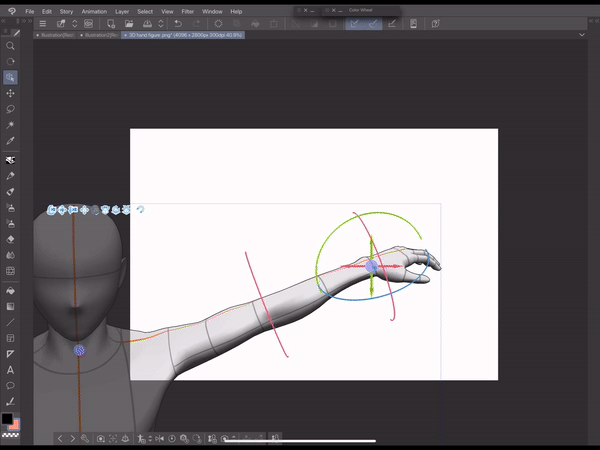
From here, you can start to play around with the model however you like
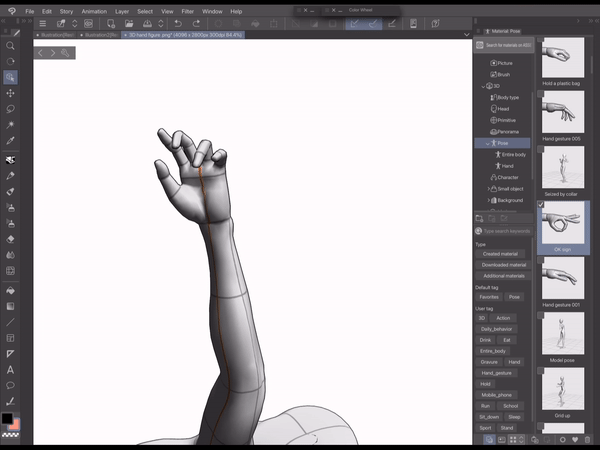
You can also drag in any hand pose you like from the pose section. To do it, simply drag in the hand pose onto the hand model.
Another feature that to help posing hands:
Click on the 🔧 (Wrench) icon → Pose. In the new version (2.1.0) it changed to “Hand pose”
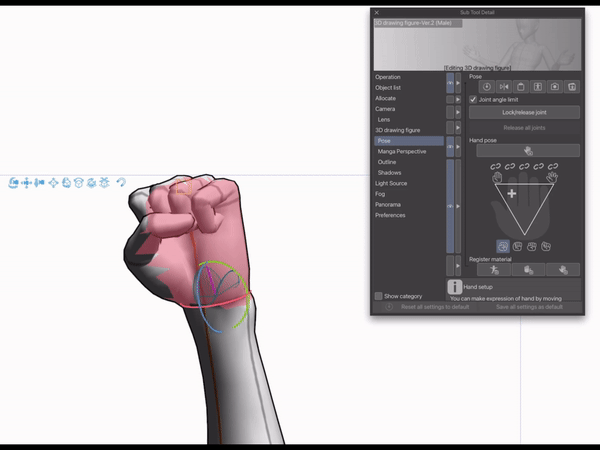
From this point, you can experiment with how the fingers can spread apart and how the hand can close into a fist.
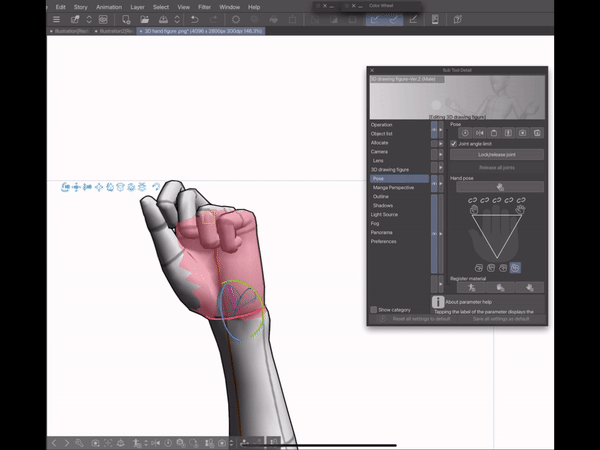
Another way to pose your hand model is to use the camera option. You can use your hand for this or a figure that resembles a hand also works. To do this, click on the Hand icon in the “Pose” menu. *For the new version (2.1.0) it’s “Hand pose”*
How to use it for practicing
In addition to using the 3D model as a reference, you can also challenge yourself: by looking at the model from one angle BUT draw it from a different angle.
Once you have finished drawing, you can rotate the camera to match your drawing angle to check your accuracy.
You can improve your ability to create hands out of thin air by doing this practice.
Here's how to go about doing this practice:
1. Posing the model to whatever pose you want.
2. Start drawing the pose from a different angle.
3. Rotate the hand model to match the angle you imagined.
4. Find and fix your mistakes.
Problems when drawing hands
When you can’t draw hands in perspective
Drawing anything in perspective is hard, but to draw hands in perspective is even harder.
Here are some tips on what to do when you can't draw hands in perspective:
- Start by understanding the basics of perspective. This means understanding how objects appear to change size and shape as they get closer or farther away from the viewer.
- Use guidelines. This can help you to place the fingers and other parts of the hand in the correct perspective.
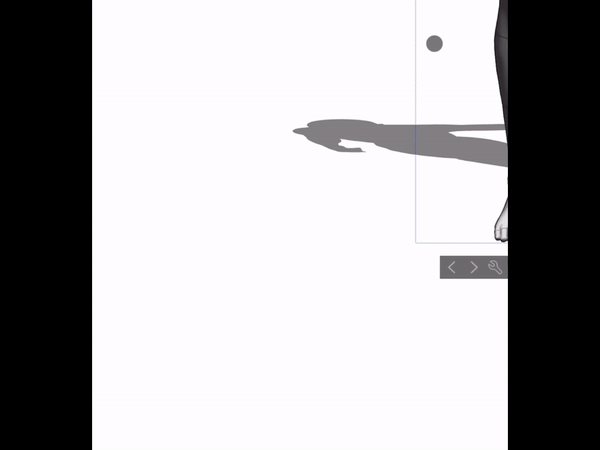
Ex. You can use the guidelines on the 3D model to know and understand how to draw a particular perspective.
Having difficulty drawing hands in proportion to a character's body?
Generally, the arm length reaches under the hips for most people. The average arm span for a human is about equal to their height. This means that if you stand up straight and extend your arms out to the sides, your fingertips will be about level with your hips or under your hips a bit.
When you're drawing a character or portrait, and you're not sure where to put the hands, here are a few tips:
- Consider the character's pose. Where would the hands naturally go in that pose?
- Think about the character's personality. What kind of things would this character be doing with their hands?
When you can’t make the hands look good
What do you do when your hand drawing doesn’t look good?
Well, not every pose will be good. Some poses look worse than others, some look good. If you’re struggling drawing a specific pose, then I suggest you to:
Take a break. Sometimes, the best thing to do when you're stuck is to take a break and come back to it later. This will give you a chance to clear your head and come back to the drawing with fresh eyes.
Look at other drawings. Studying the work of other artists can be a great way to learn new techniques and get inspiration. Pay attention to the way they use lines, shapes, and shading to create their drawings.
- Take your time. Don't rush the drawing. Take your time to get it right.
How to practice drawing hands
Practicing ways
Tips:
Use references
Start with a loose sketch
Look in the reference and see what types of shapes it have, some poses may not have that same shapes
Exercises:
10 or 15 minutes challenge: Put a timer on and draw as fast as you can from a reference
2 or 5 minutes drawing hand gesture: In this exercise, you don’t need to focus on the structure. Follow the flow of the reference that it has
After observing reference images for 5 minutes, attempt to draw the hand from memory.
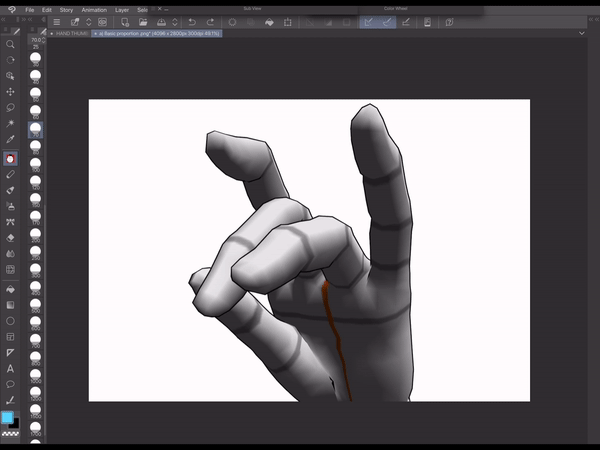
Ways to use the Sub View feature in Clip Studio Paint:
To have it, → Window → Sub View.
Some fun challenges
30-second gesture drawings: This is a great way to warm up your hand and eye coordination. Set a timer for 30 seconds and draw as many hands as you can in that time. Don't worry about getting the details right, just focus on capturing the overall gesture of the hand.
Hands in action: Find some reference photos of hands doing different things, such as holding objects, gesturing, or playing an instrument. Try to capture the movement and expression of the hands in your drawings.
Hands in different styles: Experiment with different drawing styles, such as realism, cartoon, or abstract.
Try using a template of emotions to convey the emotion through the hands. This means using the same facial expressions that you would use to convey an emotion, but instead of drawing a face, you draw hands. For example, if you want to convey happiness, you could draw hands that are open and relaxed, with the fingers spread wide. If you want to convey sadness, you could draw hands that are clasped together tightly, with the fingers curled inwards.
There are many different drawing challenges available online that you can try.
Bonus
Avoid simply copying what you see. Instead, focus on two things: accuracy and design.
Accuracy refers to accurately capturing what you are seeing. To do this, practice seeing proportions and details with accuracy.
Design involves modifying, manipulating, and adapting things to fit any circumstance. Whether they are true or not, the goal is to make something look good, lively, etc.
Both of these concepts are important to get good at.
The first step is to simplify shapes. This means training your eyes to see accurately and being able to break from reality to draw your own shapes that you see with your head, not your eyes.
Shape simplification is not an easy task. More than just replicating what you see, though. It means processing what you see and making a lot of choices.
Well my hand guide has come to an end 😽
I hope you found something of value in this. Thanks for viewing 🩵
Users who liked this post


Comment