How to Paint Snow ❄️ Winter Landscapes that Tell Stories
Video version:
🌟 This tutorial is beginner-friendly! 🌟
Some of the technical tricks may look intimidating at first, but don’t be afraid to try them :)
Text version:
Hello!
I’m .avi. I work as a professional game illustrator and creating comics and webtoons is my hobby.
Since I began working on my webtoon, which takes place in winter mountains, I’ve been researching a lot about snow and winter landscapes.
In this tutorial I’d like to share what I have found and tips on how to paint various types of snow and snowy landscapes to tell a story through them.
I’ve also prepared a set of brushes I made for painting snowy landscapes, which you can download from Assets for free!
The brush used to paint the green of the fir tree is part of another free brush pack:
I’m going to skip general landscape guidelines like composition, focal point, perspective, etc., as I have already covered these in my previous tutorial:
I’ve also made a special tutorial on painting sky in various weather conditions, winter included:
❄️ CHARACTERISTICS OF WINTER LANDSCAPES
🟦 Low angle of the sun
As we have learned at school, due to the Earth’s tilted axis, winter days are shorter and the sun is relatively low even at noon.
The color of sunlight shifts towards red as the rays have to travel longer through the atmosphere, and shadows are longer.
That gives us the opportunity to have fun with accent colors on the boundaries of shadows and light!

🟦 Snow makes everything brighter
Snow reflects most of the light it receives back into the environment, lightening up shadows and making the whole scenery appear brighter than it would be without snow.
🟦 Atmospheric perspective
During winter the atmosphere is often full of moisture or ice crystals. Fog or haze appear easily, making atmospheric perspective even more prominent.
Even with clear blue sky, ice crystals are lifted by wind, creating a special kind of fog “diamond dust”, which is a great effect for creating depth in your picture, as well as indicating chilly but dry weather.
🟦 Sky
When it snows, the sky is cloudy. The clouds are mostly without prominent shadows, as opposed to summer rain clouds, and their base is often illuminated by city lights.
On the other hand, in mountains weather conditions change so quickly that you can have snow falling with half of the sky clear. You can take advantage of that to create interesting effects!
Moreover, in mountains the cloudless sky is deeper blue than in lowlands, as they’re literally closer to space! The deep blue sky is beautiful on its own and creates a great color palette with the contrasting snowy mountains.
❄️ PAINTING SNOW
🟦 Colors of snow
Since snow reflects most of the light rays, in lit areas it reflects the color of the light, whereas in shadows it takes on the color of the atmosphere.
If your sky is blue, the snow is bluish as well.
Don’t be afraid to use saturated colors, even when drawing muddy and dirty snow!
For example, this painting was intended to give off the feeling of a dull gray lonely evening, with the only dim colors coming from the lights of the town.
But if you look closely, it’s actually full of colors, especially reddish, purplish and greenish shades, which, combined, create the greyish feeling.
Be careful not to make shadows on snow too dark, or else it will look dirty or even not like snow at all…
When it’s overcast and there’s no light source the shadows on snow don’t really turn darker, only the lit up areas disappear and the colors of the snow get unified.
Even at night avoid making the snow too dark.
I learned my lesson in these two panels where the car ends up in a shadow and the overall mood was meant to be darker, but the light from the headlights made the dark snow look like muddy shaved ice… :D
It took me a while to figure out that in addition to making the snow shapes rounder and taking down the glossiness I needed to lighten the whole layer of snow quite a lot!

🟦 Snow from various distances
💎 Distant elements
When painting snow on mountains I just use the same brush as for the rocks. The light rocky texture blends the snowfields with the mountains, imitating snow caught in the crevices.
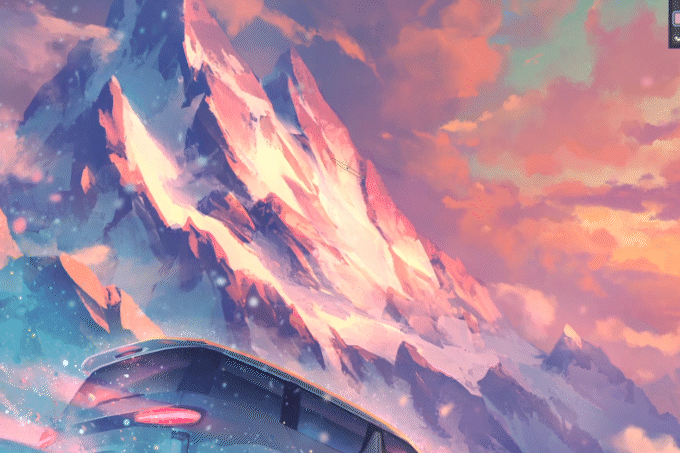
Just be careful to keep track of where the snow can physically accumulate. While it can stick to vertical surfaces, the sharp tips of rocks are typically snowless.
Flat shading with slight gradients for distant and mid-distance snow works best, as excessive scattered highlights lead to it looking more like shaved ice.
Due to the snow fields being highly contrasting, elements like trees, rocks or houses can be simplified into silhouettes even up to mid-distance.
In a snowy forest you can paint snow on branches and lights only on the foremost trees and the viewer’s mind will automatically imagine the rest!
Painting snow and highlights on each branch of each tree will make the image look artificial and noisy…
💎 Mid-distance
The way the snow is painted in mid to close distances is the most important to expressing the weather conditions.
💎 Wet snow
For painting wet snow, which indicates temperatures around 0°C, use a semi transparent brush (may have a rough texture). Leave out some half-covered patches through which the underlying surface could be seen, and make it look glossier:

I sometimes use downloaded ground brushes, but they tend to have too much noise in them which is often needlessly distracting, especially when you want the viewer focus on your character that is painted in a clean style, when you add sharpening or other filters to your finished painting, or just want to keep your paintings clean and cartoonish.
I found a quick solution to that by running the layer through the Smart smoothing filter to get rid of the noise. This filter may not be well known but it’s a very powerful helper!
Wet snow is often accompanied by big, heavy snowflakes and misty haze due to high humidity.
💎 Powder snow
For powder snow, typical for mountains and cool areas, use an opaque brush with minimal fine texture. Paint it in loaf shapes and big lumps.
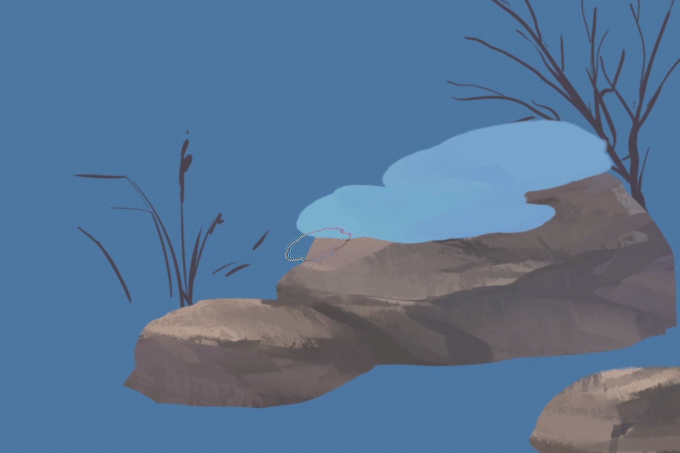
Pay attention to the volume. Even snow caught on branches of trees forms loafy shapes:
Using the Lasso fill tool for blocking out the shapes is also a quick solution:

When painting snow on deciduous trees, you can save some time with this method:
1 . Ctrl-click the layer icon of the tree or branch to make a selection of it.
2 . Expand the selection a few pixels.
3 . Fill it with the snow color on a new layer.
4 . Nudge the snow layer upwards.
5 . With the Liquify tool, make the snow “sit” on the branches.
6 . Erase the parts that are hidden behind the foreground branches, on vertical surfaces and randomly on thin branches.
7 . Add more snow on where you feel it could accumulate more, typically on thicker branches or at the forks.

💡 TIP: I use the selection shrinking and expansion commands so often that they were the very first set of actions I made – I highly recommend that for saving time!
As for shading, you can paint the lights in white color on the same layer with locked transparency.
Just avoid making completely white areas to have better control of eventual adjustments and post-processing. The blending brushes that mix with base color will help you with that.
This is the shading technique I like to use the most:
1 . Clip a new layer in some of the lightening modes on the color layer.
2 . Paint the lit areas on it.

It’s a non-destructive technique that allows easy adjustments later, like when you need to change the color of the light to fit the atmosphere!
Don’t forget to add cast shadows on snow cover – with the aforementioned technique you can just erase parts of the lighting layer to create shadows.
As explained before, keep even the deepest shadows light or else the snow will look dirty.
💎 Snow ball
For painting snow balls up close, I found round opaque brushes with blending work the best. A splotchy texture in the brush adds a nice fluffy feeling to it!

💎 Snowflake
Last but not least, painting a snowflake is super easy thanks to CSP’s symmetrical ruler!
You can set up the ruler with 12 lines (as snow crystals are hexagonal) with Line symmetry.
It’s said that no two snowflakes are the same so the shape is all up to your imagination!

For a more realistic feel keep the edges opaque and leave some of the inner parts semi-transparent.
🟦 Special effects
As explained in the beginning, in strong sunlight the edges of shadows can have very prominent colors.
You can use various layer modes to help you create the effect and paint orange, red or purple along the boundaries of shadows and light.

If you have painted the lights on a separate layer, you can easily create the edges thanks to them:
1 . Ctrl-click the light layer icon to make a selection of it.
2 . Expand it a few pixels.
3 . Fill it with the desired color on a new layer.
4 . Make the selection of the light layer again (by ctrl-clicking its layer icon).
5 . Delete that selected area from the previously created layer.
This way you get an “outline” of the light layer! You can play with the layer modes and blur it to fit your painting.

Another winter effect associated with cold but sunny weather is the diamond dust, which consists of snow crystals lifted up by wind.
For background, you can use the brush from the pack or any fog and dust brushes. For the foreground, you can play with colorful bokeh lights that the diamond dust makes!
🟦 Snow as a storytelling device
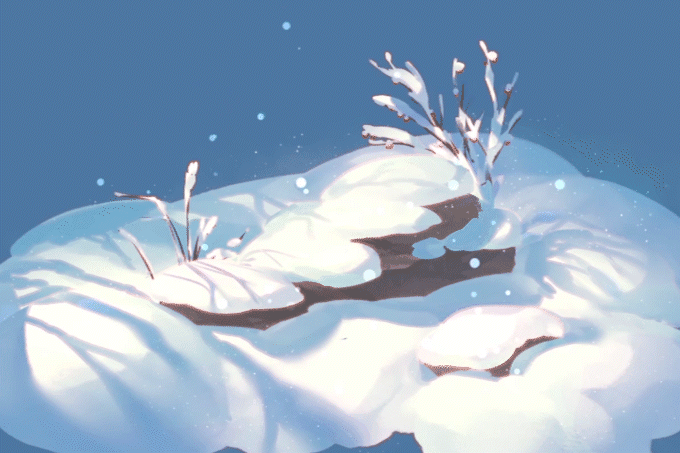
Snow can be surprisingly powerful when it comes to telling stories through it!
You can take advantage of the forms, color and light to tell the weather conditions. Shadows falling on snow cover can indicate an edge of a forest, snow staying on grass blades and thin twigs shows gentle breeze or windless conditions.
💎 Footprints
A lot can be told by footprints in a snow field.
I recommend painting shapes of the footprints on a new layer, and use it as a mask to paint in shadows and lights. Add lumps of snow around each footprint.

Making the footprints shallow with less lumps around tells the viewer the character went for a leisurely stroll…
…While deep footprints where you can’t even see the bottom and a lot of big lumps around hint on heavier circumstances, like the character struggling through deep snow on their escape or in search for someone.
💎 Falling snow
Flying snowflakes are great effects for adding motion to your painting!
I use modified downloaded brushes that follow the line direction and their thickness changes with velocity. With slow strokes, they paint round snow, while with quick strokes I get flat snowflakes riding a strong gust of wind:

To speed them up more you can add motion blur or duplicate the layer, change the color a little and move it in the direction of the movement by nudging the layer or with the help of the Liquify tool:

Remember that wind often changes direction, which you can use for storytelling too!
For example, in the opening of my webtoon, the reader’s eyes are guided through the chapter title screen to the first frame by the direction of the snowy wind gusts, on which one bigger snowflake rides:
In action scenes, the snow flies in the direction of the movement as part of the action effect:
However, when the car runs off the road and gets stuck, the snow flies against it from above as if battering it deeper into the snowdrift to further hinder the escape:
On the contrary, round snowflakes scattering in all directions indicate slow and light snowfall. Together with the fog and lights they create a dreamy haze in the evening town.
In this picture in particular, the colors and lights dimmed by the haze give off a melancholic feeling and the falling snow illuminated by the street lamps emphasizes the empty space behind the character, adding to his loneliness as he turns around to find there’s nobody following in his footprints.
The haze effect is easily amplified by making a merged duplicate of the finished painting, setting the layer to Lighten and blurring it:
The color of falling snow should be slightly lighter than the snow on the ground to make it more visible, but never darker than their background, or else it will look like soot. Only a snowflake passing in front of a light source will look natural darker.
A lazy way to avoid soot is setting the layer on Add or Screen mode:

With the transparency of the falling snow layer locked, you can paint-blend the snow further into the background, as well as add more color variety, or even lights on close-up snowflakes:
To add more depth to your picture, blur the foremost snowflakes, and eventually the furthermost.
In case the falling snow ends up being too distracting, blurring it as a whole usually solves it.

💎 Breath
Lastly, the effect I often forget and need to go back to fix: the clouds of characters’ breath.
It may seem minor, but it’s what gives life to your characters, similarly to them blinking once in a while in animation.

❄️ CONCLUSION
These were some of the interesting tips that I learned about painting snowy backgrounds and effects!
I hope they will help you have a lot of fun when telling stories through various winterscapes!
🌟⭐✨ If you enjoyed this tip, it will make me happy if you give a like so that I know I’m doing things right, eventually leave a comment on where I could improve :) ✨⭐🌟
✨ BONUS: timelapse videos of the presented paintings ✨
For those who wanted to support me, I don’t have a Patreon nor I plan to get one. I’m doing this purely for the fun of sharing knowledge :)
I appreciate your messages and thoughts very much, though, thank you!
(´。• ◡ •。`) ♡




Comment