
What is WEBTOON?
WEBTOON introduced a new way to create stories for anyone who has a story to tell. We’re home to thousands of creator-owned content with unique and diverse visions from all over the world.
Founded by NAVER in 2004, WEBTOON became a cultural phenomenon and pioneered the distribution and consumption of web-based comics in Korea. Now WEBTOON has expanded to provide content in many other languages, such as English, Spanish, French, German, Japanese, Thai, Indonesian, and Chinese.
WEBTOON has a massive collection of comics that we call ORIGINALS. These works of art come in all types of genres ranging from romance, horror, comedy, fantasy, and more.
Oh, and did we mention that we started a whole new way for you to create stories? Thanks to our self-publishing platform, CANVAS, any creator can share their stories with millions of readers across the world!
What is CANVAS?
CANVAS is WEBTOON’s self-publishing platform, where creators manage everything related to their series. Posting on CANVAS means that you, as a creator, have all control over all aspects of your story and can use the platform to build a unique audience thanks to the thousands of readers that visit the platform each day.
Creators around the world can use the platform to publish their stories, create and grow their own community, interact with readers and creators alike, and yes, even earn money thanks to our Ad Revenue Sharing Program. Who said being an artist wasn’t lucrative?
Preparing your story for CANVAS
Formatting:
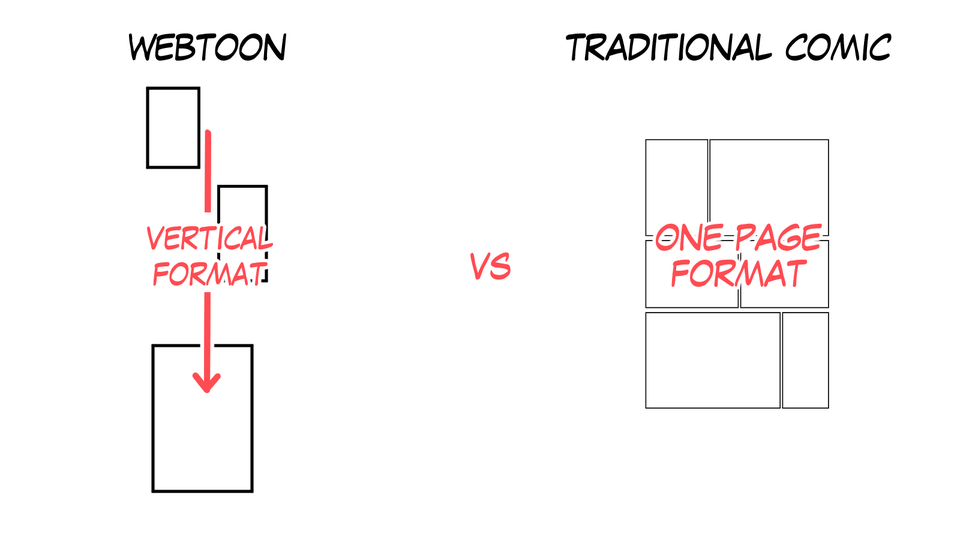
Unlike traditional comics which are meant to be read in a print format, WEBTOON is a mobile-based platform, meaning that the content has been formatted to be read vertically.
Through the vertical format, reading a WEBTOON series is meant to feel like a cinematic experience since the reader can only see one panel at a time instead of the entire page like a traditional print comic.
This gives the creator the ability to plan the reading experience in a way that can affect the pacing of their story, providing the reader with an optimal reading experience.
Most of our users use the WEBTOON APP to read their favorite series on a mobile device instead of a larger screen like a computer.
This means that most likely your story will be read on a small screen. Be sure to check readability on a mobile device when creating your comic to ensure that your font size is large enough to be comfortably read on a smartphone. If your reader is squinting, you’re probably doing something wrong.
The actual sizes of font vary by canvas size, resolution, and the type of font being used. Generally, most creators use a font size between 12px and 30px for standard text.
Basic formatting rules for vertical content:
(Remember that rules are meant to be broken, however, our editors have found that these spacing guidelines tend to work well on ORIGINALS)
Give readers space to appreciate your art by including a maximum of two panels on the screen at the same time
- Keep it easy to read, three speech bubbles or less per panel is ideal
- Vary panel width, shape, and size to imply importance and impact
- Panel to panel scenes should have a minimum distance of 200px per panel
- If there is a location or scene transition, allow for 600px to 1000px of space to convey a sense of time passing.
-These guidelines are meant for a canvas width of 800px
- This Tips article also contains great information on transition techniques
Pre-production
There’s more to creating a series than coming up with a cool idea. When planning out your story, it’s essential to plan how you intend to create it. This process is known as pre-production or planning.
Within that process are key points like:
- story structure
- script
- art style
- upload schedule
Unsurprisingly, our most successful CANVAS titles are consistent in all of these points.
Story structure and script:
Good stories need to have:
- characters
- a setting
- a plot
- a conflict
- and of course, a resolution
Characters:
Creating believable characters is one of the most important tasks for any creator.
When developing a character for your story, consider their parameters in order to have a good understanding of who they are, this will ground the character in your story and make them seem more believable to the viewer:
1. What is their role in the story?
2. What is this character's intended arc? A character arc is usually the internal journey a character goes through over the course of the story.
3. What are their strengths and weaknesses?
4. What relationships do they have with other characters in the story?
5. What is their motivation?
It’s good to develop a character turnaround to help you keep their design consistent, here is a great example of that!
Setting:
This is the location of the action which includes time and place (when and where.) Usually the setting is introduced alongside your characters at the beginning of your story so readers understand the world in which the characters live and the rules with which that world operates.
Plot:
The plot is the actual story. A plot should have a beginning, middle, and end, with a clear conflict and resolution:
Conflict is usually a problem the plot is intended to resolve, and without conflict, there’s no story to tell.
Resolution is the solution to the main conflict of the story. It’s important to make sure that resolution feels earned by wrapping up the main story conflict, character arcs, and setting.
Production
Making your story a reality
So, you planned out your story and now you’re ready to get to work. Great! But how do you get started?
The most common production stages are:
1. Thumbnails: This is when you plan out your panels based on your story. These are intended to be very loose, simple drawings that will help you understand how the episode will be structured.
2. Sketches: Once you’ve created your rough thumbnails, you’re ready to start sketching your characters and backgrounds, this is also the stage when creators plan out the placement of their speech bubbles.
3. Inking: This is the process of cleaning up your lines to create a more polished look
4. Coloring: Most of WEBTOON’s ORIGINAL titles have some sort of color, as they tend to provide a more appealing reading experience. However, it isn’t required to color your title to upload to CANVAS. If you do choose to color your series, think about how color can be used to capture the mood of a scene. We recommend researching color theory and how color can represent different emotions, settings, and moods.
5. Finalizing: This is when creators add speech bubbles, special effects, lettering, and title cards. Title cards include the series title as well as an end card, where we recommend including your social media handles at the end of an episode so your readers can find you outside of CANVAS. This is a great way to promote your series on other platforms and encourage more people to read your title.
Helpful Clip Studio Paint Functions
Clip Studio Paint has a lot of amazing functions to help you in creating your series for WEBTOON CANVAS! Here are some of the functions we think would be really helpful.
Creating Panels:
Select [Frame Border] -> select [Rectangle Frame] in the sub tool. This tool will allow you to draw within the area of the frame,
or Click [Figures] select [Rectangle] in the [Direct draw] Sub tool. In the Tool Property, in [Line/Fill], select [Create line]
Using 3D Models:
Click [Search for Materials and Assets] - included in materials are 3D drawing figures to help with difficult posing
You can design the models to the form you need for your character
To download model, Click [Material] Palette -> [3D] -> [Body Shape}. Drag and drop it on to the CANVAS from the [Material] palette to use.
Backgrounds:
Backgrounds can be difficult and time-consuming! Clip Studio Paint has some helpful tools to create backgrounds fast and easy!
Perspective Ruler:
In Clip Studio Paint, you can draw accurate perspective lines freehand using the [Perspective ruler].
To download Select [Layer] menu -> [Ruler - Frame] -> [Create Perspective Ruler], then select the perspective view you want to create via the [Create Perspective Ruler] dialog box.
LT Conversion:
Create a background from a photo or 3D material via LT conversion- The [LT conversion of layer] function can be only used in EX.
Select the layer you wish to convert on the [Layer] palette and then select [Layer] menu -> [LT Conversion of Layer], or click [Extract Line] -> [Execution of LT conversion of layer] from the [Layer Properties] palette.
For more information about Clip Studio Paint, you can check out our dedicated tutorial on CANVAS Corner
Upload your story on CANVAS
When you’re uploading on CANVAS, make sure that your comic strip is uploaded in accordance to our sizing guidelines, to ensure that your episodes will load quickly and consistently on the platform.
The sizing requirements per image are 800px by 1280px. However, most episodes will be much longer than that but don't worry our system now automatically optimizes and slices your image into multiple images to fit within the maximum image dimensions
Once you’re ready to upload by clicking on the “Publish” button on the top right corner of the WEBTOON homepage. This will take you to the series creation dashboard, where you will select your series genre, type your series title, summary and upload a thumbnail.
Series title:
This is arguably the hardest part of creating your story. The title is the first thing that a reader will see and remember. Ensure that the title best represents your story and is easy to remember so your readers can find your title within CANVAS.
Summary:
The summary will show up on your series homepage. It’s your chance to give a potential reader a brief idea of the story they are about to read. Make sure that it captures the reader’s attention to encourage them to start reading while also keeping it under 500 words.
Genre:
You must set at least one genre for your title. If you’re not sure what genre your title might fall into, we recommend reading other titles that might be similar to yours.
You can add up to 2 genres per title, the second genre is optional but highly encouraged as it makes it easier to find by readers that could be looking for a new story to read in that genre.
The genres you choose should match the intended story, as it will give the reader an expectation of what the story will be like.
Thumbnail:
This is the cover for your story. Make sure that it’s the best representation possible for it, as it could be the deciding factor between a click and a pass.
Creators use their story’s main character(s) as the image subject, however, this is a great opportunity to show your creativity and passion for your story.
The recommended size for this image is 1080x1080 px. Ensure that the file size stays under 500kb and that it’s saved in a JPG, JPEG, or PNG format.
There is also a verticle thumbnail option the recommended image size is 1080x1920 px, maximum file size is 700kb.
Uploading:
When uploading your episode, you can set your episode title as well as the thumbnail. This is also where you will upload your sliced images. All uploaded images cannot exceed the 20MB size limit.
You can also preview your episode on PC and mobile to ensure that there are no errors or formatting issues.
Dimensions to Remember
- The sizing requirements per image are 800px by 1280px
- Most episodes will be longer than this, but our system now automatically optimizes and slices your image into multiple images to fit within the maximum image dimensions
- For transitions allow for 600px to 1000px to convey a sense of time passing
- Panel to panel scenes should have a minimum distance of 200px per panel
- Most creators use a font size between 12px and 30px for standard text
- An average WEBTOON Original episode has between 30 – 60 panels
Resource Links
Once you’ve reviewed your episode, you’re ready to share your story with millions of readers around the world!
We cannot wait to read your series on CANVAS! Thank you for being a reader on our platform and for sharing your awesome and unique stories with the world!
Creators 101
CANVAS Corner series
CANVAS Corner newsletter
WEBTOON CANVAS Twitter
https://twitter.com/webtooncanvas
WEBTOON CANVAS Instagram
Creators 101 YouTube Tutorials
Illustrations created by Aericchi - Creator of 'I Hate you, I love you' and 'Faked' on WEBTOON CANVAS
Users who liked this post


Comment