
Hello everyone!
My name is Ray from Polysiert Gallerie.
I believe that anyone who change from traditional style art to digital art or some one who is starting to learn about digital art program may wonder “what is layer” in the first place. It may not happen to some of you but it did happen to me once I knew nothing. I need to learn through lots of tutorial on the internet together with lots of practising until I found out what it really is.
I was so grateful for those kind people who posted those helpful tutorials on the internet. They all are my amazing mentors. I won’t be able to achieve digital painting at all without all these people from the internet world. I respect them so much.
Now it’s time to return something to others as well. That’s why I intended to make this tutorial as good as possible to clarify all these elements about “Layer” to you guys.
Here you are, I am going to explain about “LAYER” in Clip Studio Paint from very basic knowledge together with examples for your good understanding :)
Video Tutorial
First of all, if you prefer watching a tutorial video, please feel free to watch this following Youtube video from me.
What is the concept of "Layer" ?
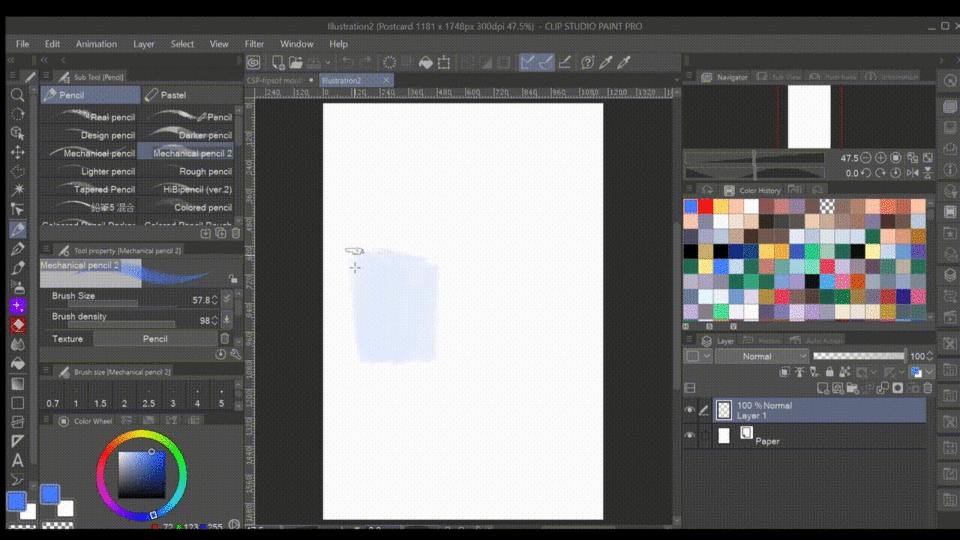
“Layer” works like a transparent sheet which allows you to paint, draw or do any kind of work on it. It can be created as much as you want. When you created a new layer to work on, it may be placed on top or below other layers. The order of the each layer depends on how you organized them. It can be moved freely from top to below. Each layer basically works separately but can be linked to each other if you added some function to them.
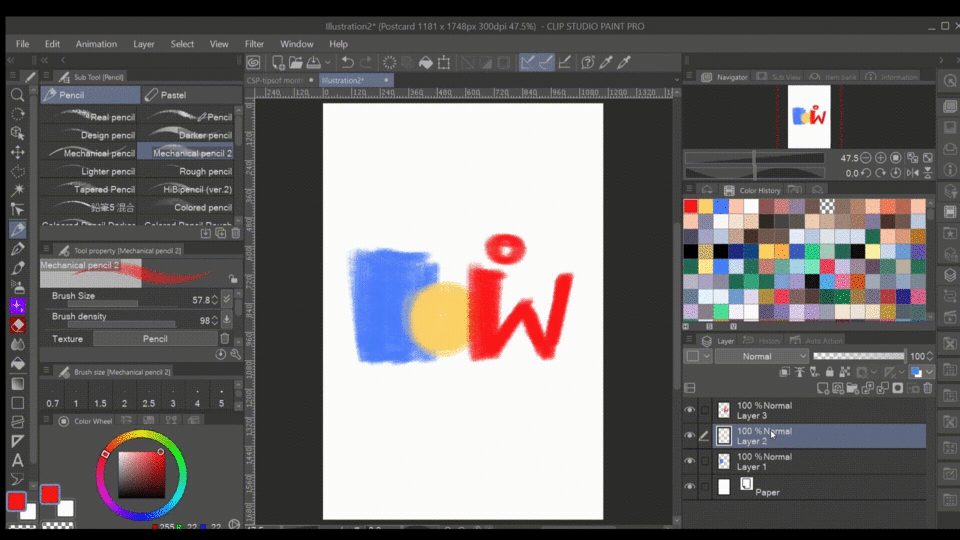
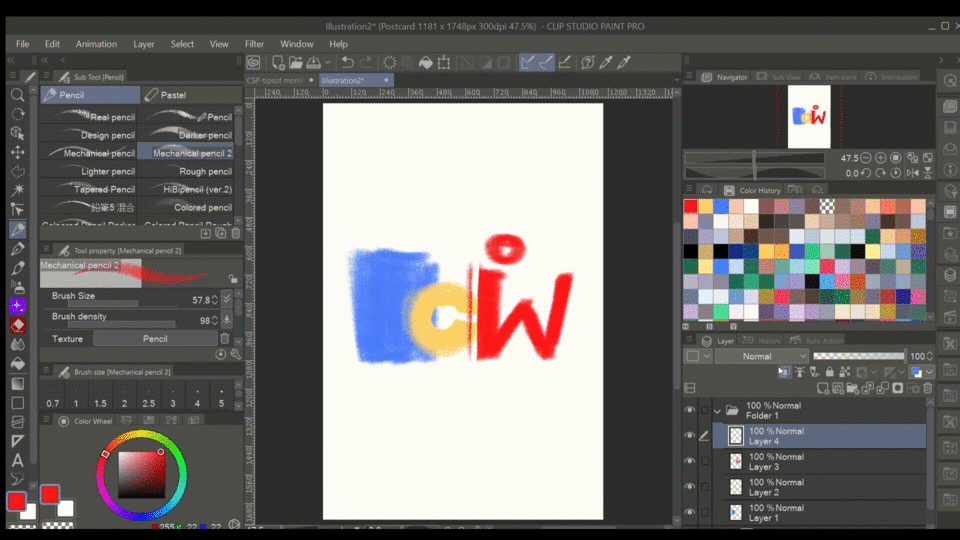
In the below example, I draw a blue square on [layer 1]. Then I created a new layer to paint a yellow circle on [layer 2] and created more layer to draw a random alphabet on [layer 3] with red.
There you could notice that painting on the top layer will usually be placed over painting from the below layer. This means the order of layers in the layer window is the same order as showing up on the artboard.
When any layer was moved either to top or below, the order of painting on the artboard will be changed.
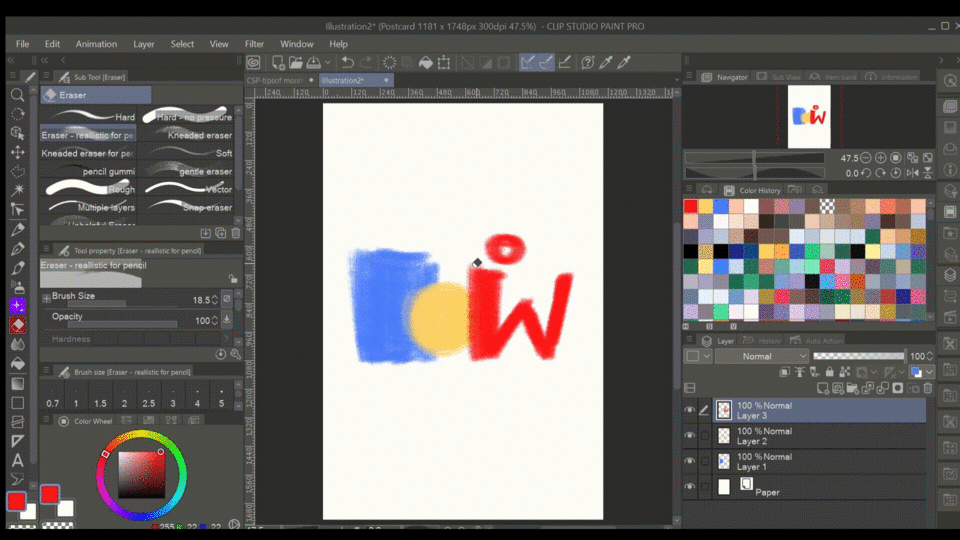
Each layer is separated. When you want to delete or do something on each painting, you need to click working on the right layer. In the example, I delete some part of the red “W” when working on [layer 3]. The yellow circle on [layer 2] will not get any effect, because it was on another layer. If you want to delete it too, you need to click on [layer 2] before working on it.
Learning essential elements on the layer window
The layer window normally located at the below right corner. If the window does not show up there, you can find them from the above menu bar [Window] > [Layer].
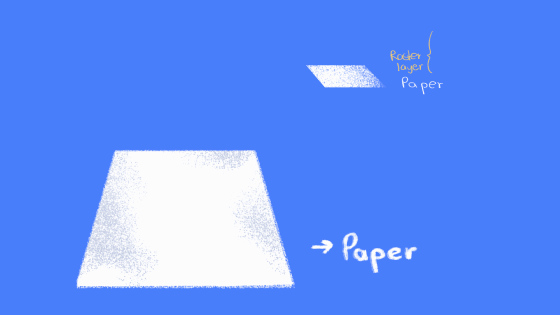
When you create a new illustration, on the pop-up window below, you can choose paper color or disable paper layer in case you did not want a background paper.
After a new illustration was created, in this case there are also 2 layers were automatically created. The first one is [Paper] which is a basic layer for any new illustration unless you clicked disable it. You can change the paper color by double-clicking on the paper icon near the layer thumbnail or clicking on the top right corner of the layer window.
The “Layer 1” above is a raster layer for overall usage in this program.
Note: When you are working on any layer, the layer name tab will become gray to let you know you are working on this layer.
--- Let’s learn about icon on the layer window! ---
No. 1 - The eye means visibility of each layer. When you clicked on the eye and it disappeared, it means this layer is hidden. To get it back, you can just click in this box again.
No. 2 - This icon means you are now working on this layer.
No. 3 – At the layer name, you can double-click on it to change name.
No. 4 - Show opacity value and selected blending mode of the layer (I will explain about these functions after this).
No. 5 – “Show layer in 2 panes” is a helpful function when you have too many layers working on and you don’t want to scroll the scrollbar too many times. This tool will separate layers list to 2 panes. Easy for switching from one layer to another layer.
No. 6 – “New raster layer” is an icon for adding raster layer.
No. 7 – “New vector layer” is an icon for adding vector layer.
Note: A vector layer is usually good for clean and neat line art. Any line creating on this layer can be controlled by [Correct line tool]. Learn more about this type of layer via the tutorial video I provided above. There are some examples to show you how it works differently compared to a raster layer.
No. 8 – “New layer folder” is a tool for organizing your layers into a group. You can manage multiple layers in the same group with one click, e.g. to hide all layers or delete all layers etc.
No. 9 - “Transfer to lower layer” is a function which allows you to transfer all painting from the layer you are working on to the below layer. Then the layer you are working on will be empty.
No. 10 - “Merge with layer below” has the same concept with the function no.9. However, The empty layer will disappear, since it was merged to the lower layer.
No. 11 – “Create layer mask” will add a mask over the layer you are working on. This mask can be used to cover or reveal details on the linked layer without ruining any original details. When you create a layer mask, there will be a white square icon appeared near the thumbnail as in the following picture. Click there to start working on the mask.
Then you can either delete or repaint on the mask layer. Use eraser to delete unwanted part. The deleted part will be hidden under the mask. When you need it back, use any coloring tool, no matter which color, to repaint at the same position you deleted it. The mask will be removed, and deleted details will be back.
Note: It’s important to be aware that you are working on the normal layer or on the mask. Only if you delete unwanted details on the mask which allows you to repaint missing details later.
No. 12 – When you are satisfied with the current layer which is linking to the layer mask and do not want any change. Click on this icon to “Apply mask to layer”. This will fix the layer mask on the current layer permanently.
No. 13 – A bin for deleting layer or folder.
No. 14 - “Clip to layer below” will limit the area on the clipped layer referred to the below layer. When you create a new layer and enable this function, the layer will be marked with a red line in front of its thumbnail. Any painting made on this clipped layer will be like a topping of the below layer. When you disable this function, the clipped layer will become a normal raster layer. Look at the example below for good understanding.
Note: This function is very useful when you want to paint on layer 3, for example, but you are not sure yet that it will look fine or not. Just paint on a new layer with this function, the painting on layer 3 won’t get any effects. You can create clipped layer as much as you want. Just be sure to paint or draw on the right layer. Moreover, you can clipped a folder too. When you clipped a folder, a new layer inside the folder do not need to be clipped, because the whole folder was already clipped.
All the clipped layers will link to only one layer, which locates under the lowest clipped layers chain. If you break a chain by cancelling clipping effect on the middle clipped layer, this layer will become the referred layer of the above clipped layer.
No. 15 - “Set as reference layer” normally be used with a line art to create reference area for other layer. As shown in the example, I draw a heart on a reference layer, then create another layer to fill color in the heart. However, you need to select [fill tool] with “Refer other layers” and set it to “refer to the reference layer” as following.
Disclaimer: This tool is helpful for a work like this and this one is only a rough sample to show you guys how it works. I’m not quite an expert for this function though. However, there’re many tutorials on clip studio Tips and Youtube if you’re curious how it works in an advanced level.
No. 16 - “Set as draft layer” should be enable on a draft layer. There will be the light blue line in front of the layer thumbnail after it was applied. This layer can be excluded when exporting the file in a single layer. There will be a pop-up window which you can choose to hide this draft layer.
No. 17 – A padlock for “Lock layer”. This function will lock the layer from any change. You can’t do nothing on this layer unless you click on a padlock again to unlock it.
No. 18 - “Lock transparent pixels” works like a clipping layer except you don’t need a new layer and you’re sure to paint on this layer within the limited area. Click it to lock the area on the selected layer before painting on the existing painting. When you’re done with this area, just click it again to unlock. Then you can paint on another area within the same layer.
No. 19 - The next icon is related to mask layer (No. 11). There are 2 sub functions. (1) Enable Mask effect on the selected layer and (2) Show the area which was temporarily deleted in blue color.
No. 20 - The next icon is related to ruler tool. There are 4 sub functions you can choose for your selected layer which is working with ruler. (1) The ruler will function on all layers. Even you aren’t working on its layer. (2) The ruler will be available on all layers unless they aren’t in the same folder. (3) The ruler will function only on the layer it’s lying. (4) A guide which created on another layer will be linked to the selected ruler.
No. 21 - “Change layer color” allows you to change colors of the whole selected layer to be monochromatic. (1) Choosing main color (2) Choosing sub color
The next row above
No. 22 - “Change palette color” is usually for organizing your layer. 6 base colors were provided in the first place, but you can also choose any other color via [color setting] when click “Use other color”. Panels in front of layer thumbnail will be changed to the selected color. Make it noticeable and you can distinguish it from other layers.
No. 23 - “Blending mode” provides a long list of color filter you can add to all layers. Since there are lots of details to talk about. I will explain about all these effects in another topic later.
No. 24 - “Opacity” comes with a range slider and a numberic control. You can adjust the opacity of each layer as you wish by draging the slider or change the number behind.
Blending mode
Let’s get back to No. 23 or “Blending mode” which I skipped before. When you clicked on the tap which usually set to “Normal”, you will find this list of all available blending mode.
“Blending mode” works like a color filter you can add on each layer in order to create some special effects. One layer can be set for only one blending mode and each layer can affect other layers, when the working area were placing on each other. Together with the chosen mode, color is also an important element which creates different result to the modified illustration. Light and dark color differently matters to each blending mode.
Here in the below example, I will let the Christmas tree and a snow man be a main item for comparison together with the colorful coat. Let’s say that the Christmas tree and snow man was painted on layer 1, and all this colorful coat will be on another layer above layer 1.
All these colorful coats were created on separated layers. According to blending mode, all of this colorful coat layers will be change to different blending mode, from normal to another.
As it is easier to understand by comparing all effects by eyes, I provided all these examples for you to look at them closely and get the idea how each of them work.
There are 3 more modes with another version of saturation when this colorful coat was replace with black color. This one is recommended to be used for checking color value of all layers below.
I recommend you to try all of them first when you are new to this function. Learn how it creates effects, then you will be more and more familiar to them. After that you may not need to try them all to find the right filter anymore.
Time for using them together!
As you can see from the example above, “blending mode” made this illustration look more interesting. All modes I have chosen for each area are showing in the below illustration.
I have followed along all these descriptions in the image. For more details, please follow these following instructions.
(1) Begin with adding more decorations on the Christmas tree - using [normal] mode layer
(2) Paint a yellow circle on the Christmas star - using [Add (glow)] mode
(3) Paint the same colors of all tree ornaments on them again with airbrush – using [Glow dodge] mode
(4) Paint shadow with dark purple – using [Multiply] mode (This mode is well-know for creating shadow, however, don’t overuse it)
(5) Add more details with sparkling snow dust – using [Linear light]
(6) Paint softly on the snow man with nearby colors to create reflection – using [Overlay]
And this is the final illustration for this Christmas season. Happy Holidays!
Conclusion
Thank you for visiting my tutorial!
I hope this tutorial would help you understand about “layer” more. This one is the very first one I did and I really did my best to make it clear for beginners. If you still have any question, feel free to leave it in the comment section, no matter on Youtube or on Clip Studio Tips post.
Like and share if you find this article helpful 😊 Till we see next time, bye!
Users who liked this post


Comment