
Introduction
So you want to get into animation? Well, before you try to animate a whole 90 minute movie, you need to know how to animate the most fundamental animation: the ball bounce. You also need to know how to polish said ball bounce to present to your friends.
Getting Started
When you open Clip Studio Paint, go to {File}, {New}, and click on the Animation Tab. There are a lot of options to set up, but since this is a ball bounce, I'll only explain two settings of note.
For the size of Output Frame, Clip Studio Paint gives you these defaults:
For me though, I like to work with this preset:
Why? Because 1). 600 dpi looks better than say, 144 dpi:
And 2). 10.5x12.5, or 12F paper, was the standard for 2d tv animation, with 15F (12.5x16) being the standard for movies. A4 and A3 paper can also work.
Next is the frame rate. There are options ranging from 8 to 60 fps. Here are three ball bounces, each animated on 1s, 2s, and 3s respectively, at different frame rates.
24fps:
12fps:

8fps:

I just leave the frame rate at 24, since it's the standard for animation.
Drawing/Inking
When you create your canvas and draw a ball bounce for the first time, you may come up with this:
Yeah...not great. In order to make good animation, you need to be familiar with some principles of animation. There are twelve, but for this demonstration, I used three: Easing, timing, and squash and stretch.
SQUASH AND STRETCH: The most important of the 12 principles, it makes something look malleable , therefore believable:
EASING: Movement needs time to speed up or slow down. This is where easing comes in. In the case of the ball bounce, place frames very close to each other for slow movement and frames far apart for fast movement:
TIMING: how many frames are held between keys and how they're placed. Most animations are drawn on these settings:
1s: Animating every frame. Extremely fluid animation suited for action scenes.
2s: Animating every two frames. The default way to animate.
3s: Animating every three frames. Movement is slow, but usually there's detail to compensate.

You can also draw on 1s, 2s, and 3s at the same time to make the animation more dynamic:
Here is a comparison between two ball bounces, one animated on twos, and one with the closest frames animated on ones, the far apart frames animated on 2s, and the splat animated on 3s:
Now that you're aware of the principles necessary, we can now draw the ball bounce!
First, draw the key drawings:
Then, draw the frames in between the key poses:
Then test the animation to make sure it flows properly, correcting it if it doesn't:

Once you're happy with your ball bounce, you can now decide on whether draw to over the sketch with an inking brush or a pencil brush:

Now that you have a decent ball bounce drawn and inked, we can now finish up by painting the ball. There are two methods of note.
Painting Method #1
This method is simple, but gets the job done. On a separate animation folder timed to the animation and with the inked ball bounce set as a reference layer, simply fill the colors in with the bucket tool:
For shading, you need to draw guidelines as to where the highlights and shadows should go. To make shading easier, it's best to use a red line for highlights and a blue line for shadows:
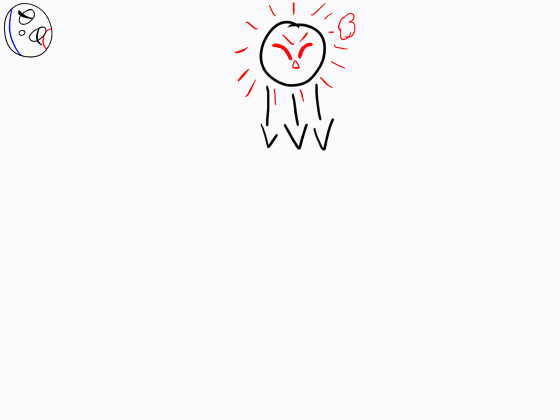
Here's the ball bounce again, with a sun drawn to show where light should hit:
Now it's only filling a matter of shading with the correct colors:
Painting Method #2
This method takes some preparation and an entirely different program to color the animation, but I feel this method gives you more control over your coloring.
In CSP, you need to make a new animation folder containing folders with three layers: Lines, Colored lines, and Shadow Markup, which is set as a draft layer:
Once you do that, you need a software to export to. I chose Opentoonz because it works well with Clip Studio Paint. If you're interested, the download link is here:
Once you have Opentoonz, in Clip Studio Paint go to {file}-{export animation}-{opentoonz scene file}:
You should see this prompt. Before exporting, you need to A). make sure to save it in Opentoonz's scene file, and B). only certain colors can be exported alongside black and white:
Once exported, go to opentoonz and look for your file, which is converted to a toonz file:
The file should look like this:
Then do the same thing as you did with the first method. Since the red and blue lines are set to Autopaint, any color filled will also cover these lines:
Here is the finished result:

Conclusion

Now you should be confident enough to animate a ball bounce. Once you master it, you can move on to more complicated animations, such as a walk cycle. But remember, animation is a lengthy process, so better get comfy.
Until next time...
Ciao! :3
Users who liked this post


Comment