
Hi, hi, guys. I’m IME, an Illustrator and Storyteller.
In this tutorial, I will be giving you some quick and easy tips on how to go about drawing different types of eyes for your character, and also brush on how to use them in your expressions.
I've also made a tutorial video on it if that's what you prefer, so you can check that one out too!
Using basic shapes
Ok, to start off. I’m gonna start with some basic shapes and explore certain eye types with them.
So we’ve got a circle, semicircle, triangle and diamond.
The one thing you might have to remember when you want to explore certain eyes depending on the shapes is that you can always distort the shape.
And by distort, I mean, you can stretch it, squash it, maybe angle it and tip it to the front a bit, tip it to the back or even drag it down a bit more to give certain characteristics and personalities to the eyes.
You don’t always have to keep the primitive form of the shape as long as the anatomy of the eye is clear, I advise you to stretch the limits of its design.
Here are a few ways you can distort the shapes to get a fun variety of eyes.
Why is it important to explore different types of eyes, you ask? When eyes are like the windows to a character's soul, having the proper eyes drawn into a character is very important.
If the design reads clearly enough to the audience, your audience wouldn't even need a proper introduction or dialogue to understand what your character will bring to the story.
Here are a few design examples to keep in mind.
Circle shapes are usually given to protagonist characters, as it is a very organic and friendly shape. So if you have a character who's either pure, childish, innocent or energetic, a circle is definitely the shape to go with!
Triangles are quite the opposite, due to its sharp edges triangles are usually shapes affiliated with danger and evil, but that doesn't mean you can't play around and switch it up a bit. (Like I have done with the first triangle shaped eye design)
Experimenting will definitely help you break some rules and come up with something new!
Adding some colour!
OK so, we're at the second part of the tutorial where I’m going to show you how to colour some eyes.
For this part of the tutorial, I alternate between the Turnip Pen (Pen), the Soft Brush (Airbrush) and the Round mixing brush (Thick paint) to colour in the eyes. These are all default pens available in Clip Studio Paint.
I've cleared up two eye types from the previous exploration sketches, one from the circle shape and one from the triangle shape, to show two super simple ways I like to colour my eyes.

So, for the circle shaped eye, I started off with an off-white base, and then I coloured in the pupil. I top it off with darker tones for the iris, and then use a bit of a black-blue to give off more depth.
Pretty simple as these are the base colours. I had a very energetic character in mind when colouring this eye, and to give off that characteristic I decided to add in light blue lines that look electric around the iris.
Now for the fun part - I add in two white spots on the eye that acts as the light reflection to give off a more lively feel.
Then I open a new layer, put it on 'Multiply' and colour in a shadow right under the eyelids. In this case I used a blue grey, but the colour usually depends on the mood and environment of the illustration.
After that, I open another new layer and set it to 'Overlay' and use the Soft brush tool to add in some a blue, which will make the blue of the eye pop out even more! Overlay truly gives the eye a more glowy feel to it, which is why it's my most favourite 'cherry on top' effect!
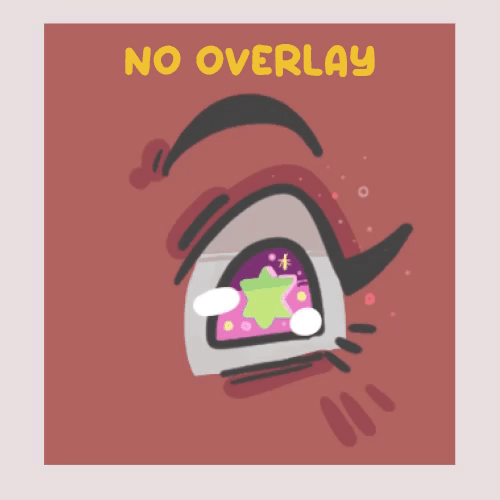
Here's that overlay pop! See the difference?
Also, don't limit yourself to only one way of colouring and designing. If your style permits it, have some fun with the different irises and sparkles you can add to your eyes! I can vouch that it's going to look super cute!
Eyes in action! How to draw expressions.
Alright, so~ now that we’ve explored some fun eye types, I want to show you guys how to use them with expressions. Which is super important when giving life to your characters.
To do this, I’m going to be using my original character, Argo!
Ok so, as you can see, Argo’s eyes are very circular, so what we’re going to do is, we’re going to distort the shape, once again according to the expression.
So it’s mostly stretching and squashing.
So here I’ve got a bunch of expressions I did as studies, and you can see that all these expressions for the eyes, are derived from the primitive circle.
Let me show you how I go through this process.
There are four emotions here from top left to bottom right; Happiness, shock, anger, and anguish.
Let's go through these one by one, so it's clearer.
The first one is happiness or glee. So in this expression you can see the eye - the furthest eye is wide and open. It shows that he is very attentive towards what he’s looking at. To show he’s excited.
And to make the expression seem not stale and stiff, I decided to make the other eye, a half circle, due to how pushed up the cheek is, with the mouth moving upwards.
It makes it more dynamic, and fun. It shows off Argo's young boyish charms.
Moving on to the next one, which is shock. Sort of negative shock or betrayal.
You can see in this expression I have not only stretched the eyes, but I’ve stretched the face. To show the extent of this emotion. With the stretch of the face, I decided to also tilt the eyes downwards to emphasize that stretch.
An important thing to remember with expressions is that, the eyes don’t do all the work for the expressions.
It’s a full feature thing!
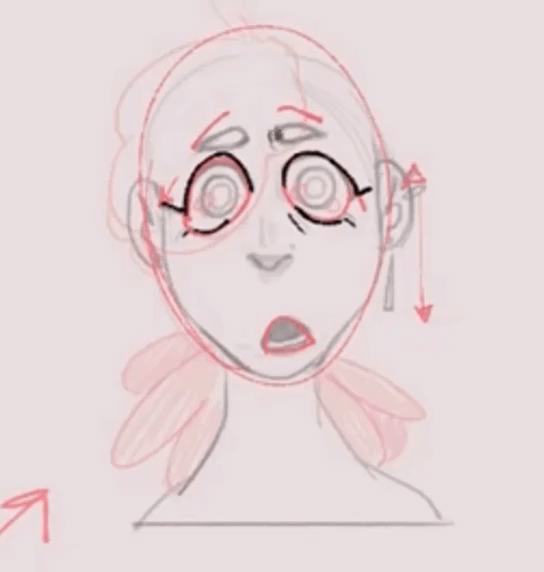
The above GIF shows how altering only the eyebrows can give off different emotions. With this in mind, make sure to always use the entirety of the features to give off the maximum effect of your expressions.
The third one is a more guarded look- an angry sort of guarded look.
I decided to give a semicircle to show that Argo is very closed off from everything. A semicircle is half of a circle, it is still derived from the circular shape, I thought it would be best to use it to symbolize the half closed expression.
Eventually, I topped it off with his eyebrows, laying heavily on top of his eyes to portray that emotion even more.
OK, as for the last expression, anguish, I’ve also added his body language to the equation. To show that Argo is moving away from the other person, or moving away from whatever is making him feel that way.
And this expression is the total opposite of shock, because I’ve squashed the face a lot. So much so that he’s getting nose wrinkles with how much he's scrunching his face. All these tiny details really add to the story and build of the character.
In addition to that, you don’t always have to keep a character's eyes open to show the emotion off. Closing it off also has its own kind of story telling.
So here I decided to close his eyes to not only emphasis and show his anguish but also, to show that he’s closed off. From the world, and from everything around him, and he’s so lost in his sadness.
Closing thoughts and Conclusions.
Design is all about the creative decisions you take, and to take these decisions, explorations is a vital part of it. 'Am I going to add a longer eye line here? Should I lengthen the eyebrow? Should I open or close the mouth?' These are all questions that will be answered after the trial and error of drawing it out.
Every expression is not the same. You should always think about your character’s personality. For example, how does Argo express happiness? There’s no sure way to say 'This is the default expression for happiness’. Everyone's expresses things differently.
Argo's story, his backstory, they feed into his expressions, and how he reacts to certain things.
It’s all about exploring it, just working through it and trying to make it very readable for the audience. So that even without dialogue, your character can still read clearly.
And lastly, remember to distort shapes to explore different designs you can come up with and most importantly, have fun while doing it!
Alright, Alright. We are finally at the end of the tutorial and if you’ve stuck around till this point, thank you so much, I hope this video has really become an eye-opener for some of you guys.
And Yep, Pun intended, I will see myself out.
Bye~!
P.S. If you want to check out my stuff, here's my Link tree:
Users who liked this post


Comment