
Hello hello everybody, it's me again Daniel (@Ado_draw), I will like for we to travel back in time to when dragons rules the sky, Centaurs roms the land and mermaids swims in vast deeps of the ocean and sings songs that drove men madly in love! Whereas we tend to hear those above mentioned in mystical story and folktale.
Hence, for today's tutorial article solely need us to understand and draw this mystical creatures known as (Hybrids).
And today's article is titled:
LEARN EASY CONCEPTS TO CREATE HYBRID CREATURES USING CLIP STUDIO.
🔸🔸🔸
If one want to draw these mystical creatures known as hybrid creatures, the first thoughts that will goes through ones mind are,
• "What do I understand by the word hybrid creatures? Or what a hybrid”
• "Do I need to understand anatomy to draw the hybrid creatures?"
• "Which part of the animal should I draw or add the human part to make it a humanoid?”
• "How do I make this creature cute?”
[Loading in process]
▪️▪️▪️
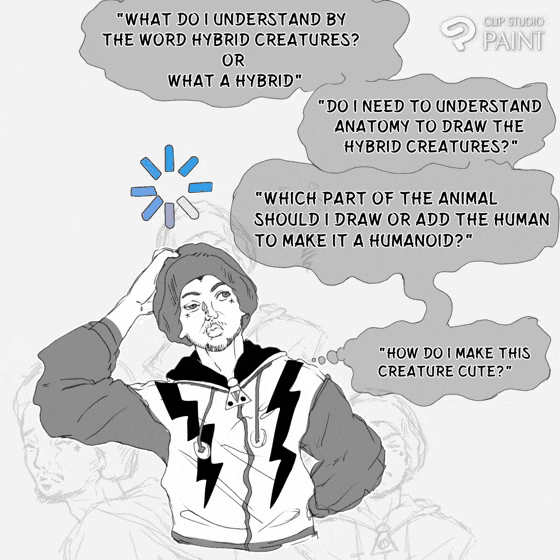
This thoughts may not cover much but I believe it highlights some of the major need ideas that is put into consideration when creating a mystical creature(also known as a hybrid).
To do so, we need take ourselves back to those days when we where told folk and mystical stories about those mystical creatures in order enjoy and pour life or existance,
Please do note that this processes I making use of on drawing of the hybrid creatures is my concepts of drawing mystical creatures which I developed from studying or great artist and you made notice my concepts may differ or be same with other artists concepts, but do note that we are all different and does our style, so don't get confuses just study and practice.
▪️▪️▪️
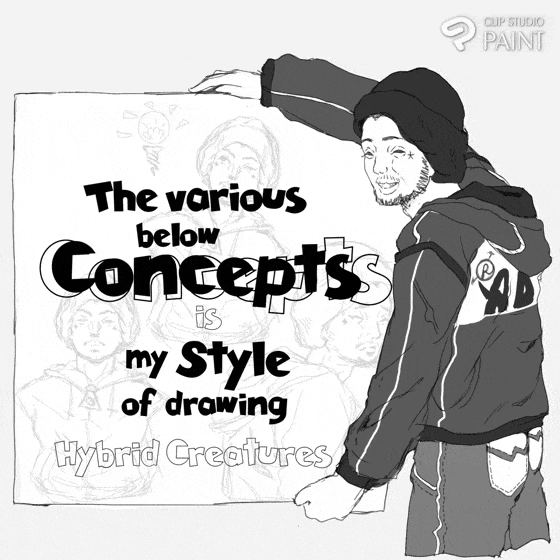
So with out further Ado.... Let's dive into it.
Concept 1: Research on what hybrid creatures is all about?
When want to venture into something this mystical like Hybrid creatures, it tend to bring up or stir up the research which we must know to be able to do, research or studies on, to better us when we draw to give the subject a good expression and bring it to life so that the viewers or audience can feeling is mystical nature and creativity.
So for researching purposes,
“ WHAT DO WE UNDERSTAND BY HYBRID CREATURES? ”
🔻• Hybrid Creatures in a common term are creatures that their parents of two different species with body partly both parents traits.
[ Who is this hybrid below? ]
🔸🔸🔸
[ if you know it name comment it below 🔻]
Which also tends to occur in plants as well but for today's tutorial we will just be looking at that of the animal aspect.
Now the hybridization both cover animal-animal hybridization, human-human hybridization and the cross species known as humanoid (which are legendary, folkloric, or mythological creatures that are part human part animal, or that resemble humans through appearance or character), hence, the humanoid is the kind of hybrid creatures we tend to look at today.
🔸🔸🔸
Now that we now have the above mentioned process brief explained, we can now move onto the next concept.
Concept 2: Do I need to understand anatomy to draw the hybrid creatures?
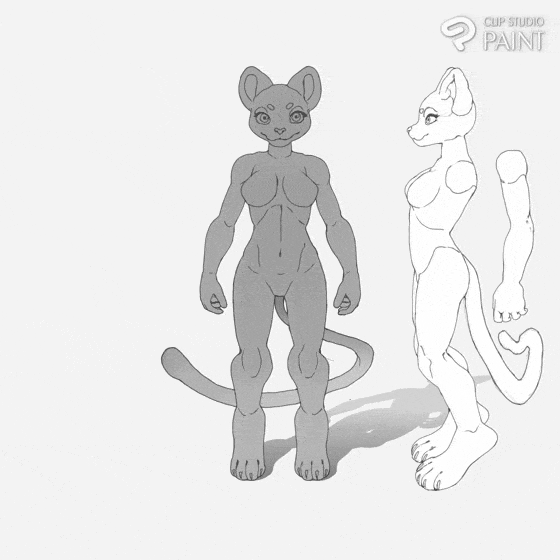
We did noted above that humanoids are made up of partly human partly animal which are the common features that makes them different from both human and animal, but to better draw humanoid hybrid creatures we need first of all understand it's both parental foundation which are the human and the animal body build up, whereas I meant both the human and animal anatomy structure.
🔸🔸🔸
Also we need identify the nature we want the human appear as ( be it a male or a female) by drawing them ourselves as shown below.
🔸🔸🔸
This may come as common to those of us doing digital art for a long time now but it tend to sound and appear new to beginners, so for the question if it is necessary to understand anatomy, my answer is yes and yes, it is very necessary.
And for easy and better understanding it is advise one uses the various regular shape as guidelines, we can easily draw out the structure of our various creatures as shown below.
🔸🔸🔸
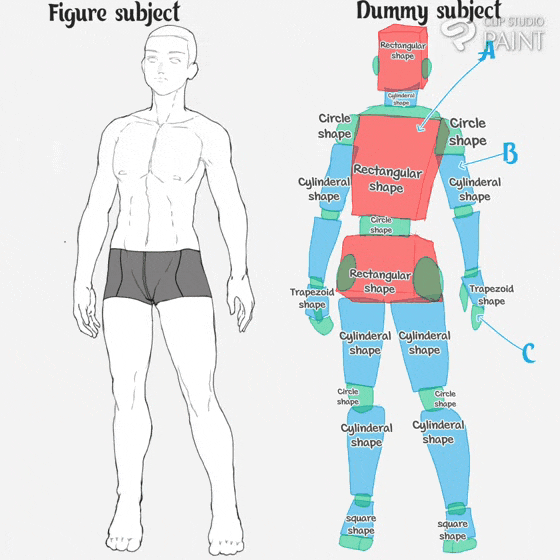
As we can see above, using the shapes like (rectangular, trapezoid, cylinderal, square and circle shapes) to frame the body structure of subject such as the head and torso which is the [A] indicated red, whereas the upper and lower limbs are the [B] indicated blue and lastly the joint which is the [C] indicated green in form of a dummy and with that, we can then use it as guideline to draw out the character figure.
Tip🔻I advise as a beginner, you should properly learn and practice how to use shape to your advantage, cause different shapes can be used to structure different boy part as shown above.
Using the regular shape as note above for every body part, we can draw out the structure of our subject in different poses easily.
🔸🔸🔸
Shape is the basic foundation which tends to help us artist determine the form of every form, subject and scene, Like take the subject in the below image.
🔸🔸🔸
If we have full and proper understanding of our regular shape, we can easily find ideas for draw our subjects from the expression and forms of even our common fruits, giving our there different body build up using the fruits as reference.
They are entire of articles on CSP site to help teach you on anatomy of both animal and human, and below are some of the article links 🔗 which can help beginners to start with, So do try them out and also there are several more on CSP site, so try searching on them as well.
▪️▪️▪️
Also we can use the 3d model figure as guidelines either the male or female figure,
🔸🔸🔸
To frame or draw our hybrid creatures as shown below.
🔸🔸🔸
(Which using the model, we can give it any sets of wings making it appear like and angel humanoid with one part human and the other part bird, which we can download from CSP assets store)
Also, we can change the size of the 3d model figure to appear as a little character or a chibi character with big head, or we can also just download a chibi character.
🔸🔸🔸
Also they are 3d model figure that has already been model a full hybrid creature as shown below,
🔸🔸🔸
They above 3d figure which are made in the form of full form hybrid can be downloaded ( by either buying it with clip or gold coins ) from the Link 🔗 below
And the kind of animal (a horse, a wolf or any other),
🔸🔸🔸
Also I will advise as we practice using shapes to frame up or draw the structure of the human characters, we need also learn and practice how to use our regular shapes to structure the animal body and try as well understand their body anatomy.
🔸🔸🔸
Now after we have properly Research and understand how to draw the the Human and Animal Creatures, we can then move on to the Next Concept which is very necessary for one to create a good hybrid creatures.
Concept 3: Which part of the animal should I draw or add the human part to make it a humanoid?
This question is very relivant cause this point out the main aspect one need know in other to create the humanoid that suit what you want, Hence, we know that all humanoids are partly animal and human, and how they both creatures are joined, I named they following forms:
1) Half form hybrid.
2) Full form hybrid.
3) Beast form hybrid.
Now when we say,
▪️ Semi-Half form hybrid,
We tend to see few of the animal part added or present on the humanoid body like the change in their ears, may be the eyes, and even the tail, but the entire body posture of this set of hybrid creature will retain or have a human structure.
Now before we draw out an example of the Semi-Half form hybrid creature, I would like to point out the significant features which by mean looking at the sets of features on the subject tend to identify the them as a Semi-Half form hybrid creature. .
And those features are as follows;
1. Ears,
2. Eyes,
4. Horns,
5.Wings,
6. Tail,
7. And lastly Claws.
🔸🔸🔸
So let's see how we can draw the above features individually;
Feature 1# Ears and Nose 🙀😻
When drawing the ears on our humanoid creatures, they tend to be practical replica of their animal parents, some of the hybrids have different sets of ears,
Take for example in the image below, the hybrid creature with a pointy ears, by mean look at it, you will know that it's animal parent is under the cat family.
🔸🔸🔸
And now looking at this second example in the image below, the hybrid creature with a Falling ears, by mean look at it, you will know that it's animal parent is under the Dog or Donkey family.
🔸🔸🔸
And for the third example in the image below, the hybrid creature has both the pointy and falling ears which by mean look at it, you will know that it's animal parent is also under the cat family but of puma kind.
🔸🔸🔸
Using what we learnt on Ears, we can try out other styles of ears and nose like rabbit ears, elf ears and some much more as shown below.
🔸🔸🔸

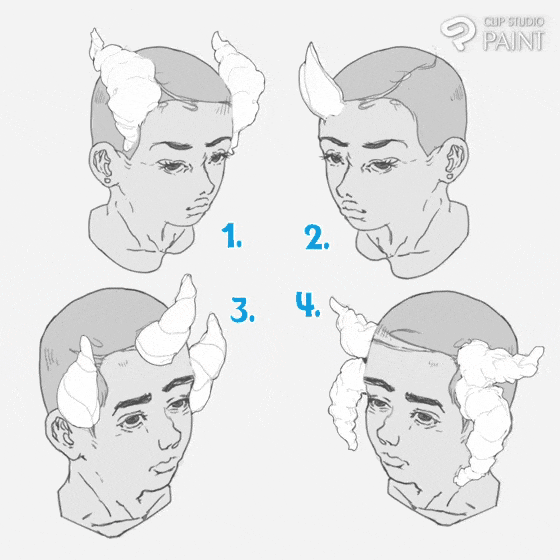
Feature 2# Horns and Wings
Horns are pointy bone like objects that animal have on their head, and because hybrid creatures are partly human and partly animal, some hybrid creature have them horns; and they term to be drawn on subject in different number some 1, 2, 3 or even 4 as we can see below.
🔸🔸🔸
And if we take a closer look at our various horns, we will see that horns usually come in different proportional expression which with our proper understanding of shapes, we can easily structure it in sections.
Take the for example in the image below the horns of the female character, the horn can be frame up using curved edge square as a guideline to form this styles of horns as indicated in step [1] for the female subject. meanwhile, for that of the male character can be frame up using round shapes as indicated in the step [1] for the male subject.
🔸🔸🔸
Hint🔻it will also be helpful if you can try study the bone flow or arrangements as shown in the image above as [2] in both subject.
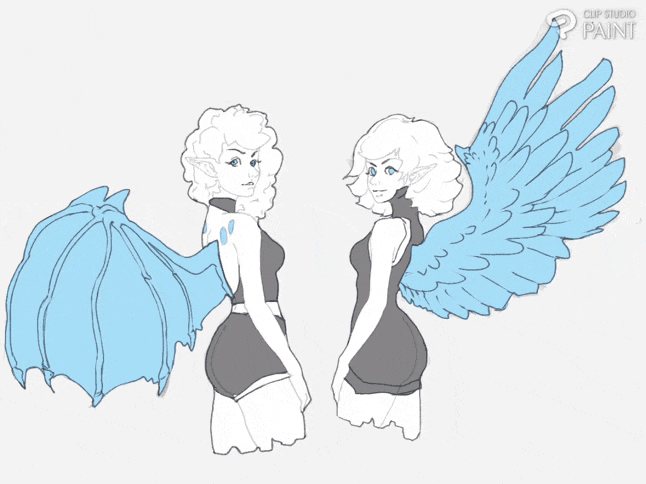
Now for the wings are also belonging to the animal parent of the hybrid offspring, the a different types, some are made up off feathers like the ones of the right hybrid creature in the below image, while some are made to appear like that of our regular bats as it can be notice on the hybrid creature by the left of the image below.
🔸🔸🔸
We can also give or design the wings of our hybrid creature in different wing span.
🔸🔸🔸
The wings can be drawn to have a different wings span appearance as shown below.
🔸🔸🔸
And how the wings are attach can also add Or give more beauty to the character.
🔸🔸🔸
If you find the above explanation not enough, you can research the below link 🔗 or other articles on wing.
Feature 3# Eyes
The Eyes of different subjects tend to varies base on the type of creatures, take for example in the image below, the subject 1 the Dragon Lady has the white part of the eyes fill with a dark colour meanwhile the pupil is fill with a lighter colour; for the subject 2, the Toad lady has a normal eyes arrangements but lens of the eyes are shape like a horizontal rectangular, and last the subject 3, the Feline Lady which tends to have three stroke on her cheeks in form of a whiskers and a vertical line of lens in the pupil of the eyes.
🔸🔸🔸
Depending on you the Eyes of your creature to be you are free to experiment using the various shapes.
Feature 4# Tails 🐊🐒
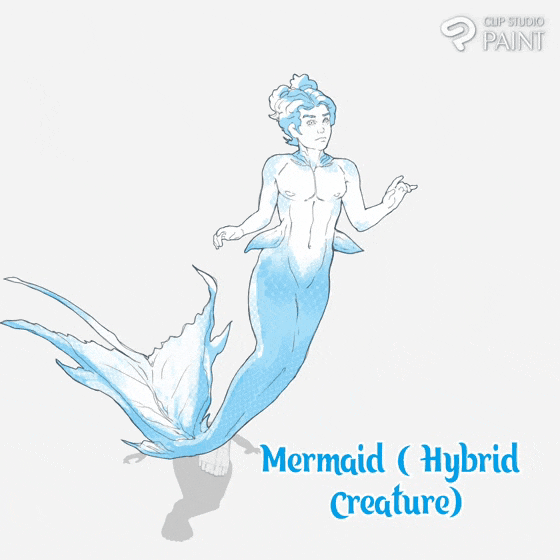
Tail are straight like and fur cartilage which some animals have to do various things like for example locomotion for fish and some other forms of marine life such as the mystical mermaid which we will later be looking at.
Tails tend to come in different forms, some are scale, smooth and furry depending on the set of creature,
🔸🔸🔸
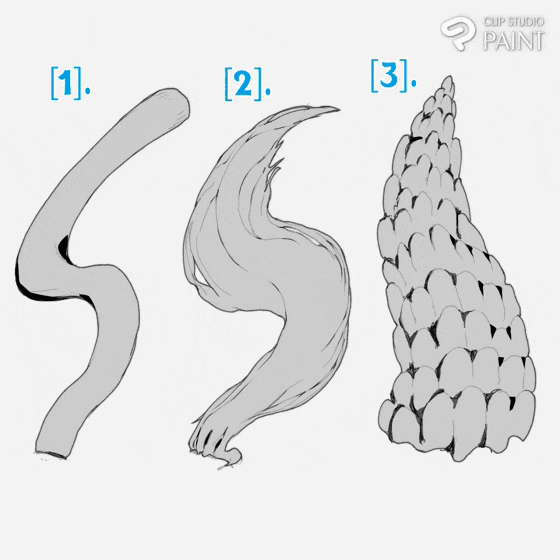
Draw of curve or straight object on your subject mean look like a tail but it does not totally defined the uniqueness of the tail as to which animal it belongs to, so before the tail can look defining you need render in details like gradient little streams of furs like in that of [2], or the scales and little bits of shadow edges like in [3], or just plain shaded edge like in [1].
🔸🔸🔸
Like take the tail of our regular felines (cat family), their tails are furry and because today's is all about hybrid creature, let's see how the tail of this our felines (cat family) can be attached.
▪️ Drawing of feline tail onto the subject,
Now say we have a hybrid creature, half cat half human and we want to attached a tail, the tail is attached at the bottom part of the back bone indicated [A], and cause this feline tail is furry but the furs are smooth, so the tail tends to appear like a elastic rod, to make it more look more like rod by suggesting the shape of the tail using like little lines stroke indicated [B].
🔸🔸🔸
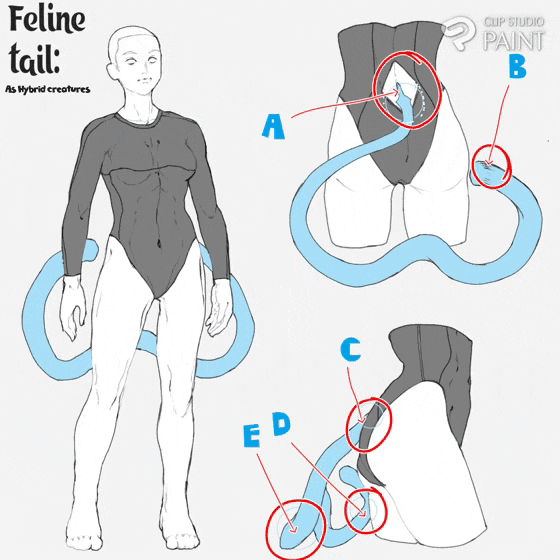
And when we view the attached tail from the side as shown above at the bottom of the image, the point which the tail attached itself to the body of the creature will move down to the be on top the butt cheeks indicated [C], and because we are viewing the tail from the side, we will see that the part of the tail closer to the viewers is bigger as indicated [E] and the part further away from the viewers is smaller as indicated [D].
▪️ Drawing of dragon tail onto the subject,
On this aspect, say we have a hybrid creature, half dragon half human and we want to attached a tail, the tail is attached at the bottom part of the back bone indicated [A], and cause this dragon tail are made up of scales just like the marine life (/ creature), we can draw the scales on the tail by freehand whereas suggesting the shape of the various scales with little curved lines indicated [B].
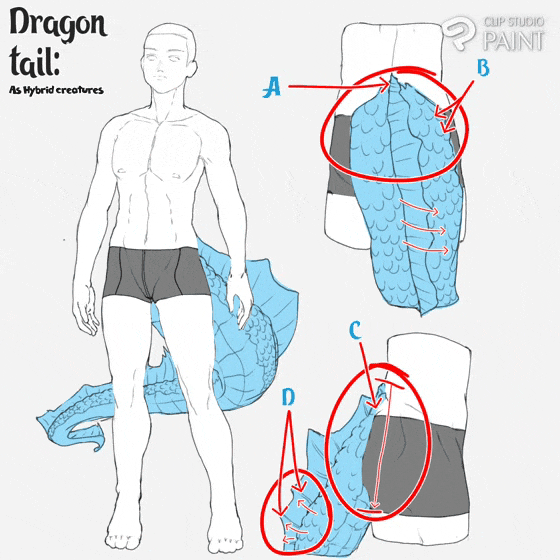
And when we view the attached tail from the side as shown above at the bottom of the image, the point which the tail attached itself to the body of the subject, we will notice the tail attach from the top part of the butt down to the bottom indicated [C], and because we are viewing the tail from the side, we will see that the part of the scales and dorsal fin closer to the viewers is bigger and the part scales and dorsal fin further away from the viewers is smaller as indicated [D].
The Tail and the Ears are mostly the unique aspect of this particular set of humanoid (semi- form hybrid), hence giving the subject the above mentioned without the artist even telling the viewers what the kinds creatures that were joined or the parental creature combined, the viewers on his or her own should know or have a clue on the various mixture or combined creatures, taking the below image for example;
🔸🔸🔸
# The cat and dog Semi-Half form hybrid creature
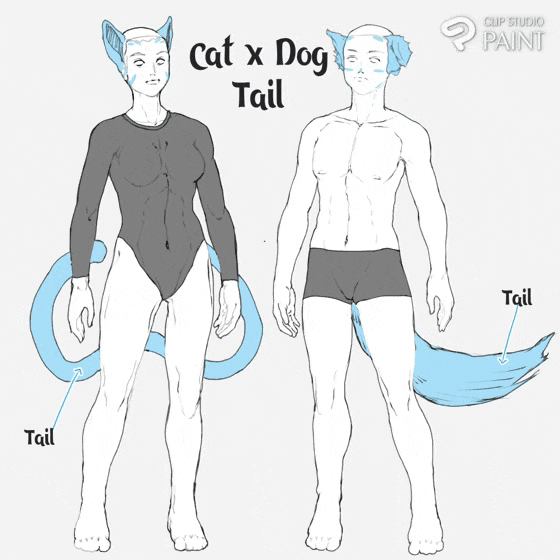
Hint🔻 Looking at our above hybrid creatures, we can see that the subject on the left is a female human with the features of a cat (the ears and tail), meanwhile that of the right is a male human with the features of a dog (the ears and tail).
And the next example;
# The dragon Semi-Half form hybrid creature
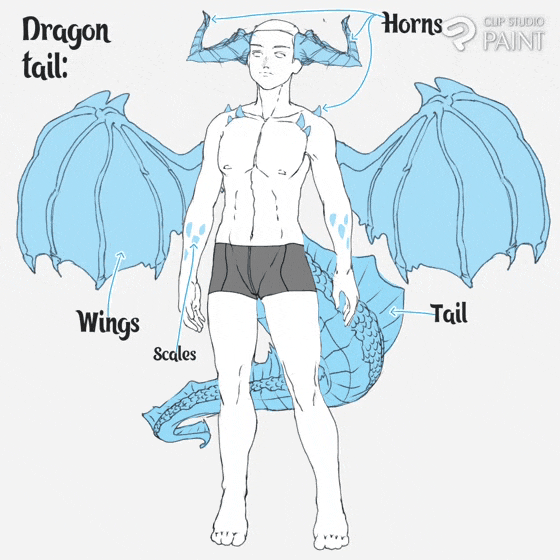
Hint 🔻 can be know base on it wings, horns, and tails.
If you find drawing the tail a problem, you can make use of the handed material below.
🔸🔸🔸
Also if you find the above explanation on how to draw wings and fur not enough, you can research the below link 🔗 or other articles on tails.
🔸🔸🔸
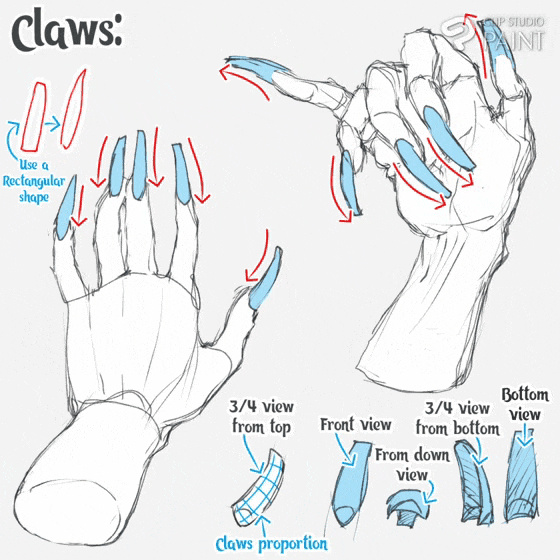
Feature 4# Claws 🦞🦂🦀
And lastly the features which the semi- half form hybrid can possible have is a Claws.
Which if we can using our regular shape rectangular to draw it but giving it a kind of curvey proportion as shown above with the various red arrow, and according to where they tend to be view from can affect the appearance of their shapes as shown for the 3/4 view from the top, front view, the down view, 3/4 from the bottom and lastly the bottom view.
🔸🔸🔸
Also we can add our stylistical choices to the claws expression of our hybrids to give the a kind of unique look.
🔸🔸🔸
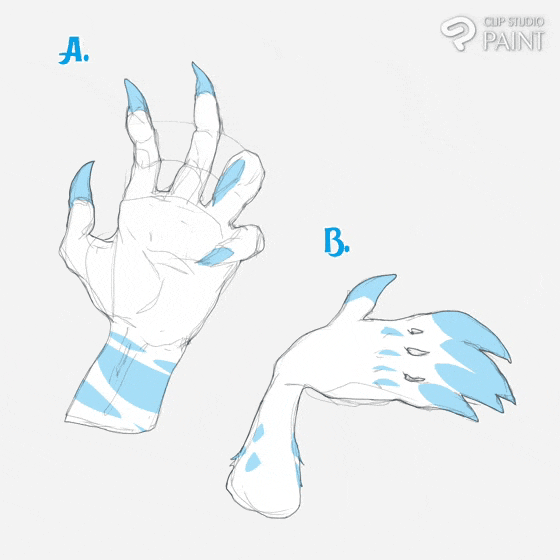
Tip🔻 the claw can be easily drawn using shapes as I did formerly mentioned above.
Now when the hand spread wide the various claws of each finger curve in different directions as we can see below.
🔸🔸🔸
If you find the above explanation not enough, you can research the below link 🔗 to learn how to draw hands.
🔸🔸🔸
Take the following below for example;
Gorgon (Semi-Half form hybrid creature)
The Gorgon is an example of a Semi-Half form hybrid creature cause we can see that the subject has a human body (female) but her hairs are made of snakes as shown below.
🔸🔸🔸
To draw the Gorgon hybrid creature, I started by first drawing the human part using our regular shape as mentioned before,
🔸🔸🔸
Then on another new layer, draw [7] sets of snakes then attached them on the head of the gorgon hybrid girl.
🔸🔸🔸
Fill in the flat base colours to help define each potions of your subject.
🔸🔸🔸
I further render more details and with that done is how I did draw the little Medusa girl (the Semi-Half form hybrid creature).
🔸🔸🔸
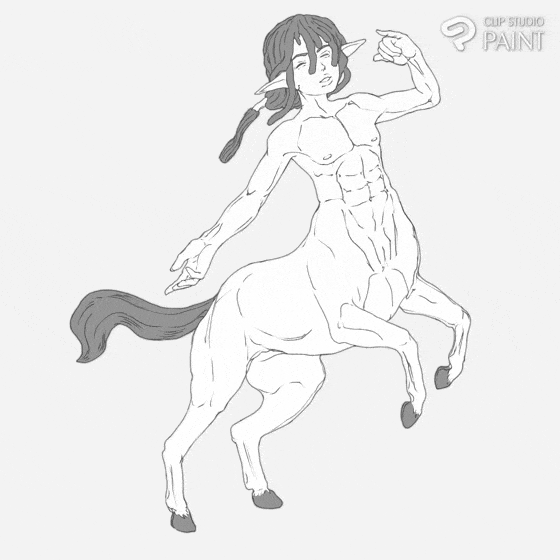
▪️▪️Half form hybrid,
We tend to see half of the animal part added or present on the humanoid body like the the limbs and posture of the animal will change along with all the above mentioned features.
And how I do structure this particular set of hybrid is to take the two parents (which for this case is the horse and human), I then take the bottom part of the Horse and the top part of the Human I then join them both to give or form their offspring known as Centaurus as shown in the below image.
🔸🔸🔸
And if I choose to go even easier, I make use of the 3d figure model which pose I adjusted using the
🔸🔸🔸
With 3d model posing the way I want, I can now rough sketch, let's say a tail and snakes on the head of the subject if we want to draw a Gorgon which is hybrid creature half snake half human,
🔸🔸🔸
Next with the structure of the Gorgon roughly drawn out, I then used that as a guideline and draw the line art of the Gorgon.
🔸🔸🔸
I can then choose to fill in a white colour,
🔸🔸🔸
Add some colour which for now I will be using a blueish colour with a harsh highlights on the side,
🔸🔸🔸
Then I finish up by creating a new layer above all the former ones, while setting it blending mode to [Multiply], I further render some scales effect onto the subject, and am done.
🔸🔸🔸

The sub tool I used for the scales can be gotten using the link 🔗 below.
🔸🔸🔸
And using the same above method you can also create a mermaid hybrid creature as I did as shown below.
🔸🔸🔸
Now for the next aspect we will be looking at is the,
▪️▪️▪️Full form hybrid,
This aspect I also called the beast form, which as the implies means that the creature has full main animal appearance but a human posture,
Take for the following below;
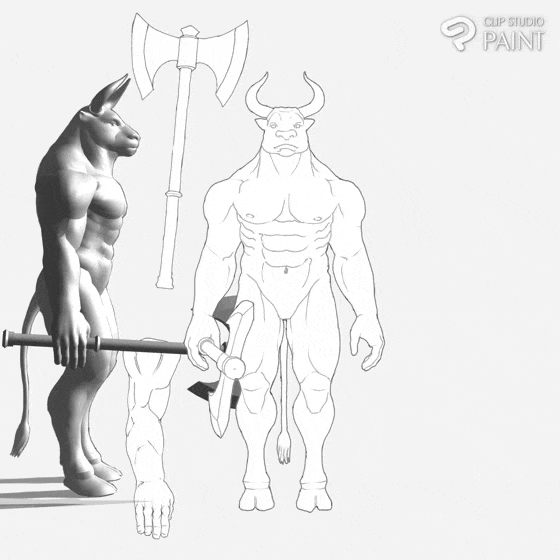
Minotaur (full form hybrid creature)
This is a hybrid creature say to have the appearance of a cow with it features and little traces of human features with human posture as is noted below,
🔸🔸🔸
Notice 🔸That the full form hybrid minotaur have this following features before it can be note as full form hybrid creature; The of the subject is shape like that of a cow with the little noticable features which made it so like the Ears, Eyes, nose, horns and mouth shape are traits of a cow. Whereas some the torso and upper limbs are made of human traits, while lastly the that of the lower limbs and tail of the subject is made up of cow traits or features.
Using the 3d model of the (Minotaur with an axe) which Layer I reduced the [Opacity] to 40%, so as see my lines when I draw out the structure of the Minotaur while using the 3d model as guideline, I draw both the Front and Side views of the Minotaur,
🔸🔸🔸
After am done drawing out the the structure of the subject, I can now fill in the flat colour which I did with just white colour,
🔸🔸🔸
But if we want to go further, one can then add our colour to the subject.
Catwoman (full form hybrid creature)
The Catwoman of a full form hybrid creature is also similar as the minotaur, they are said to have the appearance of a cat with it features and little traces of human features with human posture as is noted below,
Notice 🔸That the full form hybrid Catwoman have this following features before it can be note as full form hybrid creature; The of the subject is shape like that of a cat with the little noticable features which made it so like the Ears, Eyes, nose and mouth shape are traits of a cat. Whereas some the torso and upper limbs are made of human traits, while lastly the that of the lower limbs and tail of the subject is made up of cat traits or features.
Similarly as I did for the Minotaur, I using the 3d model of the (Catwoman with an axe) which Layer I reduced the [Opacity] to 40%, so as see my lines when I draw out the structure of the Catwoman while using the 3d model as guideline, I draw both the Front and Side views of the Catwoman,
🔸🔸🔸
After am done drawing out the the structure of the subject, I can now fill in the flat colour which I did with just a gradient grey colour to the one on the left and for the on the right, I added a flat white colour,
🔸🔸🔸
With above properly understood, I believe as a beginner you can be able to draw out any kind of hybrid creature.
Now that we are done with the theoretical aspect, we can now move onto the practical aspect.
Concept 4: The Process I go about Drawing and Colouring Hybrid Creature
I start by considering, do I have the time to draw out the structure of the subject and it's pose from scratch or the basic foundation, which for me now I do not have the time, how do I draw a hybrid? Now this is where CLIP STUDIO PAINT model features tends to help a lot.
Thanks to the new features like 3D MODEL FIGURE and 3D POSE (POSEMANIACS) that were added to CLIP STUDIO PAINT VERSION 3.0, I need not burden myself about anything.
All I do is to [import] the [3D model figure] (the humanoid hybrid creature) from the [Material box icon], using the [object sub tool] I can move the [3D model figure] in any axis.
🔸🔸🔸

Now the 3d hybrid creature figure can be gotten using the below link 🔗.
🔸🔸🔸
After we are done [importing], click on the arrow pointing downward on the bar below the 3D model figure indicated [1], a new dashboard will appear with various options, select that of [3D pose (Posemaniacs)] indicated [2].
Note🔸 before we do the above mentioned, we need to turn on our data connection on.
With the 3d pose (Posemaniacs) Click on, we will be redirected to the posemaniacs site indicated [1], you can sign up to the site which I did indicated [2]; below the site page, we tend to see different styles of pose figures but the one I am looking for is a running pose figure, so I just clicked on the little arrow pointing downward by the right indicated [3].
A new dashboard will be displayed with different sets options for different sets of figure pose styles and looking down below is running pose option which I am looking for, I click on it,
🔸🔸🔸
And we will be taking to another dashboard with the running poses, I browse through them until I found the one that suit what I wanted, I then click on it which is for the female model.
🔸🔸🔸
The next dashboard appears and I adjusted the position of the figure sideways, then I select the [Light icon], another mini dashboard will appear, I adjust the light representation to 3 point perspective,
🔸🔸🔸
Afterwards, I click on the [Display icon], set the colour of the muscle to different colours and I then set the grid mapping to 9 points.
🔸🔸🔸
And with all of that done onto the figure indicated [1], I can now send it to CLIP STUDIO PAINT by clicking on [open] indicated [2].
🔸🔸🔸
After the above is done, the pose of the 3D model figure in CLIP STUDIO PAINT will be adjusted to the one at [Posemaniacs].
🔸🔸🔸
Now looking at CSP 3D model figure, we can see that it is formed from our regular shapes which I have layer out the framing process starting by firstly drawing the Primary Step, Secondary Step and lastly Tertiary Step, whereas even as a beginner this sets of tracing practicing can help strengthen your drawing of character figure.
🔸🔸🔸
Then I adjusted the figure to the perspective I would like my character to have, I then reduced the [Opacity] of the [Layer] of the [3d figure] to 40% as shown in image [1],
Meanwhile on a newly created Layer above the former, I trace out accurately the structure of the subject, assuming some of the shape as I draw, using the pen sub tool as indicated in image [2].
🔸🔸🔸
On another layer, I rough sketch the hair and the furs on the hands and legs using the pen sub tool as indicated in image [3],
Also using the pen sub tool again on a new layer, I draw the outline of the subject.
🔸🔸🔸
Afterwards, I create three layer, two above and the other one below the above mentioned former layers.
Now for the layer below, I fill in a flat white colour to the subject using the [lasso fill sub tool] as indicated [5].
While for the two above, the one below I set the blending mode to [Multiply], I then draw the inner sides of the subject, then on the second layer above it, I set it blending mode to [Lighten] and I fill in a slightly reddish colour using the [lasso fill sub tool] as indicated in image [6].
🔸🔸🔸
Next, I move to add colours to clothes of the subject,
I started by creating two separate layer for the top wear, on the bottom layer I fill it with a flat reddish colour using the [lasso fill sub tool], meanwhile for the one above for the image [7], clipping it to the bottom layer for the top wear, I will then shade in some blue shadow using the [Flat marker sub tool] to the top wear as indicated in image [7].
While for that of image [8], on the bottom layer I add the flat dark blue colour using the [lasso fill sub tool], create a new layer above, I then clip it to the bottom and I rough shade the folding shapes of the lower wear alone the shadows as shown below.
🔸🔸🔸
Now, creating another two sets of layer as shown in the below image [9]; using the [bucket sub tool] to fill in a orange colour to the ears, upper and lower limbs of this female rabbit hybrid creature; then after the above is do, I then clipping the above layer to the bottom layer which on it I now added some gradient of dark orange highlighting the shape of the furs and shaping of the limbs using the [flat marker sub tool].
Whereas the for the image [10], I created another two sets of layer, render the skin of the subject while also add the highlights using the [flat marker sub tool] for the adding of the various colours, while on another hand, using the [blend sub tool] to blend all the colours well.
🔸🔸🔸
Next create two new layer image [11], clip the upper one to the one below, use the bucket fill sub tool to fill in a flat base colour to the hairs of the subject and using both the flat marker and blend sub tool to render details like shadows and more to the hairs while blending it as we go along.
On image [12] two new other created layer, set the blending mode of the one on top to [Multiply], add some dark colour to the shorts and a yellowish colour is also added to the tops using the flat marker sub tool.
🔸🔸🔸
And all the above is now done, we can then add background to the subject creating a layer below the former created layer mentioned above and add the background design.
🔸🔸🔸
Or speed lines to the background to help draw viewers eyes to the subject, making the subject the center of focus,
And with that done, the piece is finished as shown below,
🔸🔸🔸
Now it you felt like you are still not satisfied with the looks and you want it to look even more cute, CLIP STUDIO PAINT VERSION 3.0 got you covered, there are some other new features in the filter effects that can easily help with that can you guess what they are?!
🔸🔸🔸
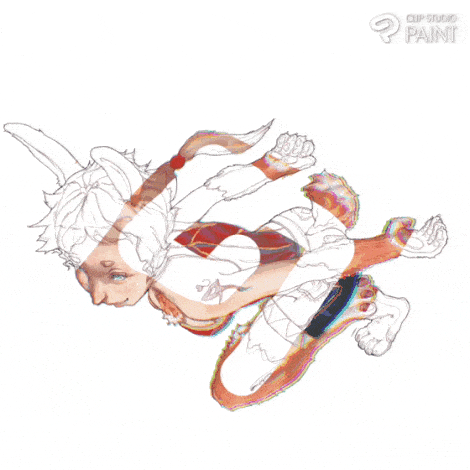
Answer: it is the [Chromatic aberration effect] and [Noise retro film effect] which when applied give the subject some make use of a fade reddish, blueish, greenish and yellowish which tend to be represented on the out line or little dots of the subject. Now how to apply them.
# How to add the Chromatic aberration effect
I started by clicking on the three sets parallel bar icon indicated [1] which takes us to the [Menu], on the menu dashboard click on the [Filter] indicated [2], a dashboard will various options will appear, then click again on the [Effect] selection indicated [3] and again another different sets of options will then also appear where we can then see the [Chromatic aberration effect], I will then select the [Chromatic aberration effect] which is indicated [4].
🔸🔸🔸
After the we click on the [Chromatic aberration effect], a mini dashboard will appear with different settings indicated [1] as shown in the image below, then for the adjustment, I simply made use of the redial (use center point)>(Intensity is set to 50%)>(Angle is set to -77 degree), so that the Chromatic aberration effect can affect the other part of the body but not the face so that the face can be the focal point for the viewers as shown in [2]. then after all is done, I click on the OK button indicated [3].
🔸🔸🔸
An the piece will the be affected by the Chromatic aberration effect as we can take notice of in the image below.
🔸🔸🔸
Now with that out of the way, we can also try out the other newly added feature the Noise effect in the retro film selection.
# How to add Noise effect in the retro film selection
Start by clicking on [Menu indicated 1]>[filter indicated 2]>[effect indicated 3]> then on the effect dashboard we will see different types of selection but the one want to make use of is that of the retro film indicated [4] which by clicking on it,
🔸🔸🔸
After the we click on the [Chromatic aberration effect], a mini dashboard will appear with different settings indicated [1] as shown in the image below, then for the adjustment, I set the preset to (None)>(Intensity is set to 6%)>(Noise strength is also set to 30%), so that the Noise effect can slightly affect entire body make the subject look dust give it a realistic effect and not so smooth that it looks more like a cartoon in the viewers eyes as shown in [2]. then after all is done, I click on the OK button indicated [3].
🔸🔸🔸
And with that the Ninja running pose rabbit 🐇🐰 hybrid creature is done.
🔸🔸🔸
And this brings us to the end of today's tutorial.
Conclusion
Thanks everyone for reading through, I hope it meet most of your need and has help unravel some secrets to drawing hybrid creatures.
Furthermore, I do advise practicing more and more, it helps a lot. Now with no further Ado, I bid you bye -byeee.
Users who liked this post


Comment