
Hey everyone,
welcome to another of my tutorial. My name is Danny and for today's tutorial I will show the precepts and ways I use to create fantasy background either for a fictional island or ancient ruins. And today's illustration is title : Tips to easily create fictional background from scratch,
I will like to point that I have break today tutorial process into few precept for easy understanding and also I will be very brief.
Now when we talking about background, some may take it to be scene that is only suppose to be behind character figure,
But if one can just properly study background, we will tend to find out that background with it's various objects are not there just for back scene only but background also can be a main scene themselves when made the center of focus.
if the figure is taking out from the background for instance.
With the character figure gone the background is now the central.
This Background may not look as much because this background was only created to boost the character figure, But this tutorial continues we we learn the various TIPS to creating a sensation background.
Now I will like us to talk about the the term [Objects] which are in the background scene which will take us to the first part of the tutorial
Object
Object, they can be the various things which are stage in a background scene like [the variety of trees, stone building, regular shape items and some much more].
And the ways which the objects (like say a buildings) relates with the background bring about the various fantasy or fiction world to exist from our minds.
The key positioning of object is relating the object to the horizon line and planes which takes us to the next category on the list.
Horizon line
The horizon line are line which the residing edge of the object Marge towards a line which the viewers line of sight can not see beyond as indicated with edge blue and green touching the red line.
Take for example a plane with a box on it and different camera pointing from all angle
And all of the nine cams a focus on the box
The horizon line also shows and controls the camera or viewing position of the scene like for the Frontward view [cam 5,6,7,8 and 9].
The red lines is showing the camera viewing line with the vertical crossing at the end of each line is the [horizon line].
While for the Backward view which is [cam 1,2,3 and 4] and a blue viewing line with the horizon line at the end.
Bird line of sight
For instance, say we want to position the view point from above, cam 5, 6 and 7 are the fun and right position to be.
But I use cam 7 position as the viewing point for the object [the box and house] which are in the following scenes,
(Object place on the plane with it three vanishing point which I indicated with the red, Blue and green lines)
[Note that when I use the primary colors the red indicate first, the blue second and the green the third]
For a real life object such as [a house] to show the upward Camera positioning, it going to look like what is below with the red horizon line above the object.
Human line of sight
Also if the view point is position at the ground level facing the front side of the object [the house], cam 7 will be the position of the camera.
Below we see a object [Box] with it red, blue and green vanishing point
For a real life object [a house] to show the frontward Camera positioning and the red lines in between shows the position which the eyes can not see beyond [horizon line] hence, the object will be normally size.
Ant line of sight
For the last example, the view point position from below the cam 9 best display this aspect,
(With the Cam 9 view highlighting the box from below with each of the vanishing lines point the position of the horizon)
For a real life object [a house] to show the downward Camera positioning. The down of the object will be bigger while the top will be small giving the object the sense of proportionality and the horizon line will be below the object with also help show where and how the camera is position in the scene.
Vanishing point
Talking about vanishing point, they are point where the plane continue multiple several and reaches the horizon line the point which the eyes can not see beyond the tends to look like dots and I have represent those points as X point (Which I indicated in red), Y point (which is indicated in blue) and last Z point (which is indicated in green) for any 3 dimensional object but we will be making use of a box.
A box better describes a 3 dimensional figure because they have two planes facing each other parallel which is indicated using the red,blue and green parallel lines for a one point perspective.
(The two Parallel red lines are the point X, the two parallel blue lines as the point Y and the two line crossing each other colour green are the point Z)
And when the object is tilted a little to form a two points perspective, objects are position on plane and as the go closer to the [horizon line] the object tends to reduce in size until the object turn to dot.
Learning the ways to draw Grid lines for background
Grid line are lines use as guidelines to draw object of a background.
For a one point perspective of a box, we start by draw two straight Parallel horizontal line [indicate as the red colour] and another two parallel draw vertical indicated with a blue colour with lastly the green line in form of an X line crossing the middle of the other lines.
Draw a little square in the middle of the bigger square using the [Grid lines] as a guideline,
Now, we can add so colours to the box and platform.
After adding colour, we can now remove the grid lines and it is done.
Firstly, Draw a straight line (Indicated using a red colour), draw another line vertical (indicated with a blue colour) And three Parallel line crossing the other line,
Next, draw the out line of the box using the Grid lines as guidelines.
Add simple colour to the box and the platform,
The finish 3/4 side view box.
One point perspective.
Draw a vertical line with small horizontal line at a given point as the [horizon line] While bearing In mind the position which the camera will be.
Draw a straight line from the small horizontal line above and below the vertical line [Horizon line] just like a spider web
Now, draw another straight line horizontal crossing the vertical line to form a net.
With that achieve we can now draw the various skyscrapers frame works.
After the line art let do a simple shading for better understanding.
Here is the finish work of a one point perspective of a background.
Two points perspective.
Draw a horizon line, mark the two points on the horizon line with a horizontal small line,
At one point draw lines from the small horizontal line up and down the horizon line
And another one from the right side of the horizon line leading up and down,
Now, we can use the drawn [Grid line] as a guideline to draw the three platform,
For better understanding we can go further and add graded colour,
And with that we are done with the two points perspective of a background.
Three point perspective.
Draw a horizon line with three small horizontally line marking the various point in space,
Following that, draw lines leading to each point,
On one of the point at the left leading up and down the horizon line,
And at the left side on the second marked point, draw a lines leading up and down the same horizon line,
Last on the third point, we draw another lines leading only up.
At this point, we can now draw the line art of the skyscrapers using the drawn grid line as a guideline.
Finish it up by adding the different grades of colour.
With that final touches, we are done with the three point perspective of a background.
Aerial Perpective
The land scale are arranged in a vertical linear form whence the foreground is in front, the midground and background
Aeriel perspective a most times use to stage background scene for the easy colouring and lighting of the Background scene
CSP Perspective ruler
If you can not draw what I just explain, that no problem because clip studio paint ver 2.0 has a useful tool called perspective ruler which can be accessible by
① Select [Layer] menu -> [Ruler - Frame] -> [Create Perspective Ruler], then select the perspective view you want to create via the [Create Perspective Ruler]
Or a two points perspective can also be accessible,
Also a three points perspective can be accessible as well.
② when we click on the perspective line icons with various joint points will appear,
With the joint icons, we can adjust the perspective lines either left, middle or right.
Also there is a feature that blow my mind and I hope to get to use them in my next tutorial is the grid X,Y and Z
The display below is how the appear on the canvas, the XY varnishing point will appear red and flat in the form of a net, the YZ varnishing point will appear on the right while the XZ will appear below the canvas.
Note: that this can change depending on the choosing perspective.
Stage of object on the background scene (Ruin on the Cliff)
Staging of the object is an important and interesting features that help show the dramatic expression of the scene like for example taking our object is place above the horizon line on the plane. I use the Blue polygon to show the object and the red line as the horizon line.
This is a two points perspective,
Making the view point from below give viewers that in deep ideal the object is on a high plane,
The Ruin on the Cliff
Object can be also be place blow the horizon line,
Ruining on the edge
This is a three point perspective,
There is no much I can say for this particular scene as we can see this point of staging best show event of a scene like for this particular scene is that the building is falling a
Part.
When drawing doors and windows for either castle or monastery, it is advisable you make use of simple shapes like for the inside which is indicated with the red coloured shape,
And for the exterior of the doors and windows which I indicated with a blue colour,
This below are some was which a castle or monastery do appear.
Floating ruin island
When we have multiple perspective of the various objects in the scene, it is best you use shapes to from them,
Take the two floating island by the right, left hand side and that of the bottom for example have their perspective drawn to the middle,
With the middle island having to vanishing point,
This scene can be use for various background like for example an island on the sea,
Or an island above the clouds.
And there is an important thing to bear in mind as when one is drawing ruin building is the below the building their are fragments of the building which fell and the environment will look unkept.
Ruin in the Sahara desert
This style of staging is use mostly because the object is basically position on top of the horizon line,
It can sometimes be a two points perspective or a one point perspective but what I will like for us to understand is that the Object size show where there object is at a point in time,
(The building in the red polygon is closer to the viewer while the blue is further away from the viewer)
And to show if the object is position at a far away distance, we can draw in some hills shapes on the plane in front of the object,
Here, we can now see that the object seem to be further away from the viewer in this background scene.
The cartoon painting of ruins (The ancient lone castle)
This style of draw is mostly use to make the object to have some kind of rubbery appearance
To achieve this, we start by drawing a cylinder shape standing upright
We can add details to the cylinder forming the various shape of bricks wrapping the Castle round, I also draw some broken brick below the Castle which fell to the ground and some tree shapes to the land plane,
After that, we can now add some plane colours to the scene And then we use the smudge tool brush to smudge the colours of land plane,
Create a new layer below all the other layers, add a choice of sky colour to the background but I will be using this choosen colour palette,
With that, I add some dark colour to the castle,
I use the [Gradient tool] to graded colour to the castle and add some flat colour to the window and door,
Move-in on, I then add some light reflection on the castle, trees and the sky behind on the background while the layer blend mode is set to [Opacity],
Then I create another new layer above all the layers, step it to colour dodge and add some light penetration ray through the trees and with that the art piece is done
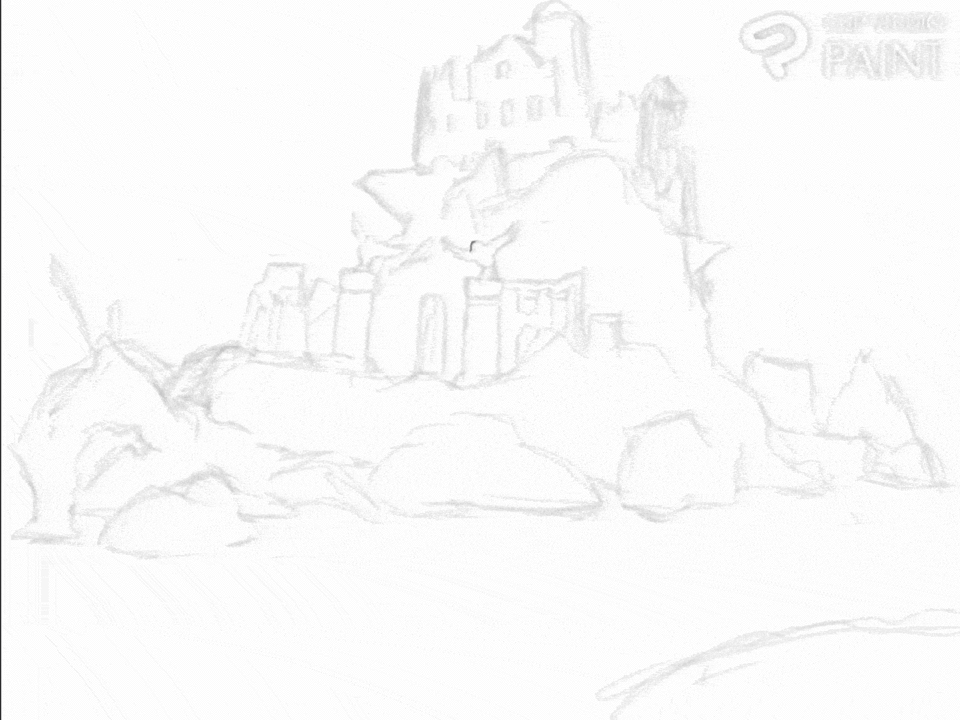
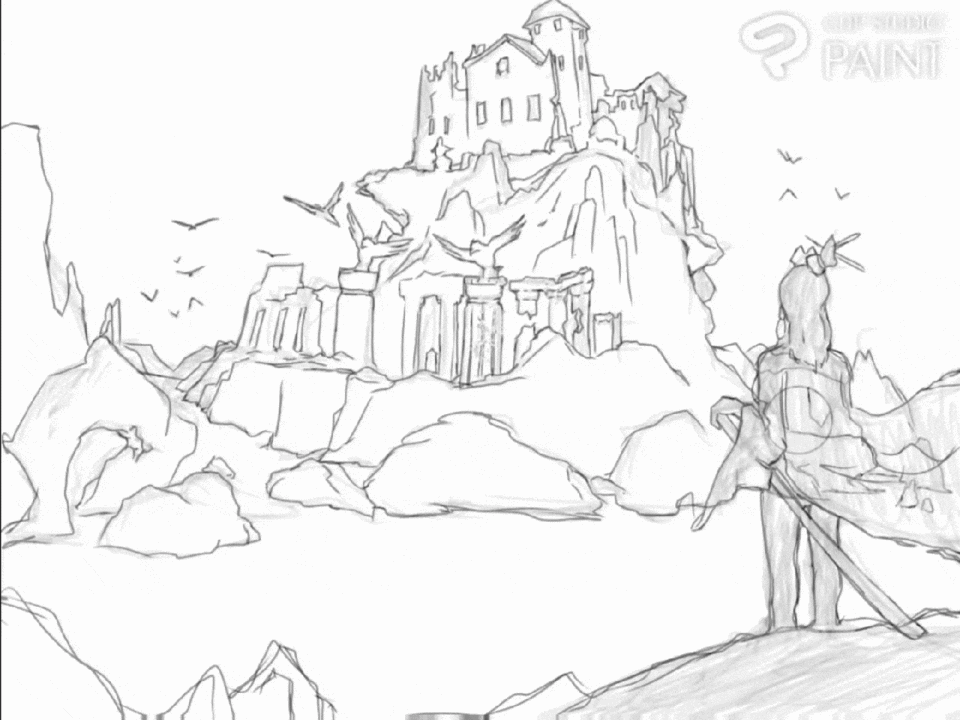
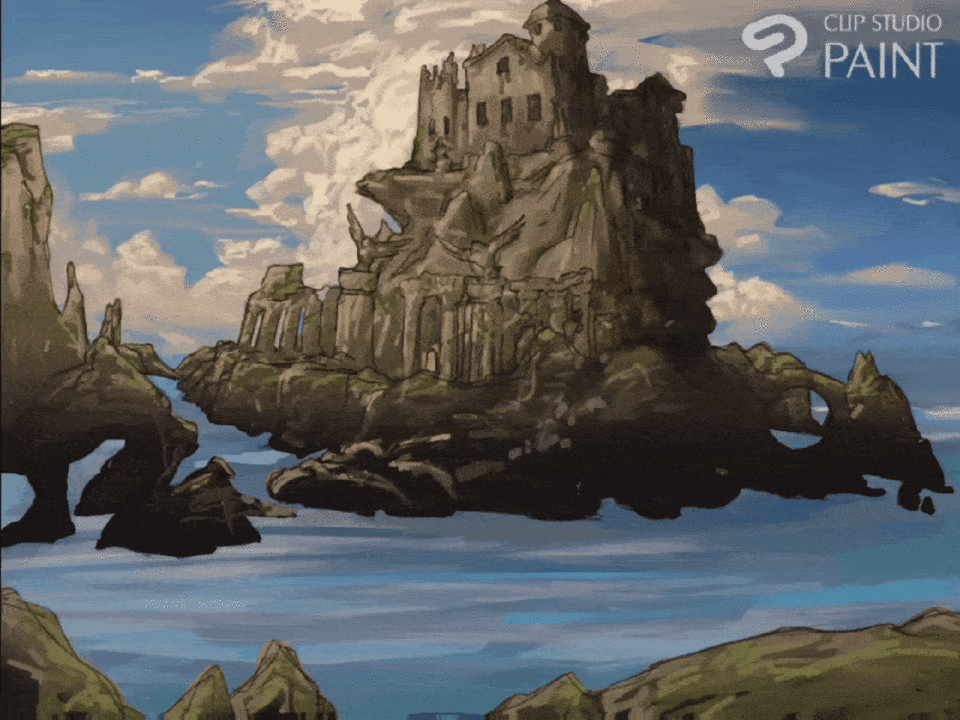
The Main aspect of the tutorial (The Lost Monastery)
Before I start I research for reference for better understanding of colour composition and staging. When I was satisfied I started by creating a Canvas with the pixel size is 1165px × 874px and revolution 72,
Then I rough sketching the object [ruin Monastery] and staging on the plane,
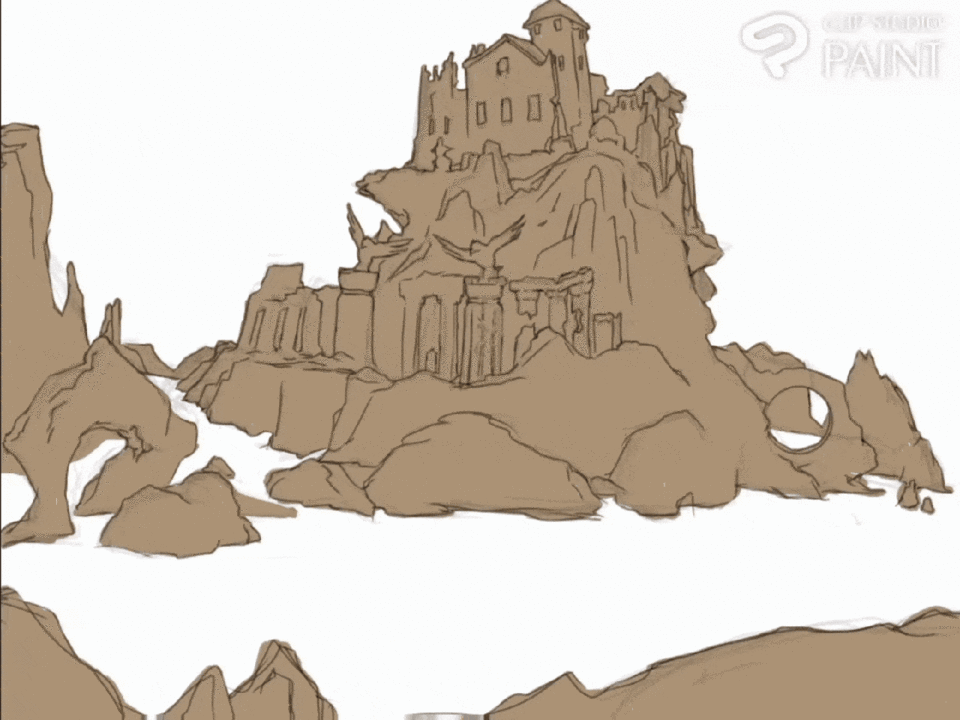
Create a new layer above the other layers and draw a clean lineart of the of the object [the ruin Monastery],
Now on another new layer created above the other lineart we draw the lineart for the female character figure,
After that, I then make it invisible by turning off the visible because I want to fully focus on the rendering of the main aspect of the background scene which is the ruin monastery,
(Notice how use layers are when paint one can place around with them and the help make both drawing and Colouring easy. So I advise you should learn to use them to your advantage)
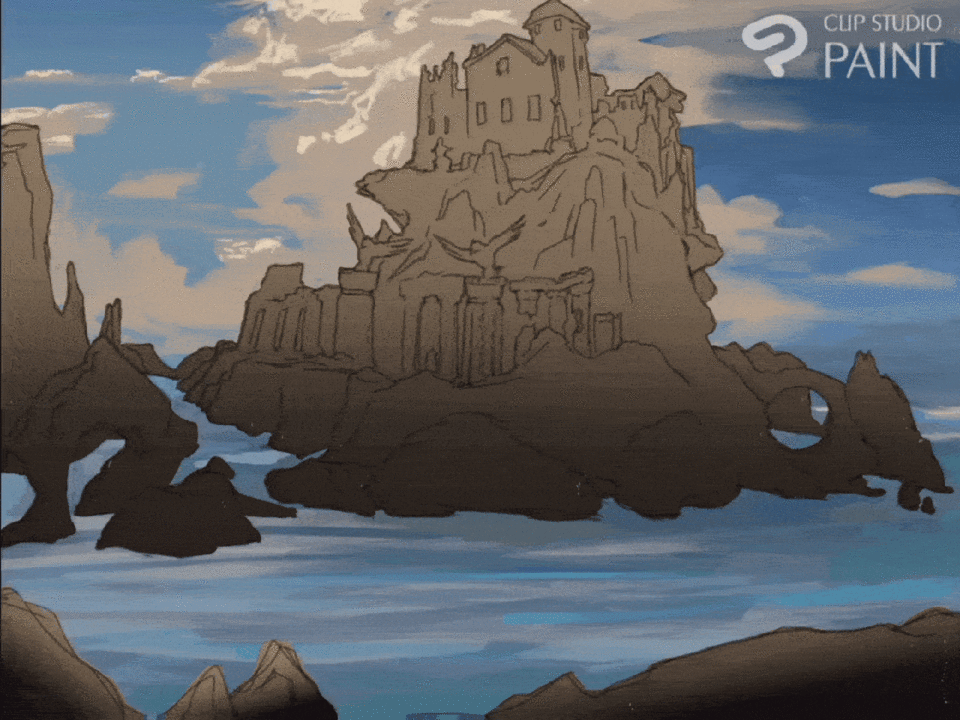
Below are the chosen colour palette I will be working with on this aspect.
Next, I move on to add gradient colour to better distinguish the upper part of the monastery from the bottom and also I added some identify features to monastery to better give it a dimensional appearance,
I then create another layer below all the layers and added some gradient colour for the background,
Above that layer I create another new layer and I paint in some water below the island and the close by Rocks,
Now, I create another layer above again and this time I add some dark colours to the sky to distinguish where the light source is coming from in the sky,
Here I move on to add some greens to the monastery and rocks on a new layer create above the Midground layer where the monastery flat colour is render, this aspect is to show the viewers that the monastery has been there for a long time and now weeds are growing on it,
I then create another layer below the Midground layer and I paint in the flat of clouds on the sky above the monastery and I use the smudge brush to smudge it to some edges a blurry appearance,
At this point the piece has started to pop out but we are not done yet.
Create another new layer above the other layers and add more details works and add more dark gradient to the bottom of the monastery and rock,
Create another layer, setting it to [Opacity] and add some warm colour to the island,
Now, I move to adding details to the clouds using a hard edge brush with it opacity set to 70% and a smudge brush and I also blend and detail the island .
(I do know that as a beginner one terms to ask what kind of set does he or her use that why I gave those above setting)

After that, I duplicated the Midground which is the island and the close by rocks and flip it over with top now facing down. I then use I the smudge brush to distort it to give viewers some suit of the island reflection or under water rocks,
Above the Midground, I create new layer and use a decorative brush to add splashes of water on the rocks,
More and more our art have start to get more realistic but let not just stop on let do more.
Create another new above all the layers, setting it to saturated and add some orange colour to the clouds to show the colour of our light source and a little pink to make the piece spontaneousness.
After doing that we are done with the ruin monastery, we can now move to adding figures. First, we make our female figure visible and paint in a dark colour below the lineart of the figure layer with some painted bird in the Background,
Set the lineart layer of the female character figure to [Multiply],
Next, I add some I detail identifying features to the female character,
Following that, I add white colours to the flying birds,
Then I create a new layer, set it to Multiply and add a darker colour to the Foreground while masking it to avoid it affecting the either the Midground or the background. I then reduce the opacity to 65% to make the female character to look dark so that focus can be easily directed to the monastery.
For my finishing touches I a new layer above it all and set it to colour dodge, I use a warm yellow colour to add light ray glowing out of the ruin monastery.
With that we are done
Conclusion
Thanks for reading and I hope this tutorial was helpful. I will love to know your thoughts on the illustration drop your comments below 👇👇 and I will reply as fast as I can and you can reach me on the various social as well.
Twitter https://twitter.com/DanielAdakole12?t=Zb1WwytJgwew7JDH4LS6bw&s=09
https://www.facebook.com/daniel.adakole.37
Instagram https://www.instagram.com/invites/contact/?i=sk3svbm4rm2a&utm_content=okfftkg
YouTube
Users who liked this post


Comment