
Wassup, guys!
I’m Link, an animator and illustrator from @linkurys
Linkurys (@linkurys) • Instagram photos and videos
This is my first time sharing animation tips online, so if any of my advice seems unclear or confusing, please don't hesitate to ask! You can leave a comment or DM me.
In this tutorial, I'll show you 3 ways to quickly and easily animate your emotes. Each method comes with its own challenges, but don't worry! I'll guide you through every step, from start to finish using Clip Studio Paint Ex !😁
What We Going To Do?
When you think of making animated emotes, you might believe it's hard, complicated, and requires a lot of work. I thought the same before I started animating. But believe it or not, those three points above are essentially all there is to it! Well, of course, it's not that straightforward, but it's easier than you might think! Especially when we use Clip Studio Paint which gives us a lot of features 😎
3 Ways to Animate Your Emotes!
As I mentioned earlier, I'll provide you with 3 ways to create your own animated emotes, which are:
1. Static Image Animation
The essence of this technique is simple, basically just moving your image/drawing to achieve the motion you want.
(This is the most popular method that people use when making their animated emotes and you've likely seen this type of emote many times, right?)
2. Parts Animation
Here, you'll separate the parts of your emotes and move them individually, using the same technique as the first method.
(Similar to the 1st method, but with more components to animate.)
3. Frame by frame Animation
Animate by drawing each movement frame by frame!
This technique demands more effort and can be somewhat challenging for beginners. However, with consistent practice, you'll find yourself becoming quicker and more proficient at creating these animations!
(The most challenging one but a lot of fun! :D)
Preparing Your Workspace and Stuff
1. Prepare your emotes drawing that you want to animate
Make sure you can see it!
When we discuss animated emotes, they're often used for live streaming chats, like on Twitch or similar platforms. Since they can appear small, it's important to make sure they're easy to see. Don't add too many tiny details that might get lost. Just keep it simple!
2. Setting up your clip studio paint workspace
Before diving into the animation tutorial, let’s set things up!
1. Open your Clip Studio Paint
2. Click File > New…
3. Select Animation on Project
4. Set your canvas/frame size to 1000x1000 px and resolution to 150
(You can choose a different size, but ensure it maintains a 1:1 scale)
5. Set your frame rates on 24 FPS
6. Click OK
If you don’t have the Timeline Panel, you can make it appear by going to Window > Timeline
Wait, what's a Timeline, you ask? Well, it's essentially the backbone of any animation project. On the timeline, you lay out sequences, set the pacing, and organize your animation frames. It's where all the individual pieces come together, allowing you to visualize and control the flow of your animation from start to finish. Think of it as the director's dashboard where every movement, every transition, and every moment is mapped out.
This is optional, but you can hide your animation folder preview for better space by going to Burger Icon (3 Lines) beside Timeline then Thumbnail size > None.
Yay! Now you’re done with setting up your Clip Studio Paint workspace! ✨
Animating and Moving Your Stuff
If you're reading this, that means you're ready to animate your emotes, right!? (Or maybe you just skipped ahead to this part 😏). Either way, let's start with the simplest yet easiest method: Static Image Animation!
1st Tips: Static Image Animation
In the picture above, you'll see three ways to move and change your static image. You can shift it around, turn it, make it bigger or smaller, or mix these methods for different effects. There are so many possibilities you can do with just using these tricks, your creativity is the only limit!
Static Image Animation: Level 1 (Basic)
1. Preparing your static image/drawing
For level 1, let’s make those disappointed emotes just by using 2 images:
-Your character drawing
-Background image
2. Creating animation folder
Before importing your drawings into Clip Studio Paint:
1. Create a new animation folder. This will help you separate your character drawing and background image into different layers.
2. Rename the animation folder as you like. For example, I use “Character” for the top layer and “Background” for the bottom one."
3. Importing your images/drawing
In Clip Studio Paint for animation, you can't just drag and drop images directly onto your canvas to import them. This is because animation cels in CSP are primarily designed for brushes and other tools, not for direct image imports. Think of it this way: they aren't made for raw image materials.
To successfully import your image files, ensure you drag & drop them to the layer pallete area, precisely below the animation folder.
The image file will be inserted as a Vector Layer named “Dino 1”.
(“Dino 1“ is my image file names)
“But the images didn’t appear on the canvas :( “ You say?
Well, it’s because you need to assign your Image Vector layer to your animated folder first!
You can do this by Clicking Assign cel to frame > Select your image layer > OK
The imported image size might be larger or smaller than your canvas size. To fit the image to the canvas without altering its proportions, press and hold the Shift key while dragging the picture's corner
That’s it! You are done with importing your character image!✨
Now, you can do the same thing on importing and assigning your background with the other animation folder!
4. Animate your drawing!
To start animating your drawing, you must activate the keyframe function first by doing:
1. Select the “Background” animation folder
2. Enabling keyframe for the layer you choose
When the keyframe is enabled, add keyframe on the first frame
Now, copy that keyframe you added and paste it to the end of your animation's duration, which is 2 seconds. You can do it easily by pressing ALT+Drag & Drop the keyframe.
Now you have 2 Keyframes!
First, select the initial keyframe. Next, click on Operation mode >Object. This setting will enable you to begin adjusting your background starting from that first keyframe
After that, move the background image to top/ going outside from the canvas
AND THAT’S IT!
You’ve made your 1st animated emote! 🥳

If you feel the background animation is too slow, feel free to adjust it to your liking. Personally, I add more keyframes close to the initial one to tweak the speed.
Here’s the result!

And here’s another result using all 3 static animation basic techniques (rotate, scale, and position) with the exact same procedure! Can you tell me where & when I use all of them? 👀

LEVELED UP! CONGRATULATIONS! ✨
You’ve completed Static Animation Level 1. Now, you’re ready to go for Level 2!
Static Image Animation: Level 2 (Advanced)
Welcome to Level 2!
By now, I assume you've got a solid grasp on the basics of static image animation. So, we'll skip the basic steps and dive straight into the animation process shall we!?
1. Level 2 Emotes Material
Using two different images might seem straightforward, especially with the endless possibilities from combining basic static animation techniques. But for this level, how about we up the ante? Let's create an animated gif using just one image! 😈
2. New file or New Timeline?
You have two options for this part: either create a new file/canvas like we've been doing, or simply create a New Timeline with the same format as before, but with minor adjustments. Curious about making New Timeline? lemme tell you!
Here’s how to make a new timeline:
1. On the Timeline Panel, click the New Timeline button.
2. A pop-up screen will appear. Since we're using the same animation format, there's no need to adjust any settings. Just rename the timeline to 'Level 2' or maybe you want to change your Playback time for a shorter/ longer duration.
3. Click OK
Your New Timeline Is Ready To Go! ✨
However, if you look at the layer panel, you'll notice the previous drawing images you imported are still there. This is because creating a new timeline means you're working within the same file as before. Those won’t affect your progress on the new timeline though!
Don’t Delete Them! ⛔
If you delete these, you'll be removing the imported files from the previous timeline. And yes, this means the animation you've been working on in the other timeline will disappear. So, it's best to leave them untouched
But if that bothers you, here’s a quick solution
1. Select all the layer
2. Group these selected layers together by pressing CTRL G
3. Label it as “Timeline 1.”
4. Simply minimize the folder to keep your workspace neat.
5. Voila! Your workspace now has a fresh, organized look with a new timeline-ready appearance ✨
3. Animating your drawing!
Your new timeline is now set, now let’s start animating!
Here’s a quick reminder for stuff you need to prepare:
1. Create a new animation folder
2. Import your image/drawing
3. Assign your imported image to animation cels
4. Adjust your image scale
Adding 2D Camera Folder:
1. Click burger button
2. New Animation Layer
3. 2D Camera Folder
Now that your 2D camera folder is set up, move your drawing layer into it. Simply drag and drop the layer inside the 2D camera folder. Doing this activates the camera effect on your images/drawings
Note before Animating 2D Camera Effect
1. Make sure you've selected the camera folder or layer.
2. The square frame you see on the canvas represents the area that will be captured by the camera effect. Essentially, whatever is inside this square will be the output
3. When you begin adjusting the camera effect frame, a keyframe will automatically be added to your timeline. If you progress to another frame duration and then adjust your camera frame, it will adapt accordingly.
4. To see your camera effect result, click & open Burger button menu on timeline > Playback Settings > Render 2D Camera
Animating 2D Camera Effect
Create a quick and vibrating camera effect, by moving your camera effect frame to a random position every 2-3 frames
The expected result should look like this

Animatin zoom effect
1. Choose the animation layer of your drawing that's inside the camera folder.
2. Turn on the keyframe option.
3. Add a keyframe at both the beginning and the end of the animation.
4. On the final keyframe, scale up and enlarge your drawing/image layer to achieve a zoom effect (make sure to do it with operation tools > object, or you won’t be able to move the image)
The expected result would be like this!
While you could consider it finished at this point, why not add a little extra flair? Let's enhance that smile to make it even more menacing. HAHA 😈

Adding Filter
1. Select your drawing layer
2. Disable keyframe function temporarily
(Don’t worry, when you turn it on again the keyframe will still remain the same)
3. Rasterize your image by Right Click on the layer > Rasterize
Rasterizing converts your Vector Layer into a Bitmap Format, which then enables you to apply filters to your image
4. Open Filter > Blur > Radial Blur
(Note: There are many other filters available that you can explore besides this one!)
5. Adjust the strength, Direction to Both directions and Mode to Smooth, then OK
6. Once done, you can reactivate the keyframe function for your drawing layer
AND HERE’S THE MENACING SMILE! 😈😈😈
LEVELED UP! CONGRATULATIONS! ✨
You’ve completed Static Animation Level 2. Now, you’re ready to go for Parts Animation!
2nd Tips: Parts Animation
The concept behind parts animation is similar to static image animation, where you move, scale, or rotate your drawing. One thing that makes it different is that you need to separate each part of your character that you want to move individually. As illustrated in the image above, my character has four parts, each of which can be animated separately then can give you more possibilities and even dynamic poses for your emotes!
Separating character parts
In this tips section, I'm aiming to animate my character sipping a cup of coffee.
To achieve this, I'll break down the character into five parts, which is:
1. Body,
2. Eye,
3. Eyebrow,
4. Lips
5. The coffee cup
Just a quick reminder guys, you don't have to mimic my poses or designs. Feel free to use your own characters, poses, and related elements. Let your creativity shine!
Setting up Animation Folder & Importing images
Setup your animation folder
Create animation folders based on the number of distinct parts your character has. Since my character is divided into five parts, I'll create five separate animation folders.
Ensure you arrange the folders correctly. You wouldn't want an image that should be at the forefront to be overlapped by other parts, would you?
Import and assign your drawing to each animation folder cels
1. Import your image/drawing to each animation folder you’ve made
2. Assign your imported drawing to the respective animation folder, just as we did with Static Image Animation: Click 'Assign cel to frame', select your image layer, and then click 'OK'. Repeat this for each part
3. Set those parts to their initial positions for the starting condition or the 1st frame
Animating character parts
Before diving into animation, it's crucial to plan out the desired motion. Based on the image above, to achieve the sipping action for our character, we need to identify which parts we'll move and which parts will remain stationary.
If we observe the image, this is what can we learn:
1. The eyebrows are moving downwards.
2. The eyes remain stationary.
3. The mouth is obscured as the character sips the coffee
Now we have our desired motion condition, let’s start animating!
1. The first thing we want to do is to enable the keyframe function on each animation folder/layer so we can start placing the keyframe on it and animate it
2. Add keyframe on the first frame and the last frame
3. Edit all of the final keyframes to represent the end motion. For my character, it's the moment when the character is sipping.
The expected result should look like this!

We could technically wrap it up here, but why not add a bit of flair to make it even better? Let's spice things up! 😎
1. Add 2D camera effect by Right Click on the Animation folder> New Animation Layer > 2D Camera Folder
2. Insert all character parts animation folder to camera folder
Animating the 2D Camera Effect
1. Close your camera folder to hide other layers. This makes your timeline easier to see.
2. Add keyframes on the first and last frame
3. Scale down the camera effect frame to achieve the zoom-in effect
Expected result should looks like this!

Feel a little bit spicy yeah? but this is not spicy enough, let’s add more spices! 😤
4. Add background, by adding a new animation folder below the camera folder
5. Select the background layer > New Animation Cel
6. Add black figure/shape on the background layer
7. Enable keyframes on the background layer
8. Add keyframes on first and last frame of the layer
9. Select the first keyframe, and turn down its opacity to 0
The expected result should look like this!

It already looks even greater don’t you think!? But I have one more final touch!
1. Make a new animation folder at the top of the camera folder and named it Foreground
2. Create a new animation cel. Add a 1/4 black shape to the canvas, covering a portion of your character drawings. Duplicate the foreground animation folder and move the duplicate to the bottom of the canvas. So now you have 2 different foreground layer on top of camera layer.
3. Enable keyframe on both layers
4. Add a new keyframe on the first and last frame on both layers
5. Select the top black foreground then select the first keyframe, shift the black shape so that it's positioned outside the top of the canvas
6. Select the bottom black foreground then select the first keyframe, shift the black shape so that it's positioned outside the bottom of the canvas
The first frame would look like this
Here’s the result!!! ✨

And here’s another result I made using all the animation techniques that we’ve covered so far! Can you tell me what & where I use all of them? 👀

LEVELED UP! CONGRATULATIONS! ✨
You’ve managed to complete both Parts Animation and Static Image Animation!
Just coming this far you’ve proven yourself you have amazing potential when it comes to animating emotes! I’m proud of you! 🥹💖
3rd Tips: Frame by Frame Animation
Introduction
Before we dive into our frame by frame animation journey, it's important to go over some fundamental terms and concepts. This will ensure that we all have a clear understanding and are on the same page as we move forward!
What is frame by frame animation?
Compared to the earlier techniques where we mainly shifted backgrounds and parts of the character to show movement, frame-by-frame animation has us illustrating every single action of our character in detail.
Take a look at the image above.
You'll notice the character leaping from one point to another.
Each phase of that leap is represented by a unique image, capturing every nuance of the motion. This is the essence of drawing each movement step by step!
Frame
A single image in a sequence of images. Just like a single photo in an album.
Frame Per Second (FPS)
How many frames (or pictures) are shown in a single second. For example, if you have 24 FPS on your animation it means that there are 24 frames on every second to make the action appear smooth
Keyframe & Inbetweening
Keyframes, These are the main frames or 'key points' of your animation. They define the start and end points of any smooth transition. Using the example of a ball being thrown, shown in the image above, the keyframes would be the starting throw, the highest point, and when it lands.
Inbetweening, This is the process of drawing the frames that exist between the keyframes to make the motion smooth. For our ball, it's the frames that show the rise and fall between those three main points.
More inbetweening means more frames and more smoother animation!
Animated Emotes with Frame by frame
Even though making frame-by-frame emotes takes more time, it's worth it for animated emotes. They don't need to be as detailed or long as regular animations. As long as they show the emotion, they do their job!
Going into every detail of the frame-by-frame technique would take a long time. There's a lot to cover, like the 12 animation principles and how to make a good scene. That would make this article really long and might be too much. We'll talk about those other details later in a different article.😉
For now, let's just focus on making those Animated Emotes with the frame-by-frame technique!
What we going to do
Before we dive in into the process of making emotes by frame by frame technique, here’s what we going to do! (I think)
1. Setting Up Workspace
Getting our animation canvas ready.
2. Sketching & Timing
Planning our animation through sketches and setting the right timing.
3. Line Art
Turning those sketches into clean lines.
4. Coloring and Rendering
Adding colors and giving it a polished look
5. Finishing touch
Umm… we’ll see about that later hehe 😋
1. Setting Up Workspace
Setting up animation canvas
If you've been following along with the steps from our previous tips, you'll know we're using the same workspace for this technique. However, if you've jumped straight to this section or need a refresher, let me do a quick recap for you!
1. Open your Clip Studio Paint, then open File > New
2. Select Animation on the Project tab and configure the animation preset like this:
3. Click OK
4. If your Timeline not showing, open Window > Timeline
Setting up animation layer
When you create a new canvas, an animation layer is automatically added and named for you. It's a good idea to rename this layer to reflect its purpose. For instance, if you're sketching your animation on that layer, you might rename it to 'Sketch Layer'.
This will give you a huge advantage in managing your animation timeline!
And that’s it! your workspace is ready to go for frame by frame animation!
Setting up Layer Folder
Using layer folders is crucial in frame-by-frame animation. They let you stack multiple layers within a single animation cel or frame, keeping things organized and efficient.
here’s how to set this up!
1. Select your animation layer
2. Create a new layer folder on layer palette/panel
3. Create a new raster layer and put it on the inside of the layer folder
4. Assign layer folder cels to your animation frame
Note: When you've assigned layer folder cels to your animation frames, they will automatically duplicate the number of raster layers within that folder. So, if Frame 1 has a layer folder with 2 raster layers, When you add a new frame like Frame 2, it will also have 2 raster layers, mirroring Frame 1.
Turn on Onion Skin
This tool will allow you to see and reference previous and subsequent frames for smoother transitions. It's akin to layering translucent onion skins, providing a "ghost" image of adjacent frames to guide the animator's work.
You can turn it on just by triggering the onion skin button on the timeline palette
2. Sketching and Timing
Sketching
Also known as 'Rough Animation', is about drawing basic movements of characters or things. These simple drawings show the main actions without detailed looks. They help us get a feel for and plan out the movement.
Timing
Timing in animation is about how many frames are used for each movement to make it feel right. It helps show things like how fast or heavy something is.
If you’ve done my static image and parts animation tips, you basically just done it when adjusting the keyframe!
Step 0: Emotes concept
Before we start drawing, think about the emote you want to make. Ask yourself:
1. What feeling or expression do you want to show?
2. How will it move? How it will start and end?
In my case, I will make a quick and simple emote for you to understand, which is:
1. I want my character winking
2. It'll change from a smile 🙂 to a wink 😉.
Understanding your goal clearly will improve both the quality and speed of your animation. It's important to know what you're aiming for!
Step 1: Make animation layer & cel
1. Make a new animation folder/layer
2. Rename the animation layer to “Sketch”
3. Add new animation cels/frame
Note:
1. Do this step each time you want to draw new frames for your animation
2. You can use layer folder too if you want
Step 2: Sketching!
Since we're in the sketching phase, feel free to experiment on your canvas and explore different ideas! Maybe you’ll find better pose for your character or whatsoever 😎
Note: I typically use the G-Pen for sketching, lineart, and coloring. But choose whichever tool you're most comfortable with!
Sketch Brief
For every shift in character expression or pose, adding an additional main pose or another keyframe helps transition the character more smoothly. So in my animation case, I’m going to add 1 more keyframe between the character smiling and winking😗
Here some quick sketch and time mapping the animation:
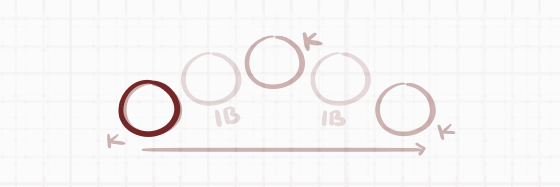
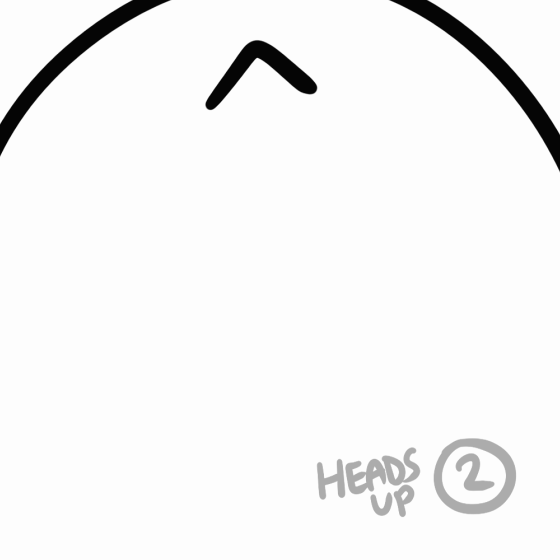
as you can see from the image above now I have 3 keyframes which are:
1. Smiling - Starting pose
2. Heads up - Transition K1 to K3 Pose
3. Winking - Ending pose
Later we will add some inbetween frames (IB) for smoother motion of our character when changing keyframes!
Sketching keyframe
Let’s start sketching our main keyframe by following these 2 simple steps:
1. Draw your starting character pose on the first frame (frame 1)
2. Draw your transition character pose in the middle frame (frame 12)
3. Draw your ending character pose in the last frame (frame 24)
Note: This is optional, but you can rename each of your frames (in my case it’s K1, K2, K3) for a more organized timeline. Well, it’s up to you!
The expected result should be like this:
Looking good eh? 😉
Sketching inbetween
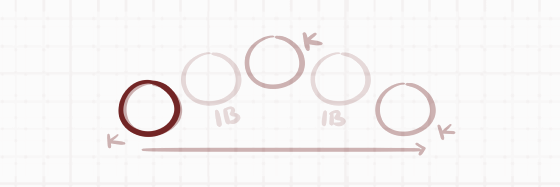
Now let’s add some in-between frames to make the transition between keyframes look seamless by doing:
1. Make and draw in-between frames for K1 and K2 in the middle between them (frame 6) with the Anticipation technique to build character momentum before doing the next pose.
2. Make and draw in-between frames for K2 and K3 in the middle between them (frame 18) with the Squash technique to build character impact when doing the wink after heads up.
The expected result would be like this:
As you can see the rough animation we make, it’s still looks too choppy to call it done. So to solve this we need to be adding more in-between frames, between in-between frames we’ve made! (got it?) 😇
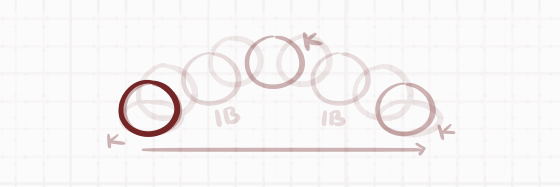
Adding Extra in-between!
These extra in-between frames differ from our previous ones, which used anticipation and squash techniques. For these frames, we'll simply draw lines that transition smoothly from the keyframe to the original in-between.
1. Make and draw extra in-between frames in the middle of your every keyframe and the original in-between. Let’s label every extra in-between to “e”
Here’s the expected result!
Current speed

Slowed

Here’s what happens on every frame 👀
The total frames that we’ve drawn are 9 frames, which is:
1. 3x Keyframes / Main poses
2. 2x In-between frame
3. 4x Extra In-between frame
If the rough animation seems a bit off to you, that's because we haven't fine-tuned the timing yet. The goal of this sketching stage is to get a grasp on drawing keyframes and in-betweens correctly! So worry no more because we’re going to the timing part!😎
Note: The sketching part is not your character's best movement, we might wanna delete some unnecessary frames or add a new frame when we adjust the timing!
Step 3: Timing!
Adjusting the timing is the pretty hard part when it comes to animating stuff, even for me! It needs a lot of practice to get to know and feel the best timing for your animation because every different movement or different pose requires a different timing too!
You can't replicate this step exactly (unless you're using my specific character as a reference). Instead, trust your instincts and adjust the timing based on your own vision. Tweak the character's movement until it feels just right!
Here are some tips you can follow to help you get the right timing for your emotes:
1. Determine the speed of your character's movements.
-If the movement is going from slow to fast, place the frames closer together.
-If the movement is going from fast to slow, space the frames out a bit more.
2. Change, delete, or even add a new frame if your character movement doesn’t feel right.
Because I’m making this tutorial at the same time I’m doing the animation and drawing. I have some unnecessary frames that need to be deleted and some frames to be added.
Note: Having too many or too few frames can negatively impact your animation's flow and clarity.
Here's my timeline with adjusted timing and modifying some frames
Here's some illustration for frame that I deleted and added
1. As you can see from the image above, I’ve deleted 3 unnecessary frames, which are:
1. e2
2. e3
3. e4
I removed this frame because it disrupted the natural flow of my character's movement. It's crucial to carefully review each frame in your animation to identify and eliminate any that might cause inconsistencies or make the motion appear unnatural.
2. I added K22 and K33 frames to the timeline!
but why it’s looking the same with K2 and K3? it’s because I just duplicated those frames to create some overlap and bounce effect by stretching the duplicated drawing like this:
Select a frame that you want to stretch > CTRL Shift T to enter free transform mode > Select the top node and stretch it slightly to the top
Overlap effect
From the image above, you can see how the frame causes the character to overlap during the "head's up" motion. This exaggerates the movement, making it more dramatic!
Bounce effect
After the "heads up" gesture, you'll notice that as my character swiftly moves his head down, a bouncing effect is created when he winks. This adds dynamism to the animation!
And here’s the final result!
Before

(Goofy ahh movement 💀)
After

(Finally an actual movement 😎)
Step 4: Take a rest and admire your rough animation ✨
You are officially done with the sketching and timing step! Well done! ✨
Of course, it’s not done yet! We need to make it look nicer by putting some smooth line art and adding cute colors on it to make proper emotes!
Why don’t you take your time to admire and review your completed sketch animation?
Like I did right now 🥹🥹🥹
3. Line Art
Now that we've achieved the desired motion during the sketching and timing phase, it's time to refine our animation with smooth and precise lines!
Step 1: Setting up animation layer
1. Turn down the sketch animation layer opacity to 30
2. Make a new animation layer above the sketch layer and rename it to Lineart
3. Make a new layer folder on lineart animation layer
4. Assign the layer folder cels to the animation frame
Now you’ve done setting up your animation layer for lineart, let’s go to the next step!
Step 2: Doing the lineart
After setting up the animation layer, let’s draw our lineart on it!
Here are some tips that might assist you during the process:
Tools:
1. Select your preferred pen or brush tools that fit your drawing styles (that you always use in your drawing). In my case I use G-Pen.
3. Ensure you have a consistent pen or brush size!
4. Enable stabilizer on your pen will dramatically help you when stroking your line
5. Add more raster layers to your layer folder, so you can draw your character parts separately
6. Use Transform Tools for changing your drawing position, shape, etc
Tips:
1. Use long and continuous strokes for a smoother and more confident look rather than short and choppy ones.
2. Take breaks, periodically zoom out to see the overall image, and ensure everything is proportionate and consistent.
3. BE PATIENT, If a line doesn't look right, don't hesitate to undo it and try again. Strive for the best quality, even if it takes a few tries.
4. Clean up any overlapping lines or imperfections once you're done to give a polished look to your animation.
5. Feel free to customize character poses and add frames to the animation.
6. View your clean lineart progress by toggling the sketch layer visibility On and Off.
And that’s it for the lineart tips that I can give to you right now
Good luck and have fun doing the lineart! 😘
Here’s the linearted version of my character!

Step 3: Take a rest and admire your lineart version of your animation ✨
You are officially done with the Lineart! Fantastik! ✨
Great job making it this far in our animated emotes journey! Sketching, adjusting the timing, and perfecting the line art can be the most challenging aspects of animation. Now that those steps are behind us, we can dive into the fun part: coloring! Let's bring those drawings to life!🤩
But before that, why don’t you take your time again to admire and review your completed sketch animation?
Like I did right now (again)🥹🥹🥹
4. Coloring and Render
The way we color and render our drawings in animation depends on the complexity of the drawing itself. However, since we are animating emotes that have a simple design and only a few frames to color, this part should be the most enjoyable and easy peasy!
Step 1: Setting up animation layer
1. Make a new animation layer below the Lineart layer and rename it to Color
2. Make a new layer folder on Color animation layer
3. Assign the layer folder cels to the animation frame
Now you’ve done setting up your animation layer for color, let’s go to the next step!
Step 2: Base Color
In this part of the coloring step, we’ll be using Fill Tool for the base color of our animation! There is 2 way you can do the base color:
1st way : Using Fill Tool
1. Make sure you selected your color layer and frame
2. Select Fill Tool on the toolbar
3. In the fill tool settings, choose "Refer other layers."
This lets you use the fill tool based on a different active layer's boundaries.
4. Select your preferred color
5. Use the fill tool to color in your canvas
6. Done!
2nd way: Using Lasso tool
1. Make sure you selected your color layer and frame
2. Select Selection Area on the toolbar
3. Choose Lasso
4. Select your preferred color
5. Use the Lasso tool to draw and select the specific area on your canvas that you want to fill with color.
6. A pop-up will appear, then select the paint bucket icon (or Fill icon)
And that’s it how to put base color on your animation! All you have to do now is repeat the same process for each frame you make!
Here's my character with the base color!

We can see our character clearly by the time we finished this step!
Let’s move on to the next one!
Step 3: Render
Render step includes adding secondary colors, shading, and highlights. Here are the things you need to do:
Shadow line
Sketching shadow lines for each keyframe ensures consistent and accurate shading during the rendering process. It means it will be the border when you apply color to your render layer. Here’s how to do it:
1. Make a new animation layer above your character lineart and name it Shadow Line
2. Draw your character shadow line on every frame. (use a contrast color for a better view)
Note: You can implement this on the other things too, like for your character highlight
Here's that shadow line when implemented on my character✨

Because my character is a slime I need to make the shadow line quite different from other character designs! (Like the shadow is in the inside of his body)
Rendering
Now we can start our rendering process, by following these steps:
1. Make a new animation layer below shadow line layer and name it Render
2. Add a new layer folder and assign it to the Render layer frame
3. Select the Render layer, then color the shadow area with Fill tool
(Make sure the Fill tool option is “Refer other layers”)
4. Do it for every frame
5. If you are done using the shadow line, you can toggle the visibility button off or delete it if necessary
Voila! Here'sthe final result of our animation!

We can call it done by now! But as I mentioned earlier on the first page of Frame-by-frame animation, we gonna add some finishing touches! 😎
5. Finishing Touch
The finishing touch can vary; you can enhance your animation by adding special effects, a background, or any other elements you think will elevate your animated piece!
Here's my finishing touch of my animated emotes with sparkle effect! ✨

MAX LEVEL ACQUIRED! CONGRATULATIONS! ✨
You've mastered the art of Frame-by-Frame Animation in creating animated emotes! With this achievement under your belt, you're now ready to embark on new creative journeys and further hone your skills. The world of animation eagerly awaits your next masterpiece! 🚀
Exporting Your Animated Emotes
Having journeyed with me through the various stages of creating animated emotes, you've earned more than just skills. As a keepsake, take the animated emotes we crafted together! After all, it's a testament to your hard work and dedication. Enjoy! 🌟
How to claim your animated emote:
1. Adjust your preferred animation starting and ending point frame
2. Open File > Export > Animation > Animated GIF…
3. Select the destination folder where you'd like to store your animated emotes.
A pop-up window will show up, allowing you to modify the export settings:
1. Width and height, your animated emotes size in pixel
2. Export range, how long frame you want to export
3. Frame rate, Set to Maximum (24FPS)
4. Exporting with dithering or background transparent is up to you
5. OK
Yayyy! You’ve Claimed Your Animated Emotes! ✨
Animation Mastery Pin
Now you’ve got your souvenir for doing the hard work of animating with me, why don’t you go grab some of your title here? Which one do you get? 👀
Closing

My journey in sharing my experiences with animated emotes has come to an end. It has been my pleasure to guide you through the process, and I truly hope you have found it enlightening. 🥺💖
As you embark on your own animation adventures, always remember to stay curious, practice frequently, and most importantly, enjoy the process! I wish you the best of luck in all your creative endeavors.
Until next time! ✨✨✨
Users who liked this post


Comment