
Introduction and Video Version
This tutorial will cover how to use the new align and distribute tools that were added in Clip Studio Paint version 2.0 - and then use the result in a perspective drawing!
Here's the tip in video form. If you prefer text, you can find that below!
I've been working on this 3-point perspective illustration featuring a set of skyrise buildings, and I'll show you how to easily add windows just like this!
Create a File for the Window Grid
To start, I'll make a new file at 1200 pixels wide by 2400 pixels tall.
The new file will have a raster layer by default, but I'm going to delete that by selecting it and pressing the trash can icon.
Then, I will create a new vector layer. Vector layers are indicated by the cube icon on the layer.
Vector layers are great for lineart because you can resize them without having to worry about losing image quality!
Since my scene is a high bird's eye view, I don't need detailed windows, so simple rectangles will do.
Go to the Figure tool and select the Rectangle subtool.
Note: As with all tools, the icon of the Figure tool may look different depending on which subtool is selected.
Using a brush size of 4, I'll draw one small rectangle to represent a window.
Duplicate Vector Objects in the Same Layer
Go to the Operation tool and make sure the Object subtool is the current subtool.
Select the vector object. Note that you need to click directly on the line. You'll know the vector object is selected when it has both a blue surrounding box, and an orange selection on the rectangle itself.
Go to the Edit menu and select Copy. Then, go to the Edit menu and select Paste. This will duplicate the window on this same vector layer, over top of the original one.
Note: Ctrl C (⌘Cmd C on Mac) is the shortcut to Copy, and Ctrl V (⌘Cmd V on Mac) is the shortcut to Paste.

Using the Object subtool, drag the newly created window to the side. Don't worry about keeping it lined up, we'll get to that in a second.
When dragging, it's a good idea to position your cursor near the blue bounding box until you see the move icon appear (as you can see in the animation above). Then you can click and move the object. If you try to click and drag the vector object directly, you might accidentally drag one of the control points, which will change your shape instead!

Keep pasting more windows until you've got a line of at least ten - however many windows you want across your building's face.
Selecting Multiple Objects on a Vector Layer
Now, select them all. It's possible to do this by holding down the Shift key and clicking each one, but there's an easier way!
In the Object subtool, click the dropdown "Operation of transparent part." Turn on the checkbox that says "Select area by dragging," and make sure the option underneath is set to "Objects in this layer."

Align and Distribute the Windows
Go to the Align and Distribute palette. If you don't see it on screen, click the Window menu and select Align/Distribute from the list.
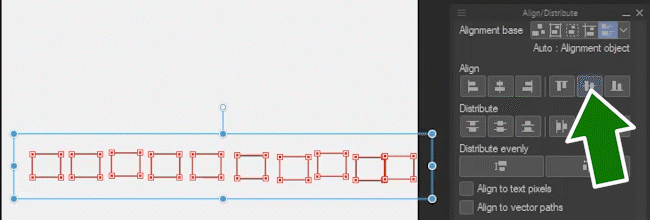
To get all the windows on the same horizontal line, click Align Vertical Centers.

To space the windows an equal distance from each other, click Distribute Horizontal Spacing.
But what if you want a different spacing between them?
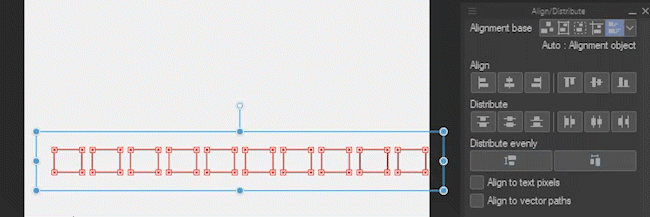
By default, they'll be spaced evenly between the ones on each end.
So if you want a wider spacing, move one out and then distribute, or if you want a narrower spacing, move them further in.
There are several additional options for how to align and distribute objects, even if they're different shapes and sizes. The official Clip Studio tutorial gives a great overview of all of them! Here's the link:
I'd like to center this set of objects on the canvas. If I try to click Align Horizontal Centers with each individual object selected, they just jumble up on top of each other.
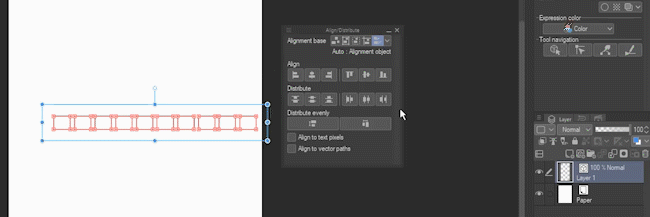
You can, however, use the align tool on the whole layer and it treats everything inside the layer as one object. Click the layer to select it, and then click Align Horizontal Centers.
Hint: This also works with folders. Select a folder, and all layers within can be aligned as if they were one object.
Next, I want to repeat this row of windows vertically.
Right-click the layer and select Duplicate Layer.
Hint: Or use the Copy and Paste shortcuts I mentioned earlier (Ctrl C and Ctrl V) to duplicate layers faster.
Repeat this until there's a whole bunch of layers, at least 20. Skyscrapers are tall! I'm doing 30 rows for this one.
Now I've got all these layers stacked on top of each other. This time, I want to distribute them up and down the whole canvas.
On the Align/Distribute palette, change the Alignment Base to Canvas.
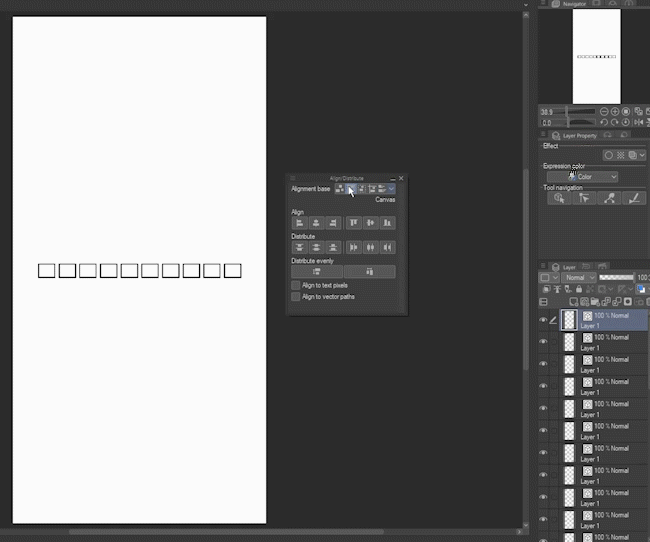
Select all of the layers by clicking the first one, holding down the Shift key, and clicking the last one.
Then, on the Align/Distribute palette, click Distribute Vertical Spacing.
Finally, with all of the layers still selected, right click on any of them and choose Merge Selected Layers. They will all merge into a single vector layer.
Now is a good time to rename the layer. I simply called mine: "Windows"
Copy the Windows Layer Into Your Art
Make sure the layer is still selected, then go to the Edit menu and choose Copy.
Then, open the art you want to add the windows to. (File -> Open)
Select the layer just below where you want the windows layer to go.
Go to the Edit menu and choose Paste.
The Windows vector layer now appears above the layer I had selected.
The windows look small, but because they are on a vector layer, they can be resized however big or small I need them.
Transform the Grid to Fit the Art
Go to Edit Menu, hover over Transform, and choose Free Transform.
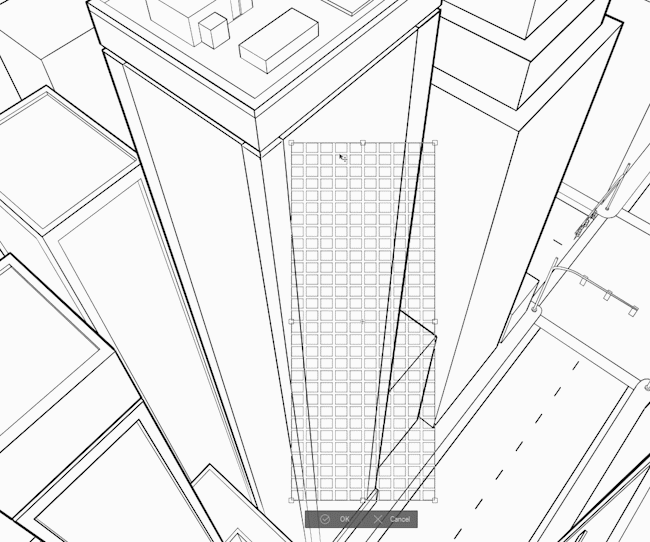
Move the windows layer to the building.
Drag the control points at each corner of the bounding box so that the windows cover the side of the building, following the existing lines of perspective.
Do not hit OK yet - there's one more setting we want to look at.
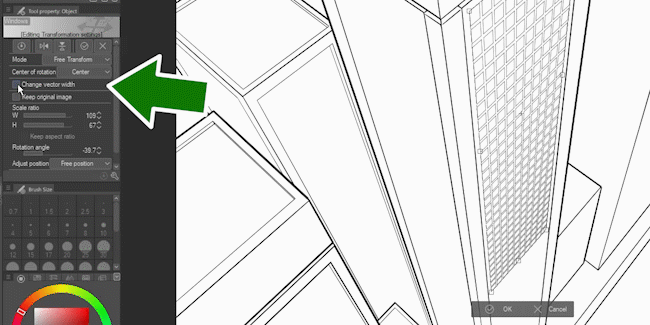
Make sure "Change vector width" is checked. As you can see in the animation, when this option is checked, the nearer lines become thicker, and the distant lines become thinner.
Now you can click OK to confirm the transformation.
Cleanup and Finishing the Lineart
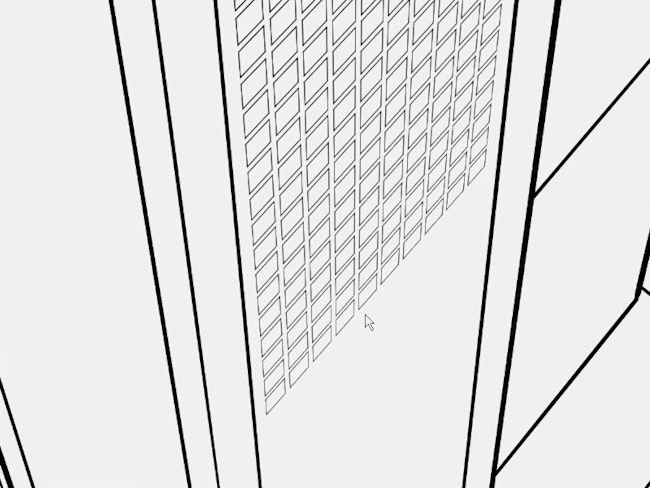
Because it's still a vector layer, I can also use the Object Tool to pick out a few windows to delete as they become less visible in the distance. I'm simply clicking to select them, then hitting the Delete key on my keyboard.
The windows on skyscrapers come in all sizes and configurations. Be sure to look at plenty of reference photos to get ideas!
I'll go ahead and create windows for the remainder of the main skyscrapers in my scene using the exact same technique.
Remember that buildings further away will have less detail.
And here's how my line art turned out!
Conclusion
The new align and distribute tools are great for 2D drawings, designs, and patterns, but I thought it'd be fun to explore how they could be used for 3D perspective art as well. I hope you found this tip helpful!
If you like my tutorials, follow me here on Clip Studio Tips or subscribe to my YouTube channel. Please feel free to tag me @MsRedNebula on Twitter or Instagram and show me any art you created using this tip!
Users who liked this post


Comment