10 Secret Clip Studio Features Nobody Uses
Video
Intro
Hello there, this is Tamil.
While many are familiar Clip Studio Paint, there are secret features waiting to be discovered by the adventurous artist. In this tutorial, I will show these hidden gems, unlocking the full potential of Clip Studio Paint. Get ready to elevate your digital art game.
Top Bar Customization

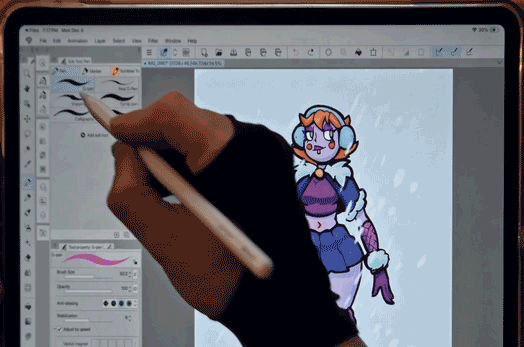
Top bar is customizable! You can add and remove things from there at any time.
For instance, you can effortlessly add your preferred brush or color to the top bar. Simply choose a color, press and hold around that area with your finger, and click "Add Color."
Deleting items from the top bar is equally straightforward. Just press and hold your finger on the unwanted icon, then select "Delete."
By the way, the girl painting from this tutorial is from my winter OC challenge. A painted this a while ago. If you want to see the process, feel free to check it out :)
3D Model Proportions
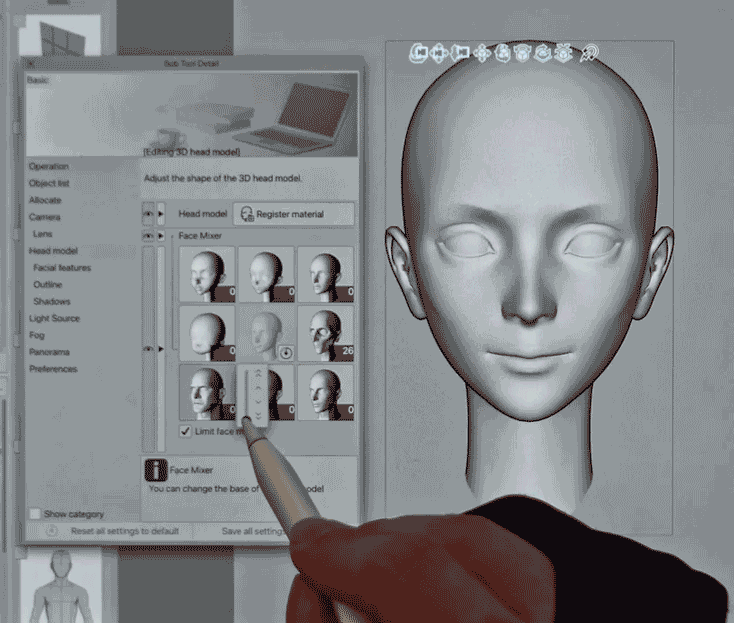
Another noteworthy feature introduced fairly recently allows you to adjust the proportions of your 3D model in Clip Studio Paint, providing an exciting avenue to enhance your character's personality and versatility.
Access this function by clicking on the settings button, revealing a diverse selection of pre-made character faces. The magic happens as you mix and match these faces using the slider, and for a more personalized touch, you can even fine-tune individual facial features. It's a game-changer that adds a whole new dimension of creativity to your 3D character design process!

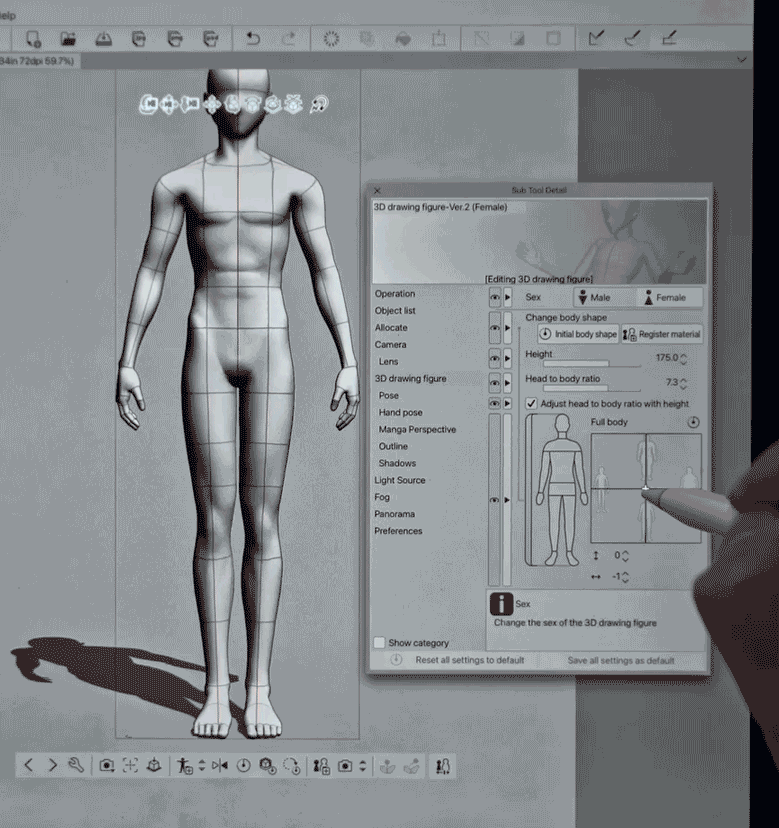
This versatility extends beyond just facial adjustments – it applies to entire characters! Locate the same sliders within the settings of the model, allowing you to modify the proportions of the entire character. Embrace a hands-on approach to learning the program by exploring these features; don't hesitate to experiment and discover the full spectrum of possibilities at your fingertips.
Experimenting with the sliders in the leftward direction creates a leaner character, while sliding to the right adds weight for a fuller appearance. For male characters, moving to the top of the sliders introduces a muscular physique – a dynamic element that adds an extra layer of fun to your creative process.
Moreover, the customization doesn't stop there; you can fine-tune specific body parts. Whether you want broader shoulders or a more delicate frame, simply click on the desired body part within the settings to sculpt your character with precision and detail. The power to craft your characters exactly as you envision them is right at your fingertips!

I also made an old tutorial for 3D models in clip studio paint. If you want to dive more into it, feel free to check it out.
Auto Action
The Auto Action feature in Clip Studio Paint is a fantastic tool designed to streamline your workflow by automating repetitive steps. Its capabilities are virtually limitless, offering you a shortcut to efficiency and time-saving possibilities in your artistic endeavors.
Accessing the Auto Action feature is a breeze. Simply navigate to "Window" and select "Auto Action" to unlock a world of time-saving possibilities at your fingertips.
Upon entering the Auto Action menu, you'll find a plethora of default actions ready for exploration. Take a moment to peruse these pre-made actions and witness the potential they hold. What's even more exciting is the ability to expand your collection by downloading actions created by various artists.
Let’s make a very quick action I love to use all the time just to show you the possibilities.
First let’s click on the create new action button at the bottom right.
It will allow us to rename the action to anything you want. For example, overlay pink. After that you want to press the red recording dot. From now on, any button we press, Clip Studio Paint will remember it.
My actions were very simple:
- I created a new layer on top in the layer panel.
- Went to Select -> Select All
- Double clicked color and picked the color I like.
- Then clicked the fill button from selection.
- Changed opacity of the layer to 50%.
- Deselected.
It’s a very simple action that allows me to save so much time. Putting an overlay on top of my work is a very easy way to make colors more cohesive and make them pop.
An action that would take me 30 seconds to make, now only takes me one click! All you have to do is to just click the play button at the bottom.
Don’t hesitate to experiment and delete items inside the action. You can edit the actions as you please.
There is a very crazy combination with another function I will show you after this, that will blow your mind.
Find Layer
While not exactly hidden, the "Select Layer" tool is a lifesaver in the midst of countless layers when you need to pinpoint a specific area for editing. Head to the "Operation" tab, locate the "Select Layer" tool, and witness its handiness in action. To utilize it, a simple drag from one point to another around the desired area will efficiently select the elements you need. Say goodbye to layer-search frustration and hello to precision editing with this invaluable tool!
Simple Mode - best sketching feature
The recent addition of Simple Mode in Clip Studio Paint is a game-changer for those seeking a streamlined experience in sketching and painting. This feature declutters the user interface, allowing you to tailor your workspace by removing unnecessary buttons.
I personally find it incredibly useful for sketching during classes or in the relaxed ambiance of coffee shops. While a separate tutorial delves into the specifics of Simple Mode, here, we'll briefly acknowledge its existence and the benefits it brings to your creative sessions.
It looks something like this. If you want to dive in more, then see article below.
"Transparency" Color
My absolute favorite gem in Clip Studio Paint is the Transparency Color feature—a game-changer that I wish every program adopted. In every tutorial I create, I make it a point to share this invaluable tool.
Unlike typical painting programs with just two color boxes, Clip Studio Paint introduces a third: Transparency Color. This magical addition transforms any brush into an eraser, revolutionizing the way you approach and refine your artwork. If you haven't explored this feature yet, now is the perfect time to unlock its potential!
The shortcut for this is “C”. Bonus tip:
To toggle between 2 regular colors is “X”.
The key to maximizing the Transparency Color feature lies in selecting the right brush. While the traditional eraser tool can be somewhat limiting and time-consuming to set up, this function enables a swift transition, allowing you to use your chosen brush as an eraser seamlessly.
This is particularly crucial when working with textured brushes, like those mimicking real oil paint. By employing this technique, you retain the authentic feel of traditional painting while enjoying the efficiency of digital tools. It's the perfect solution for maintaining the artistic integrity of your work with minimal hassle.
Select Tool Secret
Thank you for sticking around! As a little reward, let's explore a hidden gem: the Selection Tool Secret. By mastering this in tandem with action buttons, you're on the path to becoming an unstoppable artist!
Start by selecting an area using the select tool. It is not very important which selection tool you prefer in this case. I usually just go for lasso or square.
Once you've chosen an area with the selection tool, you'll notice a familiar toolbar at the bottom. While it's handy, there's room for even more enhancement. Let's take it a step further!
This is where the magic happens! This button allows us to add shortcuts to this panel for later use. What can be added? Almost anything!
From filters to Menu commands. It’s all in here! But here is the best part. We can add our ACTION that we made here.
We can add any action we created into this panel. This tool becomes the most powerful cheat code to saving time. It allows me to focus on art, instead of making masks and filters. Try it out yourself! The only limit is your imagination.
The End
Thank you for reading! I hope you found valuable insights. Don’t hesitate to check out the video for more demonstration and easy to see tips.
Let me know what is your favorite feature!
My social media:


댓글