Turn your photo into Anime Background | Clipstudio Mobile
Hello, MarL here
I will share tips on how to turn your camera photos into anime background using Clipstudio Mobile Application.
Let's start!
CREATING CANVAS USING PHOTO
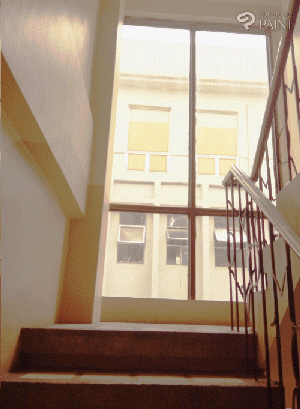
To create a canvas, click [New from device storage]. Pick the photo you plan on using for your drawing.
Click [Selection Area] and choose [rectangle].
Pick the desired part you like, if you're planning to rotate the photo it's better to pick a large portion first before rotating it so you can easily crop the photo without worrying blank spaces.
To rotate it, click [Scale/Rotate] then click [OK]
After adjusting it, click the [Selection area] again, then pick the final portion your going to use. Then click the second icon below [CROP].
RESIZING
Before editing, resize the photo first
Click [Menu]
Click [Edit]
Click [Change image resolution]. Do not pick change canvas size as it might blur the photo. Choosing image resolution will retain it's quality while lowering the size of your file.
First [change resolution] to [300 dpi]. You can lower the size if you want but I recommend 300 dpi so you can work on the details more.
then go to [width] change it to [1500 pixel] so that it's big and you can resize when needed.
Make sure the [interpolation method] is in [hard edges (nearest neighbor)]. This technique will make each of your pixel bigger by replaces every pixel with the nearest pixel in the output. In simple terms, it will avoid your photo to become blurry and retain it's quality.
then click [OK]
EDITING THE PHOTO
LET'S START THE REAL DEAL!
1. Tone Curve
choose [New correction layer] > [Tone curve]
Tone Curve are used to adjust the tones of the image to make it brighter or darker. Using RGB curve, tones can be adjust by highlights, midtones and shadows.
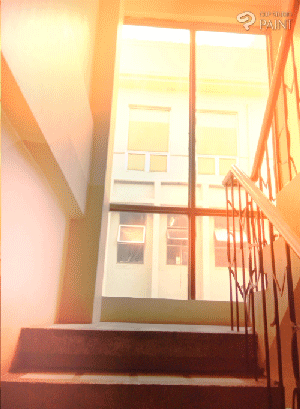
Since I’m aiming for a sunset vibe, I’m making it brighter.
TIP:
-If you're going to draw a night theme or a horror theme it’s better to make it a LITTLE darker. It’s alright since you can adjust the tone anytime since we are using the “New correction layer" by double clicking.
-Using a brighter tone is much preferable since you can easily adjust the color using color balance and airbrush. We’re going to that later..
2. Hue/Saturation/Luminosity
For this part, I did this to emphasize the lines of the rooftop. This step isn’t really necessary so you can skip this if you want.
[Hold the layer], choose [new correction layer] > [hue/saturation/luminosity]
Adjust the setting.
3. Color Balance
For step 3, let's go back to [New correction layer] then pick [Color balance].
Click [Highlights] first.
Adjust the color level, I'm aiming for a sunset vibe so I'm making it a little bit orange or maybe yellow.
and also remember to [keep brightness].
ADDING COLORS

1. Add Glow
Click [new layer], to rename the layer, double click the text.
Change blend mode to [Add Glow].
Click [Pen] > [Air brush] > [Soft].
It's better to make the AIRBRUSH OPACITY 100%
It's ok, since you can always adjust the LAYER OPACITY
Change the color to Orange to make a sunset vibe
2. Adding Unrealistic Color to make it more Anime
Click [new layer] make it [Add glow].
Choose color light pink or red.
For a little highlights and anime like color.
You can choose any color, don't be afraid to experiment.
I use a new layer with [Color burn] blend, since I had a hard time making it more orange. This step isn't necessary.
LINEART
[Hold photo layer] > [duplicate].
You can change the layer name to 'line art'.
Move the 'line art' layer above the tone curve layer. To see the process better, [HIDE THE MAIN PHOTO].
Now go back to the 'line art' layer.
Click [menu] > [filter] > [effect] > [artistic].
Go to process choose [lines only].
Adjust everything to your desired line art.
However, avoid making it too detail, make it simple if possible. Remember we're making anime background. Sometimes simple is better.
Change the 'Line art Layer' blend mode to [Soft Light].
Then turn back the photo layer again.
SHADOWS
Click new layer , change blend mode to [multiply].
Move the layer BELOW LINE ART LAYER.
Click [pen], choose [g-pen].
You can either use color to light violet to dark blue.
Or use the eyedropper tool.
To use this you can either go to tool section and pick the eyedropper tool or just hold the screen and pick the color.
This is the timelapse that I took in Clip studio when I was making shadows.

HIGHLIGHTS
Create new layer below 'lineart layer', make it [SCREEN BLEND].
Use [airbrush] > [soft] then use light orange color.
For final details, add a droplet effect.
Go to [Brush Mode] > [Airbrush] > [Droplet].
Remember to adjust the particle size.
Our anime background is done!
Blending Character
NOTE: Before you read this part, in this image I usually use "Color burn Blend" since it's the only blend that I think might fit the photo. You don't need to copy step by step. What matters is that the character you will use should blend with the background. That's all you can continue now.
After you draw your character, if by example you character does not blend with the background.
Click [new layer] > [Clip Layer]
Use [Gradient] > adjust the color> then [multiply] mode.
When adjusting the color of your gradient make sure that it is compatible with your background. Since mine is a sunset theme. I pick dark violet (for the shadow part) and Light yellow (for the brightness).
1. To change the color gradient double click the middle part of BOX #1.
2. Make sure the opacity is in 100 percent.
3. Click [Specified color] then choose the color you will use.
Create new layer if you still want to make adjustment. You can keep using gradient if it's a little too light for you. Then change the blend mode to colorburn for a shadow effect.
Make sure to add some real shadow for your character.
I used [Soft Bleed Pen] then adjust the opacity layer.
Then create new layer again change blend to [color burn]. You can also use Add Glow Mode here, but in my case I like the effect of colorburn blend more.
You can use any pen, I chose gpen. Then pick a light color.
Highlight some part on the side of the character, where light usually came in contact.
For FINAL BLENDING, I adjust the color with tone curve.
For the last step, add some detail.
Create [New Layer] > [Screen Blend] > lower the opacity layer
Go to[Airbrush]> [Droplet]
AND WE ARE DONE! GOODLUCK CREATING YOUR DRAWING!
THIS IS THE FINAL PRODUCT OF THE TUTORIAL.


留言