Selecting Made Easy - Quick Masks and Selection Layers
This tutorial will cover a couple selection tools in Clip Studio Paint that don't get much love. Let's talk about quick masks and selection layers.
Here’s the video version of the tutorial, but if you prefer text, it can be found below!
Quick Masks
Creating a Quick Mask Layer
Quick masks and selection layers share a lot of features, but I'll talk about quick masks first.
There's a lot of overlapping detail on this piece, so it'd be nice to be able to select parts of it, like the primary feathers, on their own.
Go to the Select menu and choose Quick Mask.
This creates a special, temporary layer on which you can use any of your normal drawing tools.
Drawing On the Quick Mask Layer
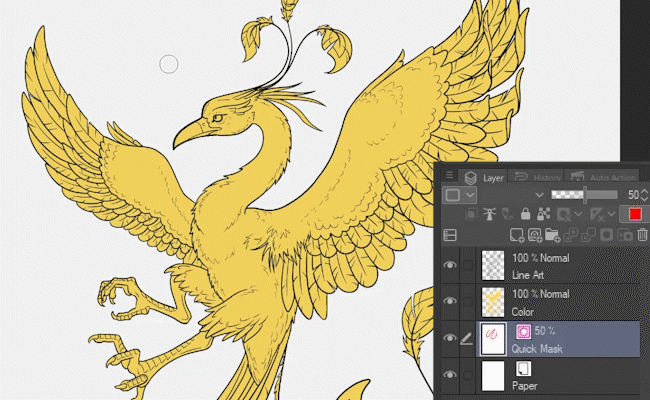
Two things become immediately clear:
1. No matter what color you draw with, this layer is displayed in red to make it easy to see.
2. The Quick Mask layer shows in front of all other layers, no matter what order it appears on your Layer palette.
Hint: If you need a different color, you can pick one by clicking the red icon beneath the layer opacity. For now, I’ll keep the mask red.
Converting the Mask to a Selection
Go back to the Select menu and notice that Quick Mask has a checkmark next to it. That means one is already active, and you can only have one at a time.
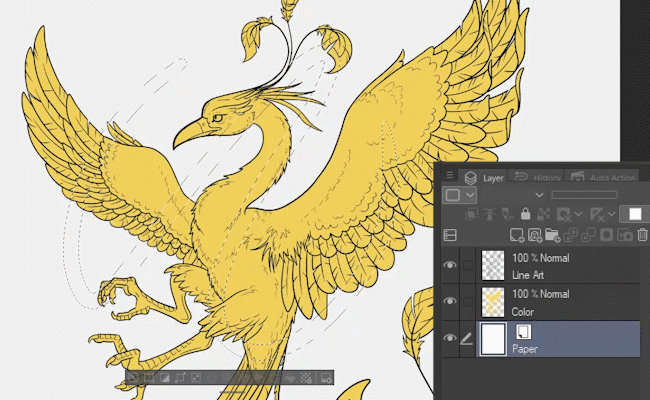
If you click on Quick Mask again, the temporary layer disappears, and whatever you have drawn on that layer is converted into a selection.
Quick Mask With Existing Selection
Say you want to add to the selection.
Go back to the Select menu and turn Quick Mask back on again. If you already have something selected, it'll become a part of the mask layer automatically.
Quick Mask in Practice
So, how is this useful?
For this first example, I want to select just the outer wing feathers on the right hand side.
First, without anything currently selected, turn on Quick Mask (Select Menu - Quick Mask)
You can use any drawing tool on the Quick Mask layer, but here’s a quick way I like to do it!
First, go to your line art layer and turn it into a Reference Layer by clicking the lighthouse icon.
Hint: You’ll be able to see that it’s a reference layer because of the lighthouse icon that now appears next to it.
Go to the Fill tool, and select the Refer Other Layers sub tool.
In the tool properties, make sure the “Refer Multiple” option is set to the reference layer (the same lighthouse icon).

Now, when I use the Fill tool on the Quick Mask layer, it refers to my line art layer and paints in each enclosed space - in this case, each individual feather.
Hint: You can also zoom in to correct any small areas that didn’t get filled with the pen tool.
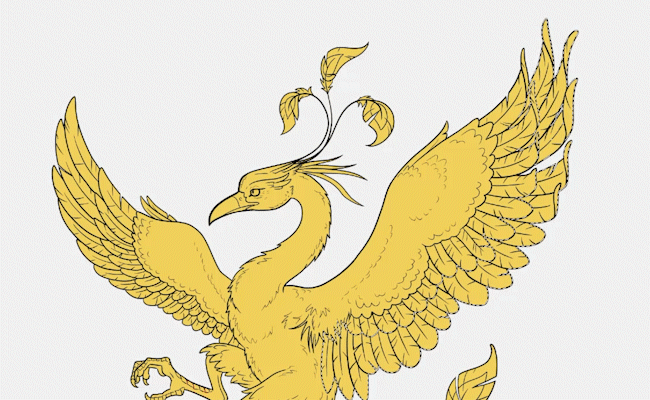
Turn the Quick Mask back off to convert it to a selection.
Now I can apply color, shading, or any other effects to this section of feathers alone.
Selection Layers
The Quick Mask feature is great if you just need to temporarily select something one time. But if you need to select it over and over again, we'll turn to Selection Layers instead.
Convert to Selection Layer
I've still got the feathers selected, but I want to save the selection for future use.
Go to the Select menu and choose Convert to Selection Layer.
It may look like everything just turned green, but that's just the new Selection Layer in action. Just like the Quick Mask layer was red, this one is green.
A selection layer is almost exactly the same as a Quick Mask, with a couple key differences - for one thing, it's permanent.
Hint: You can hide the selection layer using the eyeball icon on the Layer palette to get it out of the way, if you don’t want to see the green. Also, just like the Quick Masks, you can change Selection Layers to a different color if you wish.
Adding to the Selection Layer

Just like the Quick Mask, you can use any of the drawing tools on this layer.
I’m using the Fill tool with the Refer Other Layers sub tool, using my line art as a reference layer, just like before.
Turn Selection Layer into a Selection
There are a couple ways to convert a selection layer into a selection.
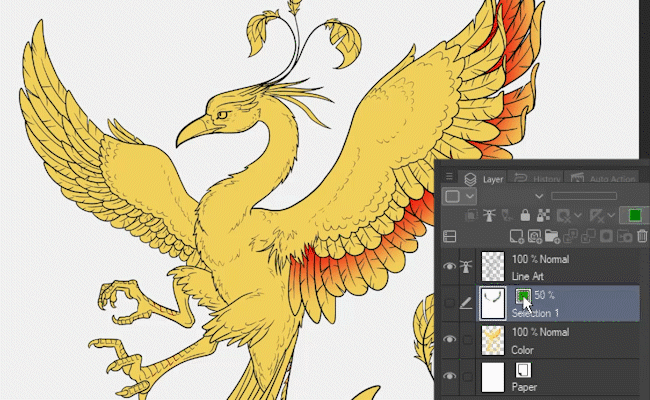
The quickest way is to simply left click on the green icon on the selection layer itself.
You can also right-click on the layer and use the different features under Selection From Layer for more control. They’re pretty self-explanatory, but in short:
Create Selection - Exactly the same as clicking the green icon. It creates a brand new selection with just the pixels from this layer (and removes any prior selection)
Add Selection - Adds the pixels of this layer to an existing selection
Delete Selection - Removes just the pixels of this layer from an existing selection
Select Overlapping Area - Selects only where the pixels of this layer overlap with an existing selection.
Multiple Selection Layers
The other key difference is that you can have multiple selection layers, as many as you want.
Here, I’ve made another selection layer by going to the Select menu and choosing Convert to Selection Layer again. Because I didn’t have anything selected this time, I get a blank selection layer.
For this one, I’ve colored in the beak and feet.
Hint: You can see my first selection layer is still there, but hidden with its eyeball icon turned off.
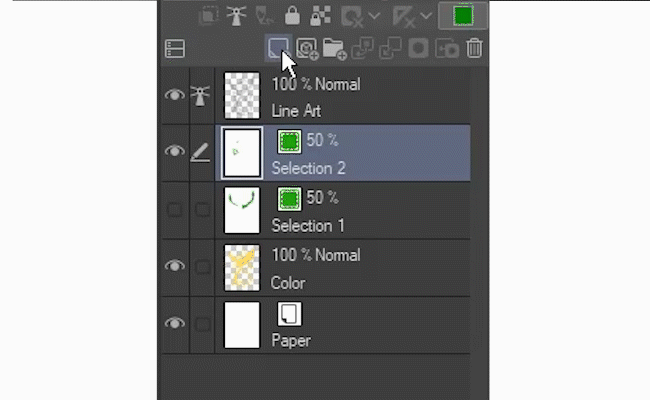
To stay organized, you can make a separate folder just for your selection layers, so you can minimize it when you don't need it.
1. Click the New Layer Folder button.
2. Select both selection layers by holding down the Ctrl key as you click them. (Command key on a Mac)
3. Drag the selected layers into the folder.
4. Rename the folder by clicking the name once, and typing in your new name when the cursor appears.
5. You can now click the arrow to minimize the folder.
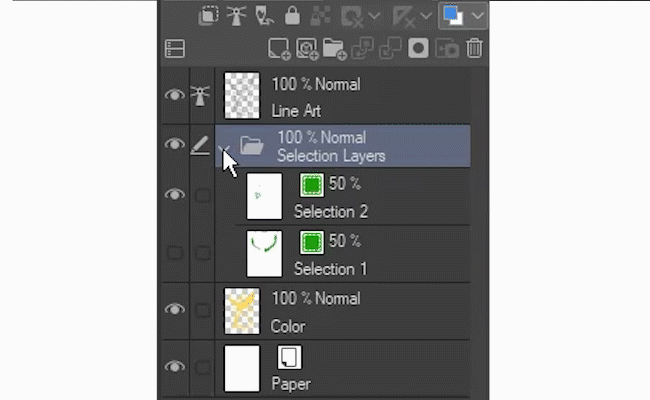
You can rename selection layers just like any other layer, too.
Just like when renaming the folder, simply click once on the layer name, and type in your new name.
Example
Using the Quick Mask and Selection Layer features are a great way to keep parts of your art organized and streamline the process of coloring.
Here, I’ve used a combination of Quick Masks and Selection Layers to add some flare to the base colors for my phoenix artwork.
Shading can, of course, be added using the same technique!
Bonus Tips
Before I wrap up, here are a few quick tips on using Quick Masks and Selection Layers.
Tip 1: Quick Mask Shortcut
It’s really handy to be able to turn your Quick Mask on and off quickly, but it doesn't have a keyboard shortcut by default. No problem, it’s easy to set up!
To set up a shortcut, open the File menu and click Shortcut Settings.
Make sure Category is set to Menu Commands.
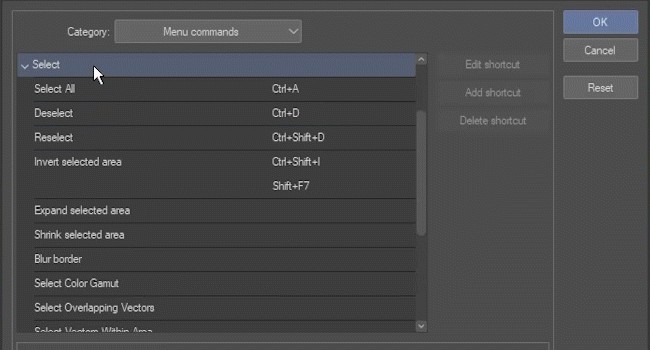
You’ll see a list of all the same menus as the bar across the top of your screen.
1. Scroll down until you find the Select menu, and under it, click Quick Mask.
2. Click the Edit Shortcut button.
3. Use your keyboard to enter a shortcut of your choice.
I like to use Ctrl-M. To do that, hold down the Ctrl key on your keyboard (or Command on a Mac), and then press the M key.
You’ll see the shortcut appear beside Quick Mask. Hit the Enter key on your keyboard when you’re done, the press OK to close the dialog box.
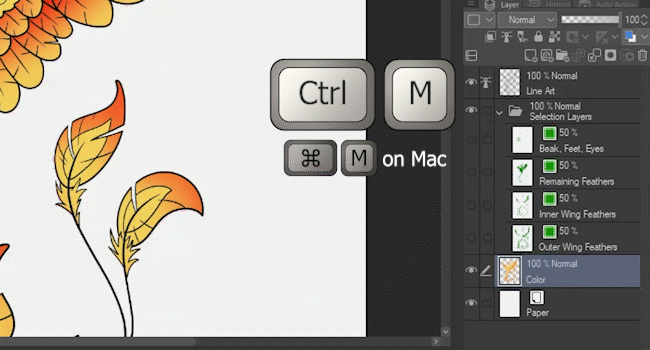
Hitting Ctrl-M will now toggle your Quick Mask on and off.
Tip 2: Partial Selections
Say your selection mask covers several sections of feathers, but you only want to select the outer feathers on the right hand side.
Go to the Selection Area tool and choose the Lasso sub tool.

Click and drag to make a loose selection around the area of feathers you wish to select - in this case, just the outer feathers on the right wing.
Right click on the Selection Layer, go to Selection From Layer, and choose Select Overlapping Area.
Remember, Select Overlapping Area only creates a selection where both your existing selection and the pixels of this layer are.
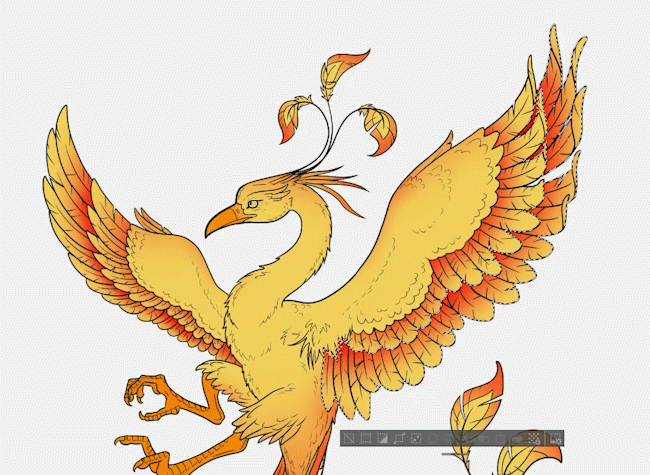
Now just the outer feathers on the right hand side are selected!
Tip 3: Select Quick Mask without Deleting
This one is very simple, but it’s handy to know.
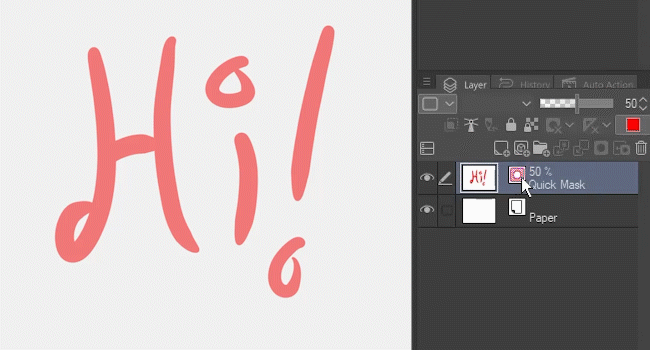
Like the Selection Layer, you can turn your Quick Mask into a selection by left clicking its icon. Unlike turning the Quick Mask off to make a selection, this method doesn't remove the Quick Mask layer, so you can keep using it.
As I said, there's a lot of overlap between these two tools.
Conclusion
I hope I got you excited to try out these versatile selection tools!
Be sure to follow me @MsRedNebula on Twitter, Instagram, Bluesky, or Mastodon to see when I announce new tutorials. You can also follow me here on Clip Studio Tips, or subscribe to my YouTube channel.
As always, have fun making art!


留言