
[A] Introduction
Hey there, Welcome to this tutorial! I'm AzzouBK, and today we'll learn how to use Clip Studio Paint's 3D models to help us draw the work uniforms of a Firefighter, a Police officer and a Doctor.
[B] 3D Library
After creating a new illustration with the desired dimensions. You need to open the Materials Panel (located right next to the navigator panel)
Click on the "two arrow" icon to expand the panel or collapse it.
If for some reason it isn't there, you can still open it by going through: Window-Material-Material[3D]
Clip Studio Paint offers a wide variety of Great ,Free to use 3D materials. Ranging from things as simple as a Mug, all the way to complex 3D backgrounds!
-I recommend you explore all the contents of the library, as most of them are very useful.
For this tutorial we'll only need the "3D Drawing Figure" (located in the Body type folder)
Choose a gender, then simply drag and drop the model into the canvas.
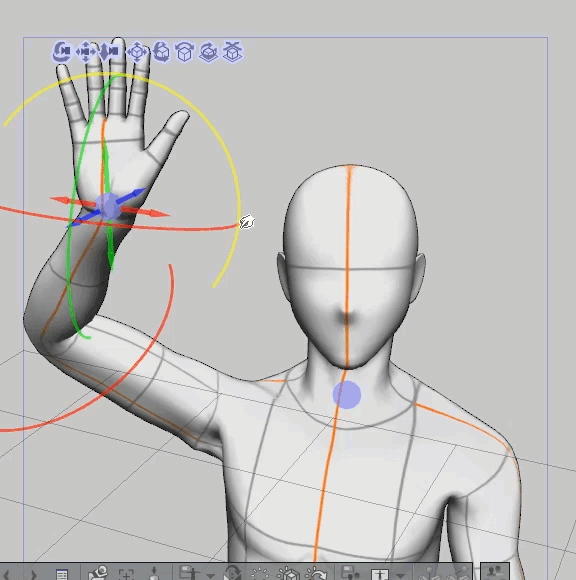
[C] Posing
To pose the model, left click on a part of the body, The selected part will be highlighted with a blue color, Then either drag it to move it freely, or use the posing controls.
Using the mouse wheel, you can adjust the perspective for a foreshortening effect.
When satisfied with the basic pose, you can open the model's properties to adjust more details.
-To open the property window, click on the icon highlighted on the toolbar.
Change the body shape to the physique that best suits your preferences.
Here's a quick tip! Adjust the light source now, because it will be very helpful later on!
-You can go on for hours fine tuning the model to perfection, but I personally find it unnecessary as it's just a guide.
When you're done with the pose, you can save it by pressing the save icon on the toolbar.
After that, name the pose and specify a directory and hit OK.
[D] Preparation (optional)
I like to create an outline around the 3D model and then convert it into a normal layer to make it manageable and easy to work with.
So I start by applying a Line extraction filter with these settings:
And then I use the default settings on the next window.
-These settings are probably not the best for what I'm going for, and I should have invested more time into finding what works and what doesn't. feel free to experiment till you get it right.
The results are a bit rough, but when I hide the secondary outline layer it looks much better. I also disable the Tone effect from all the layers.
Then I merge them together into a single layer.
Last but not least, I apply the Layer color effect (Ctrl+B) and lower the opacity to make it easier for sketching on top of.
[E] Lineart
With that's all done, the anatomy reference is Ready. Now you can google more references of the actual uniform. I went with a stylized US firefighter uniform.
Having gathered enough data, Create a new layer on top of the model, grab a brush and start sketching!
It's almost as if you're dressing up a doll.
-Sketches are meant to be rough, they're just a guide.
When you're done, Hide the model layer and apply "Layer Color" effect and decrease the opacity of your sketch (the same treatment we did to the 3D model).
On a new layer, trace over the messy sketch to create smooth and neat linework.
[F] Coloring
Create a new layer for Base Color. Then, with the "Auto Select" tool, click outside of the your Lineart to select everything outside the shape of the character.
-keep in mind that your linework must be connected together-closed. If not then you can manually select the parts that don't work, with the Lasso tool.
After that, Click on "Invert Selected Area" from the tool bar bellow.
Fill the selection with the color of your choice.
Click on "Fill" from the tool bar.
Next, Create a folder on top, and Clip it to the Base color layer.
In that folder, create a new layer for each color.
Being clipped to the layer below, you won't have to worry about colors getting outside of the character shape.
After that, I apply 2 levels of shading for each color.
I paint each shade on its own separate layer. and both layers are clipped to that base color's layer.
I use a light blue color and set the layer mode to Multiply.
If you're struggling with shading and lighting, you can actually use the 3D model once again as a reference, to help you visualize the light source and better understand where to shade.
After finishing the shading process, I like to add an effect on top of the folder that contains the color layers.
Grab a soft Airbrush, choose an Orange or a Dark red color, and paint over the edges of the shadows.
Set the layer mode to Overlay and adjust the opacity till it looks good.
Another simple yet very effective tip is to change the lineart color.
Clip a new layer on top of your linework, choose a slightly darker color than the shadow of that area and paint over the inside lines.
-This will help the lines blend together nicely with the colors.
Finally, add a Rim light!
To do that, place all your layers in a new folder, create a layer on top of that and make sure it's clipped on. Set the layer mode to either Color dodge, Glow dodge or Add (glow).
After that, paint over the edges with a saturated color of your choice, I used a Dark red.
And Voila!!
[G] Police officer uniform
Following the exact same process to draw a police officer uniform.
1st step: Pose the 3D model.
2nd: Roughly sketch the uniform.
3rd: Draw a clean lineart.
4th: Color (base colors and shading)
5th: Add effects!
This time I used the Female drawing figure.
And Done! She looks alright, a bit rigid and robotic (that can be fixed with a more dynamic pose).
I did not use the 2 layer shading method to save time for this tutorial.
[H] Doctor uniform
Again, same steps!
[I] Tips summary
1st Tip: Make sure to look up a lot of reference material from different sources, as some of them can be misleading if you're going with an authentic look.
-An example of a good reference is a picture of a real firefighter, police office or a doctor at work. Try to avoid Costumes and Cosplay.
2nd Tip: Clip Studio Paint offers a large number of Ready to use poses. Both full body and hand poses.
If you're character is Standing, walking, sitting down, jumping, running... There's an already made pose to help save time!
3rd Tip: We've already talked about this, use the 3D model's light source as a lighting reference to determine where to shade.
-You can even set multiple Light sources and change their color!
4th Tip: If you're like me, and probably almost all artists, you're struggling with drawing clothes.
The best solution for this is to practice drawing from real life. Simply place a piece of cloth and Stare at it Intensely for hours!
Yeah well, that doesn't really help huh. Another solution is to look for even more references.
Here's one of the best tutorials I've seen on Youtube:
[J] Thank you
The End!
Thank you for reading, I hope this was useful.
If you have questions or need any help, feel free to DM me on Instagram: @azzoubk
Stay safe and have a Great day!
Users who liked this post


Comment