
Introducción
Los stickers son una gran ayuda al momento de transmitir una emoción, y si el sticker es animado ayudan mucho más.

En este tutorial aprenderemos lo básico para animar un emote / sticker como este, utilizando Clip Studio Paint. Pero lo aprendido en este tutorial no solo se limita a emotes, también puede ser utilizado en cualquier tipo de proyecto animado.
Para hacer animaciones en Clip Studio Paint recomiendo usar la versión EX ya que tiene todas las características de animación habilitadas, también puedes utilizar la versión Pro pero está versión está limitada a solo 24 frames de animación.
Toma en cuenta que este tutorial es para enseñarte el proceso que utilizo para hacer animaciones y no es un tutorial de como conseguir esta animación paso a paso.
También hay una versión en video por si prefieres este formato.
Conceptos básicos
Animación
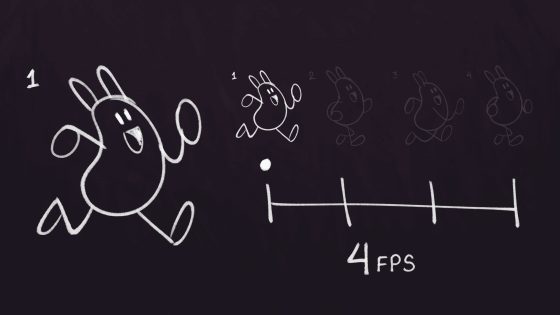
La animación es una sucesión de imágenes que al mostrarse a una velocidad adecuada transmite la sensación del movimiento.
FPS
FPS son las siglas utilizadas para cuadros por segundos e indica cuantos tiempo se mostrará cada una de las imágenes durante un segundo. Si decimos que una animación está a 4fps, esto quiere decir que hay 4 imágenes mostrándose una tras otra durante un 1/4 de segundo cada una.
Línea de tiempo
La línea de tiempo es una representación gráfica en la que se controla el tiempo que cada dibujo se muestra en la animación.
Con estos conceptos básicos ya podemos pasar a animar a nuestro personaje
Animando el sticker
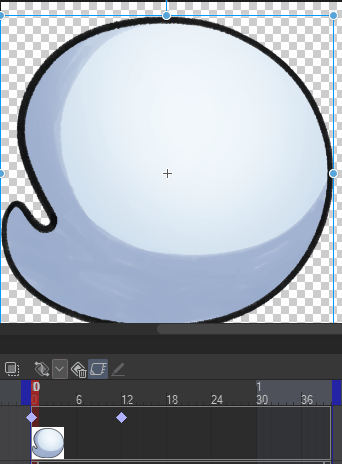
Preparando el sticker para ser animado

Esta animación fue hecha utilizando la técnica de cut out, la cual consiste en separar cada una de las piezas de nuestro personaje en layers diferentes para luego ser animadas, modificando sus características de transformación como: rotación, posición o escala, utilizando fotogramas claves para animarlo. Esto facilita la animación y evita el tener que dibujar cada uno de los fotogramas multiples veces. También se utiliza un poco de animación cuadro a cuadro para crear el parpadeo del personaje.
Lo primero que haremos es dibujar cada una de las partes de nuestro personaje en capas o carpetas separadas, para este paso debemos tomar en cuenta cada uno de los objetos que queremos animar.
Personalmente me gusta trabajar cada pieza del cuerpo en carpetas separadas, con una capa dedicada a la línea y otra al color, la cantidad de capas suele variar dependiendo de la cantidad de detalles que se necesiten.
Animar cada una de estas piezas por separado puede ser un complicado cuando se utilizan carpetas, debido a que se debe tomar en cuenta cada una de las capas. Afortunadamente podemos solucionar esto utilizando File Objects.
Convirtiendo carpetas en file objects
Un file object es básicamente un documento de Clip studio paint dentro de otro documento. y al utilizar esto reducimos la cantidad de capas en el timeline y mantenemos la opción de editar por si es necesario.
Para crear un file object basta con dar clic derecho sobre las capas o carpetas que queremos en ese file object, y seleccionar la opción File object (X) > Convert Layer To File Object…
Este nos preguntará que area queremos para el file object, yo recomiendo utilizar el Drawing area ya que este se ajustará al area que tenga pixeles dibujados, también recomiendo deshabilitar la opción Keep Original Layer para eliminar las capas y tener el documento más limpio. Al presionar OK nos preguntará donde queremos guardar el file object. En este paso es recomendable guardar el documento original y los nuevos file objects en la misma ubicación, esto es por si queremos cambiar la ubicación de los archivos más adelante solo tendríamos que mover la carpeta y de este modo evitamos que los file objects se desconfiguren.
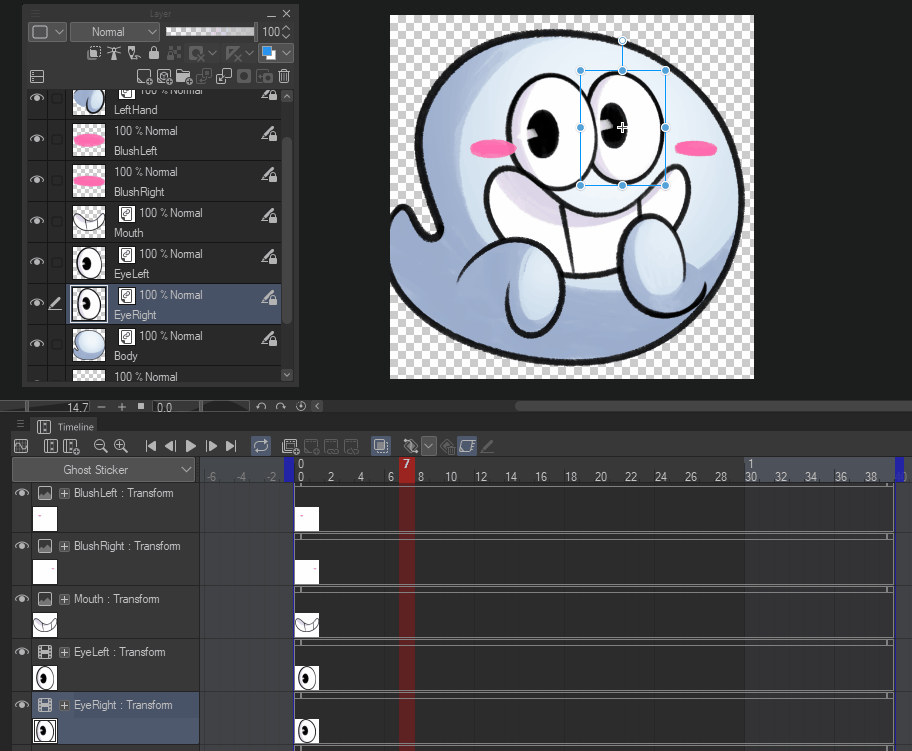
Cuando importamos una capa como file object tendremos este icono sobre el nombre del layer que indica que es un file object.
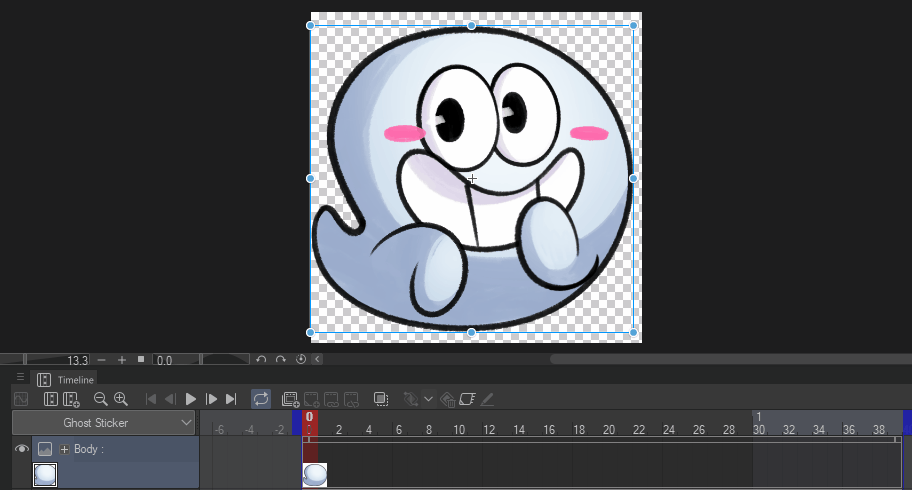
Al convertir cada una de las carpetas tendremos algo como esto, con cada una de las piezas separadas listas para ser animadas.
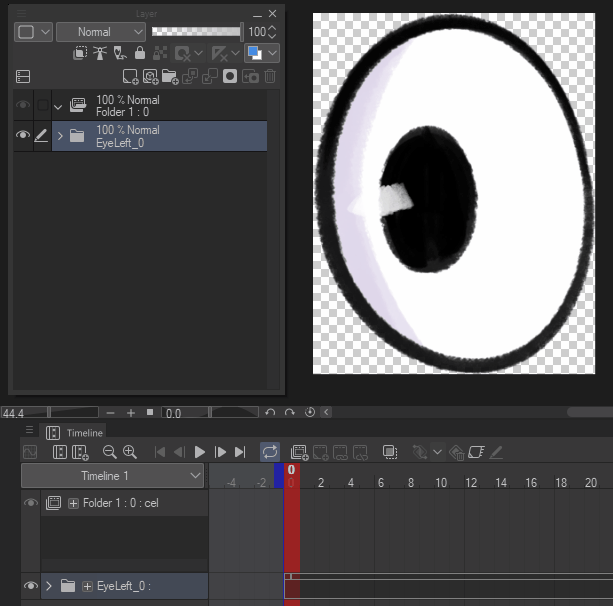
Pero antes de empezar a animar debemos hacer un paso extra para los ojos ya que habrá una animación cuadro a cuadro dentro de los file objects, y para que estos se vean reflejados en el timeline de nuestro archivo principal es necesario importarlos nuevamente como archivo “Movie”.
Importar file object como Movie
Esta es una tarea fácil de conseguir y solo se necesitan un par de clics. Para importar un archivo como movie solo se necesita ir a File> Import> Movie y seleccionar el archivo que se desea importar como película, en este caso será el archivo file object de cada ojo y se importaran en el archivo como fileobjects y en capas separadas. colocamos cada ojo en la posición deseada y ya podremos continuar trabajando.
Ahora con cada una de las piezas separadas por file objects ya podremos empezar a animar nuestro personaje utilizando la línea de tiempo.
Linea de tiempo
Desde esta ventana controlaremos que capas se mostraran en la animación y cuantos tiempo se mostrará cada una.
Para Abrir esta ventana debemos dar clic en Window > Timeline
Se abrirá una ventana en que nos muestra todos los controles necesarios para la animación.
Ahora debemos crear una nueva línea de tiempo, para ello daremos clic en el icono New timeline y aquí podremos configurar parámetros como:
Time line name: El nombre para para identificar cada línea de tiempo.
Frame rate: acá se define el frame rate para la animación (Esta es a cuantos frames por segundo se reproducirá la animación)
Playback time: La cantidad de frames habilitados en la línea de tiempo, estos se pueden modificar luego desde la misma línea de tiempo.
Scene number: El número de escena para la animación, útil para organizar el trabajo cuando se trabaja en producciones grandes. Este solo se usa como etiqueta y no afecta de ninguna manera el timeline.
Shot number: El número de secuencia que se esta trabajando en la escena. Este solo se usa como etiqueta y no afecta de ninguna manera el timeline.
Division Lines: Sirve para especificar a cada cuantos frames aparecerá una línea para mejorar la visualización de cada grupo
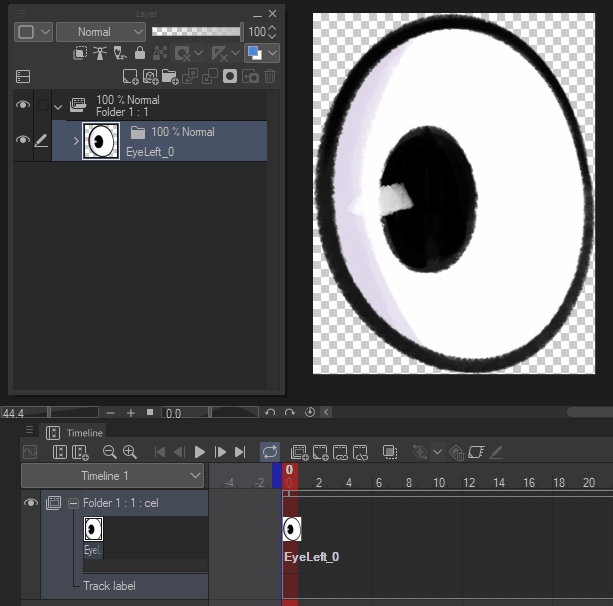
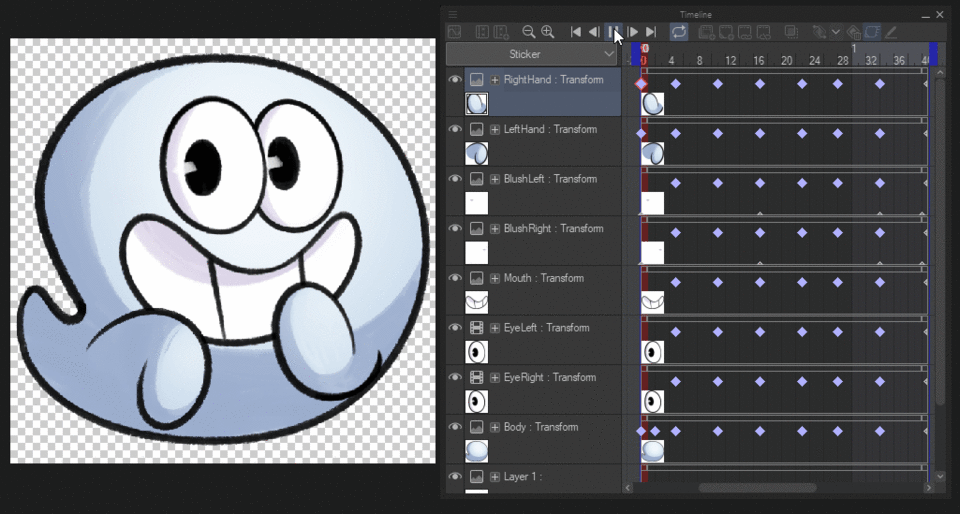
Esto creará automáticamente una línea de tiempo para cada una de las capas y podremos modificar sus propiedades transformación usando keyframes o utilizando carpetas de animación para hacer animaciones cuadro a cuadro.
Como puedes ver las capas de los ojos tienen un icono de película, esto es porque los he importado como un archivo Movie, lo cual sirve para poder visualizar las animaciones que estén en ese file object. Esto lo hacemos de esta manera porque dentro del clip de los ojos aremos una animación cuadro a cuadro para hacer que el personaje parpadee.
Animación cuadro a cuadro
Una animación cuadro a cuadro es básicamente colocar dibujos distintos consecutivamente para generar la ilusión de movimiento, a cada uno de estos dibujos en Clip Studio Paint se les conoce como cel.
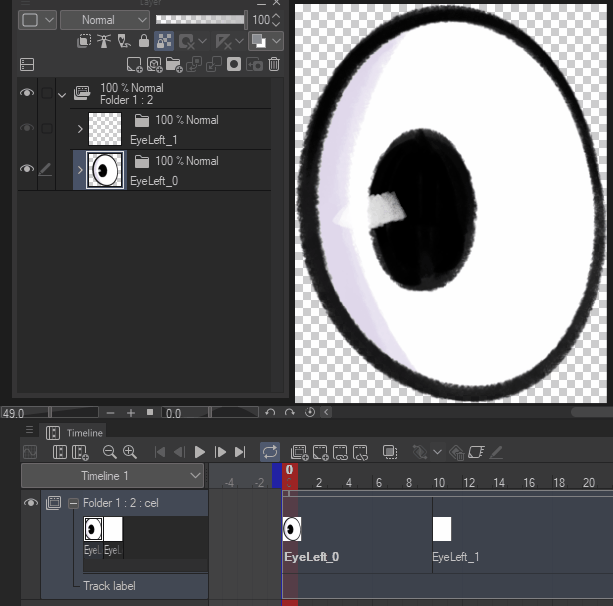
Para los ojos usaremos este tipo de animación ya que necesitamos dos dibujos distintos para el ojo, un dibujo para el ojo abierto y otro para el ojo cerrado. Esta animación la haremos en el file object de cada ojo.
Editar file object
Para editar nuestro file object debemos dar clic derecho sobre el layer y dar clic en File object> Open File of file object, esto nos abrirá el archivo de clip studio paint en otra ventana.
Nueva línea de tiempo
Ahora en este documento crearemos una nueva línea de tiempo siguiendo los mismos pasos que seguimos en el documento principal y la prepararemos para hacer la animación
Carpeta de animación
Para hacer una animación cuadro a cuadro necesitamos utilizar una carpeta de animación y para crearla debemos dar clic en el icono New animation folder (A) en la ventana timeline, al hacer esto obtendremos una nueva carpeta con este el icono (B), dentro de esta carpeta iremos agregando cada uno de los dibujos que queremos en la animación.
En este caso arrastraré la carpeta con el ojo que ya tenía dibujado a la carpeta de animación. La carpeta con el ojo permanecerá oculta ya que la carpeta de animación controla en que momento volverla visible en base a la línea de tiempo.
Ahora asignaremos la carpeta del ojo a nuestra linea de tiempo, para ello colocaremos nuestro cursor en el frame en el que queramos vincular la carpeta del ojo y daremos clic en el icono Assign Cel to frame (A), al hacer esto nos aparecerá una ventana preguntando que capa dentro de la carpeta animación queremos asignar, en este caso asignaremos la carpeta con nuestro ojo.
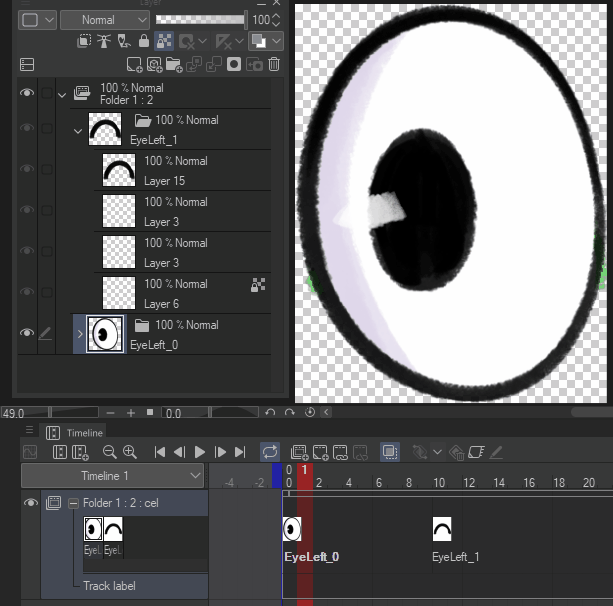
Creando un nuevo cel
Ahora crearemos un nuevo cel moviendo el cursor al frame que queremos y daremos clic en el icono New animation cel (B), este nos creará una nueva capa dentro de la carpeta de animación, lo genial de esto es que al crear un nuevo cel este contempla las capas existentes, por ejemplo, en el caso de este ojo la carpeta contiene una carpeta con cinco capas dentro y al crear un nuevo cel se creara una nueva carpeta con las 5 capas en ella.
Dibujando nuevo Cel
En este nuevo cel dibujaremos el ojo cerrado, para colocaremos el cursor sobre el nuevo cel, en la ventana de las capas seleccionaremos alguna de las capas vacías y dibujaremos el nuevo frame en ella.
Acá podemos utilizar la opción Onion skin (C) para ver el dibujo previo facilitando dibujar el nuevo frame.
Esta es la forma básica en la que se crea una animación cuadro a cuadro, si quieres una animación más compleja solo debes ir agregando nuevos cels y dibujos.
Para modificar la duración de cada cel basta con colocar el cursor en el primer frame del cel y arrastrar hasta el frame en el queramos.
Ahora si vamos a nuestro archivo principal podremos ver como nuestro personaje giña el ojo.
Ya tenemos un ojo animado, ahora solo necesitamos replicar estos pasos en el otro ojo.
Ahora animaremos el resto del cuerpo de nuestro personaje utilizando animación con keyframes.
Animación con Keyframes
La animación con key frame consiste en guardar las propiedades de transformación de un layer en un frame, y al tener dos frames con datos distintos clip studio paint se encargará de hacer la transición entre cada uno de los frames intermedios, facilitando el proceso de animación.
las propiedades de transformación son: posición, escala y rotación y podremos guardar estos datos utilizando los key frames.
Veamos un ejemplo modificando la rotación del cuerpo de nuestro personaje.
Nuevo keyframe
Para crear un key frame primero debemos habilitar los keyframes de la capa dando clic en Enable key frame on this layer (A), luego podremos crear un keyframe dando clic en Add keyframe (B), al dar clic en este icono se creara un keyframe en la posición de nuestro cursor.
Ahora solo necesitamos de un segundo Keyframe para poder crear la transición, para crearlo arrastraremos nuestro cursor a la posición en donde queramos colocar el nuevo keyframe y con la herramienta object modificaremos los parámetros de nuestra capa.
Si queremos modificar la duración de la animación solo necesitaremos arrastrar el keyframe final al frame que deseemos.
Creando un loop
Para crear un loop primero debemos crear un keyframe al principio de nuestra animación y copiar este mismo keyframe al final. Luego podremos crear el resto de key frames en el medio, si nos colocamos con el cursor en cualquier frame y modificamos cualquiera de las propiedades de transformación se creara un nuevo keyframe automáticamente, esto ayuda un montón a agilizar el trabajo de animación.
Como puedes ver al rotar el cuerpo este rota desde el centro, esto lo podemos modificar cambiando de posición el pivote.
Pivote para rotación
Para modificar el pivote solo necesitas seleccionar la herramienta Object, colocarte en el layer de nuestro objeto y arrastrar el pivote al punto en donde queremos que rote el objeto.
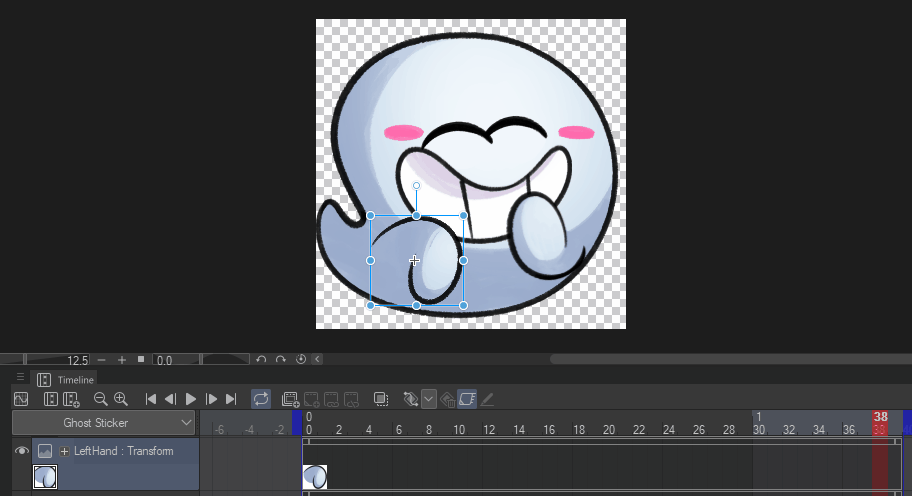
Seguiremos los mismos pasos para animar, los ojos la boca y las mejillas, pero en lugar de modificar su rotación modificaremos la posición de todos los objetos.
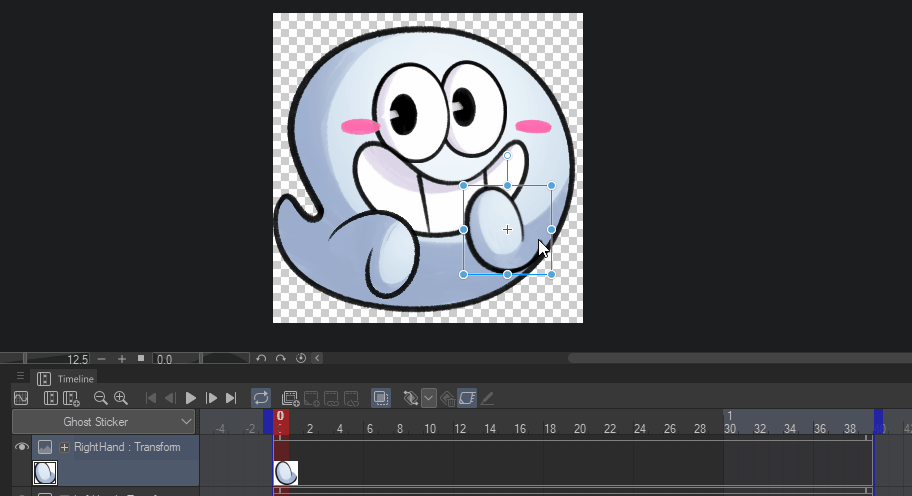
Podemos seguir estos mismos pasos para animar la otra mano.
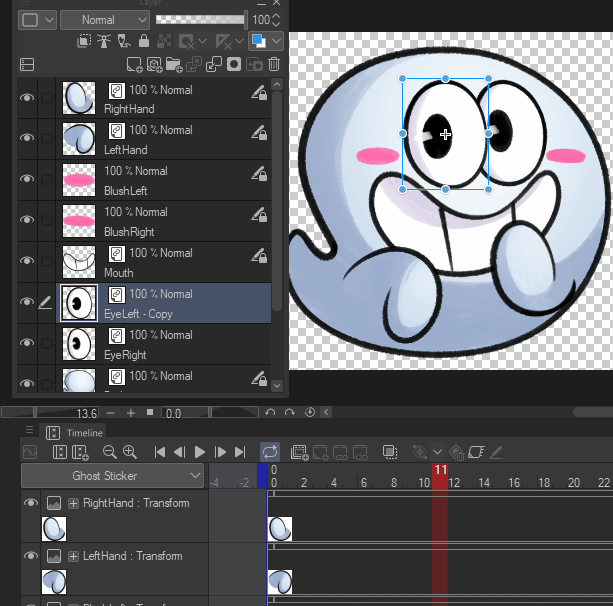
Modificar varios layers a la vez
Al igual que que el resto del cuerpo ahora animaremos las piezas faltantes pero en lugar de modificar su rotación modificaremos la posición.
Solo que en esta ocasión los modificaremos al mismo tiempo seleccionando todas las layers y creando los keyframes mientras los layers se encuentren seleccionados.
Siguiendo estos sencillos pasos podremos ir jugando con las piezas de nuestro personaje hasta conseguir la animación que deseamos.
Lo ultimo que haremos es hacer que el rubor de las mejillas aparezca y desaparezca modificando la opacidad de las layers.
Modificar opacidad con keyframes
Los keyframes de opacidad se ven representados por un pequeño triangulo en la parte inferior de la timeline de la capa. Debes tomar en cuenta que a estos keyframes no se les puede modificar la posición después de ser aplicados como se hace con los keyframes de transformación.

Para modificar la opacidad debemos asegurarnos de tener los keyframes activos, y de forma similar a modificar la posición debemos colocar nuestro cursor donde queremos el primer keyframe. En este caso quiero que el rubor de las mejillas aparezca y por eso reduciré la opacidad de la capa al 0% desde las propiedades de capa en la ventana layer, esto creara un keyframe automáticamente. Luego colocaremos el cursor en donde queremos que aparezcan los rubores y colocaremos al 100% por ciento la opacidad.
Resultado final
Y así quedó nuestra animación finalizada, debes tomar en cuenta que la animación se vera mejor mientras más atento estés a como reacciona cada parte del cuerpo al movimiento.
Toma todo el tiempo que necesites para afinar cada uno de los keyframes para obtener el resultado deseado.
Cuéntame en los comentarios si te pareció util el tutorial y siéntete libre de preguntar por cualquier duda que tengas con gusto intentaré responder.
Considera seguirme en las redes sociales para conocer más de mi trabajo.
¡Gracias por leer!
Users who liked this post


Comment