Draw fast using "secret features"
Hey, I've been drawing the comic called Loading Artist for years now, and I've learned some really time-saving tricks along the way. I've put together a video that goes over all of this, but if you'd prefer to read then read on!
The "secret features" I'm going to be revealing to you aren't technically "secret secret", but I never see anyone using them properly so they may as well be.
Let's begin by drawing the head:
Whoops that sucks.
But hey, instead of undoing and redoing a bunch of times, what if you could just PINCH and pull your line into the best line it can be?
TIP #1: VECTOR LAYERS
Vector layers are different from your regular raster layers. Instead of drawing down pixels, you're actually drawing a mathematical curve with properties that determine the shape and thickness of the lines.. or something.
To create a Vector Layer, click on Layer > New Layer > Vector Layer. Or just click the little button with the cube on it in the Layers window:
You can tell if a layer is a Vector layer by seeing if it has that small cube icon next to it.
Now select one of your Vector lines you've drawn in your Vector layer by choosing the Object subtool (inside of the Operation tool):
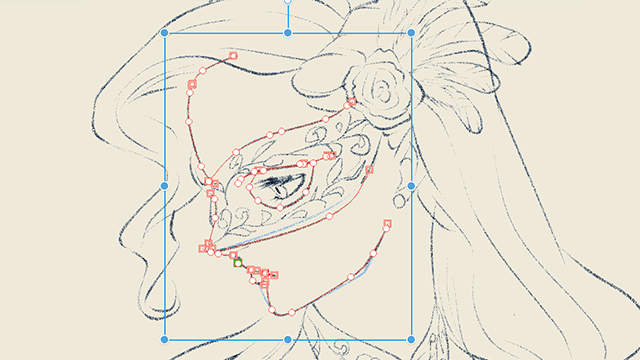
After selecting one of your lines, you can see this string of dots:
These dots are called CONTROL POINTS and determine the shape of your line. By selecting the line with the Object tool you can perform a bunch of different actions:
You can move these points around, or the entire line.
You can also transform the line by clicking/dragging the bounding box points.
You can also delete a line by selecting it and pressing the Delete key.
You can change the Brush Size and/or Brush Shape of a selected line.
You can also change it for the entire Vector layer all at once if you don't select any specific line.
However, I mentioned PINCHING the line, not just pulling control points individually. For that go into the Correct Line tool:
And then select the Pinch subtool near the top:
Now just click and drag any part of your Vector line to pinch it into position. It takes Pen Pressure into account, so keep that in mind (the harder you press, the greater the area it will pinch along with it):
(Alright this looks a lot clearer in motion from the video, but you get the idea)
In addition to Pinch, there's a bunch of other nifty sub tools in here:
[CONTROL POINT]
This lets you manipulate the control points with great precision and even comes with a drop down of different processes:
[SIMPLIFY VECTOR LINE]
This is useful for when your line might have too many control points making it a bit too hard to use or to get a smooth curve. It also has a neat feature called 'Delete shorter line' which lets you delete any small straggly lines that might be interfering with your work:
[CONNECT VECTOR LINE]
This subtool lets you join multiple lines into one. This also works for circles too. However, be sure to first move (or pinch) your lines to be as close together as possible before connecting for a better result.
[REDRAW VECTOR LINE]
Feel like redrawing a line but without having to redraw it from scratch? Use this!
[REDRAW VECTOR LINE WIDTH]
Same principle as the subtool before, but instead of redrawing the shape you're only redrawing the thickness of the line.
[CORRECT LINE WIDTH]
Similar to the one above, but instead of redrawing the thickness per individual line, you're affecting a general area:
Alright now using everything we've learned about Vector layers so far, I'm going to go ahead and draw the rest of my character:
It's looking a little crazy right now with all of these overlapping lines, but that's on purpose! Because it will demonstrate my next big tip:
TIP #2: VECTOR ERASE
Clip Studio Paint has a feature called 'Vector Erase' that can be enabled on an Erase tool (or just use the Vector Erase subtool) that can erase overlapping lines instantly:
You want to make sure Vector eraser is turned on, and that "Erase up to intersection" is selected:
Now whatever line your Erase tool touches, it will be removed up until it intersects with another line. I use this ALL OF THE TIME for my comics.
The other 2 options are:
[Whole Line] which erases the entire line no matter what is overlapping it.
[Erase touched areas] which acts as more of a traditional eraser, except considering you're erasing parts of a vector line it can a little odd. It's still useful in the right situations though!
So.. now you know about Vector Layers and Vector Erase. That's great and will speed up your workflow a lot, but you could be SO MUCH FASTER if you used Modifier Keys..!
TIP #3: MODIFIER KEYS
Modifier keys are a lot like hot keys.
For those who don't know, hot keys are like a shortcut to a tool:
You press a button -> it changes to that tool
Press another button -> it changes to another tool
.. and so on.
But a MODIFIER KEY is a button you HOLD DOWN to temporarily swap to another tool, and letting go swaps you right back to whatever you were doing.
You've probably already dabbled with modifier keys (maybe without even realizing it!). You know when you hold down "Alt" and it changes to the eyedropper, or hold down "Space" and it changes to the Hand tool so you can pan around? Those are modifier keys!
I know that's a pretty standard feature, but did you know in Clip Studio Paint you can completely customize this??
Open the Modifier key settings by going to: File > Modifier key settings
You can see the 2 examples I mentioned earlier about holding Alt for eyedropper, or Space for the hand tool. And as handy as all of this is already, if you click 'Settings for each process of tool' in the top left, you'll be able to set up modifier keys depending on what tool you're currently using!
This is so incredibly useful and I use these A LOT!
Some of my main ones I depend on a lot are for my G-pen Sub Tool, and those are:
Hold [Ctrl] to swap to: Object selection tool
Hold [Shift] to swap to: Vector Erase brush
Hold [Ctrl+Alt] to: Change brush size
Hold [Shift+Alt] to swap to: Hard Erase brush
Speaking of which: SIMILAR TOOLS WILL SHARE MODIFIER KEYS
For example the modifier keys I've set up for my Pen tool are also the same for my Pencil tool.
You can tell which tools CSP considers as similar by looking at the Output and Input processes at the top.
For example, the Pen and Pencil tools are both:
Output process: Direct draw
Input process: Pen
But for something like.. the Crayon tool, it's:
Output process: Direct draw
Input process: Brush
So it's NOT similar to the Pen or Pencil, and has its own modifier keys!
So anyway have a think about what tools would be handy to swap to and when. But don't feel like you've gotta use every one of these modifier keys because that will be incredibly overwhelming and I wouldn't suggest it (not until you're comfortable with them anyway).
And now for my final tip on how to draw faster!
It is...
TIP #4: HOT KEYS
BUT WAIT WAIT WAIT wait wait I know you use hot keys. I mean, you're reading a guide on how to draw faster so it's highly likely you already use them, but.. are you using them in the best way?
Open the Shortcut Settings window by going to File> Shortcut Settings:
Now, pretend you're playing a game and you're using the W, A, S, and D keys to move around. You wouldn't press J to jump. J sucks. You would press something more easily reachable like Space!
So why would you use hot keys like J in your drawing program?
Have a think about what tools you rely on the most, and then think about where you'd rather have your hot key to be. The goal here is to move your hand as little as possible, because any time spent moving across the keyboard is time WASTED.
However.. the only downside is you'd then become accustomed to your customized hot key placement and if you ever need to use someone else's computer to draw you'd be a bit lost. But then again how often are you really going to be drawing on someone else's computer anyway?
OUTRO
.. and that's it for now!
Thank you for reading! I hope these tips were helpful to you.
I stream myself drawing all my comics on my Twitch channel if you'd like to watch sometime or ask any questions:
Otherwise feel free to read all my Loading Artist comics for free online, they're all on my site:
Or if you'd like to support the comic (and get some neat behind-the-scenes stuff in the process), consider checking out my Patreon!
Otherwise you can also follow me on:


Comment