
In this tutorial, I will show you the technique for creating a beautiful sky and apply it to panoramic scene animation by using the 2d camera function from clip studio. It's very easy but it gives a cool result.
Note: I got the inspiration for this tutorial from my favorite animation: Your Name, which has many stunning sky scenes. ;)
Video tutorial
Overview concept of painting the sky
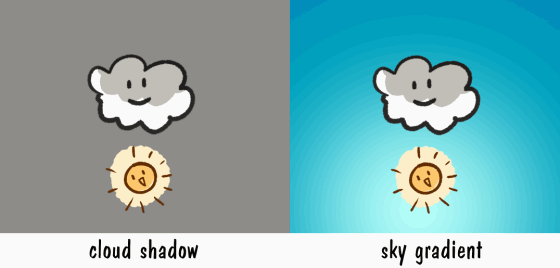
These are the most basic components of the sky during the daytime: blue sky and white clouds.
To make it look more dimensional, apply shadows on the clouds, gradient to the sky, and the light reflection.
Earth’s surface reflects the sunlight. This makes the sky gradient and light reflect to the cloud.

With these basics, painting with a textured brush will simply give it a more realistic look.
There are many brushes for painting clouds in Clipstudio Asset. For me, I recommend my favorite one
The shadow direction of the cloud and gradient in the sky is related to the position of the light source.
The light direction of the sky also applies to objects in the scene.
There are also different types of clouds, the shadow will not appear on high sky clouds ( such as Cirrocumulus and Cirrostratus) because they’re too far from the earth surface.
We can mix several types of clouds for a natural look. There is no limit to its structure, nature is amazing :)
We can also quickly edit the sky, just use the correction layer [gradient map] to adjust the tint of the sky and layer blending mode to add a glow effect to sun and stars.
Gradient map basic
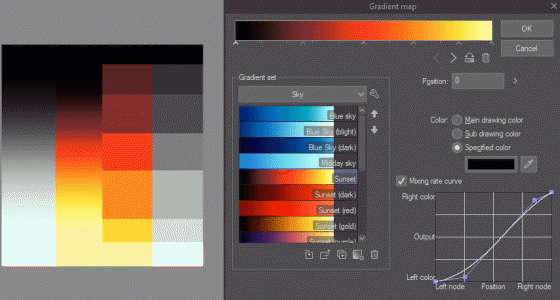
Gradient map is the main key for editing the sky in various versions.
Paint in grayscale and applying on the gradient map will replace the gray level to the color on the gradient bar.
From this example, you can see the white will be replaced by yellow, which is on the right edge of the bar, and the black will be replaced by the color on the left side of the bar.
There is also a sky gradient set that is the standard preset on the software.
The standard color set also have switches for the grayscale color, this is also useful for value painting
There are 2 ways to apply the gradient to grayscale image;
1. Edit > Tonal Correction > Gradient map
This will one time change the color in one layer into color from the gradient bar, you cannot adjust the gradient after applying the edit.
2. Layer > New Correction Layer > Gradient map
This will create new gradient map that covers all the layers below it, if you double click on the layer thumbnail, the gradient map popup will appear so you can adjust and see the result of the adjustment in real-time
In this tutorial, I will use the correction layer
The basic adjustment to gradient bar is by clicking on the ^ icon below the gradient bar to set the color on or drag it to adjust the color position
you can also inverse the color position by this icon
Also can give a specific color to the selected position.
There are also downloadable gradient sets from Clip studio assets.
It can help you save a lot of time choosing the color :D
Here is the link for the asset used in the image:
Import the asset with this menu
The asset is ready to use!!
If you adjust the gradient, you can also save it by this icon for later use
Painting the sky
Usually, you can just paint the cloud freely, but sketching will help you with alignment, especially in cases of curve composition as if the image was taken with a fisheye lens.
Select the gradient tool in the Foreground to background mode, give the pre-setting like this,
'Shape' : Oval (because we’re making the fisheye lens look)
'Where to create' : Create a gradient layer
Drag the gradient area on the canvas.
This will create a gradient layer on the canvas
Then create the correction layer,
[Layer > New Correction Layer > Gradient map]
gradient map with the sky color you prefer.
You can adjust the color position for a smoother gradient.
You can also adjust the gradient layer with the object tool
Create a new layer and paint the clouds. Make sure you only use the grayscale shade for controllable value to adjust in the gradient map Correction layer.
(I use the [Finger tip] tool to blend the high sky clouds)
If there are many layers of cloud, put them into one folder for the correction layer
Once you apply the gradient map, clip it to the layer below. So the gradient map only takes effect on the cloud
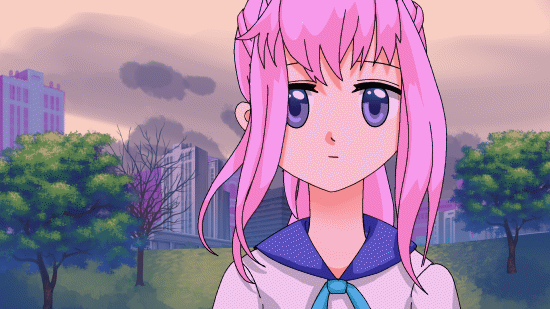
Now we have the sky with the blue tint that matches the sky.
You may apply the light effect to the character with some layer blending mode clipping with the character layer
To add the sun
Use the Burst tool to create a sunray effect
In the tool property, set the [Gap of line] to 30
Then disable all the [Disarray] settings
Drag over the sun shape
Then edit it with object tool
Adjust the length to make it to make the line fill the image
Adjust the shape of the ray by moving the edge node with object tool
You can find additional settings to the tool in the setting icon
Disable the starting, this will make the ray have only one pointy end
Rasterize the layer, then use [Finger tip] tool to add blending effect to the edge
Note: hold shift to make the drag in line.
Merge the ray to the circle shape, duplicate layer, apply blur filter[Filter>Blur>Gaussian Blur] and apply layer blending[Add(grow)] to make it shiny
Adjust it to the scene by selecting each layer and [Create transform] (ctrl+T)
finished
To adjust the sky into a twilight shade, use the inverted gradient on the clouds with the same gradient as the sky to make the silhouette look.
For the night sky, I use the spray brush to create stars
Then I duplicate the layer and apply a blur filter
[Filter > Blur> Gaussian Blur]
This will create a starlight effect
Create animated panoramic sky scene
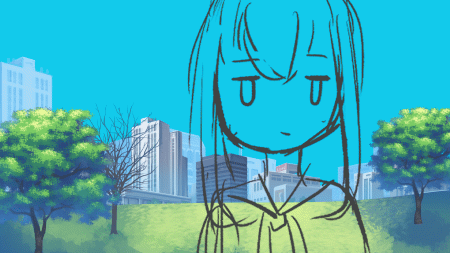
First of all, you must understand the overview of the shot, the object is to stay in one place while the camera is panning like this.
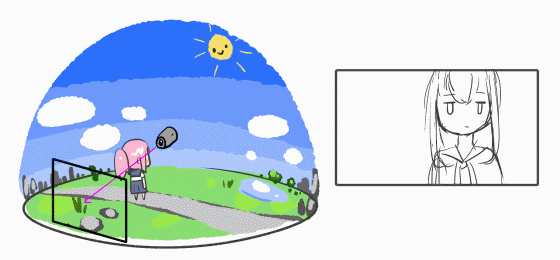
The moving object in the scene will be the background while there is a perspective change applied frame by frame on the character.
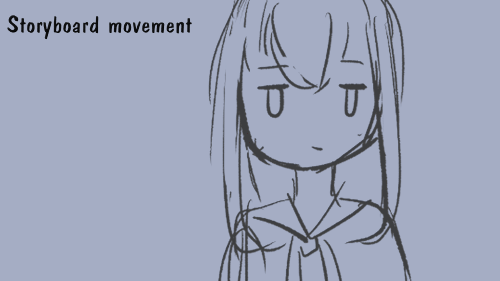
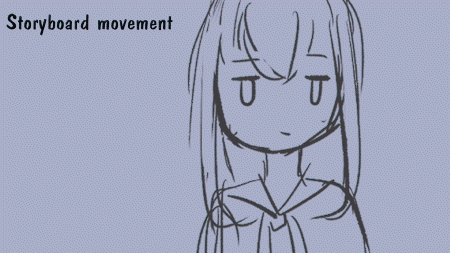
The workflow starts from drawing the scene order in a storyboard, which we will use the character as the proxy
Then add the keyframes and adjust the timing
This step is enough to start working on the background process, the keyframe animation will be done separately.
>> Step 1 : Sketch the background position
Create a new canvas for animation. Make sure it has the same frame rate to the keyframe timing file
(here I used 24 frames per second)
Go to menu [File > Import> Create new file object] then select the keyframe timing file(.clip)
The file includes the animation which will appear on the canvas
(Make sure the layer is outside the animation folder or it won’t show on the canvas)
Adjust timeline area to fit the timeline of the imported object
Draw the background sketch in the animation folder, match it with the timing keyframes we made
Note : draw only a few frames where background has changed, just to avoid confusion when animating
>> Step 2 : Add the sky gradient
Start by removing the background of the timing file by right-clicking on the layer > File Object> Open file from file object
In the file, remove the background layer, leave only the sketch line then save it
The file object will become transparent
Create a gradient layer and apply the gradient map correction layer
Enable the layer keyframe of gradient map to animate
Select the frame and move the gradient related to the sketch with [Object tool]
Make sure you create layer keyframe on the gradient, not the mask (click on the gradient layer thumbnail to select the gradient)
When you finish the adjustment to the sketch you will get the gradient sky that follows the camera panning
>> Step 3 : Create background
There are some keyframes that show the background before it pans up to the sky
Draw the background. Here I will use Clipstudio assets for the park and the town in the back.
You will find useful image assets in image materials, it’s not only ready-to-use but also useful for referring color.
Simply drag the object to the canvas to use it.
I picked the color from the tree and apply it to the ground
There are also default brushes for creating textured effects, I applied it to the ground to make grass
I use the ‘transparent city’ image material behind the park to create city view in the distance
And make further distance
I use the layer property on the material to adjust its color
In conclusion, we will have 3 layers for the background (merge the park into one layer)
The movement of background is different from the sky gradient, because it moves away quickly from the animation design,
so we enable the keyframe and move the layer away related to the position in the sketch animation
Create the keyframe only where it shows in the scene
(Rotate and move to the corner)
The camera panning will look more clear at this step
>> Step 4 : Add cloud
For the cloud, we will use a 2D camera for easier control. You can also use a layer keyframe but it will be a bit complicated.
Paint the cloud to the end scene and apply the gradient map , small clouds will make it look farther away.
Resize the canvas, go to Edit > Change canvas size
You can simply put the number or adjust the transform border to resize it to the canvas.
There is more space for camera work on the clouds, don’t worry, when we export it, it will show only objects in the boundary edge.
Draw the extended clouds in line, this will be used for the early stage of the camera pan
Create 2d camera folder
and place all cloud layers inside
Use [Object tool] to select camera folder, and drag it to the cloud edge
In camera option, you can check how it appears on camera with display mode option
(you must switch it back to field guide mode to edit the cloud again)
There will be 3 phases of moving the cloud, create the keyframe at the positions where it supposes to move
The background is done!!

>> Step 5: finishing
In separate file, make the frame by frame animation of the character
[Important!] set the frame rate to 24, the frame rate must be the same for background and character
Note : For the final step I also added some wind movement keyframes to the hair
For more details on animation Check my previous tutorial about using bezier tool for animation process here
Replace the timing keyframe with the finished character animation
It is recommended to make the character file with the same dimensions of the background, so it has no problem importing.
Optional: also add the sun layer and apply the layer keyframe
then move it relating to cloud position in camera folder
apply also some layer clipping for light and shading effect to the character
And it’s done!! Simple panoramic sky scene with clip studio!!

Note : you can simply adjust the gradient map to change the time of the scene in less than 3 minutes :D
I hope this tutorial is useful for your animation scene, Happy animating!! ^ ^
Users who liked this post


Comment