
Hi everybody!
In this CLIP STUDIO TIPS, I will cover how to draw three types of chibis!
The tutorial will cover 4 heads, 3 heads, and 2 heads chibis, from sketch to color.
What's a CHIBI?
"Chibi" is a Japanese terminology that's used to define a small/short person. As you might know or have guessed, that's why "chibis" are so small and cute! Nowadays it's used to refer to this style of art as well, in which we usually create a "smaller" and "cuter" version of a character!
Enjoy!
CHIBIS general proportions
Let's start with general proportions!
You probably can notice from the start the difference between these three types of chibis, right? As shown in the picture, you can use a "head circle" as a reference to always get the length of the bodies the same. Usually "2 circles" are equal to the head size, since in chibis the head tends to be bigger, with bigger eyes and super cute features!
--
As for the "4 heads" one, we'll have a more "human-like" body, ALMOST similar to those of children's. It'll be more proportioned, and overall there will be more space for details. Almost two heads will cover the head, meanwhile, the rest will cover the body and the legs. Arms are usually AS long AS the head, but generally, the fingertips should be slightly below the pubis!
--
In the "3 heads" version, you'll notice how the head is slightly squashed, the eyes tend to be bigger and the facial features tend to be simplified: in fact, you can see the nose disappeared and the mouth is simple and cute, without many details! (Although you CAN add them!)
The body is shorter, and the features are even more simplified compared to the "4 heads" version.
--
Now for the "2 heads" version, you'll see that everything is extremely simplified. The hands are almost non-visible and the facial features are super simple as well! We'll cover some super cute facial expressions with this version later on in the tutorial!
You can also see that there are almost non-existent body shapes, and it's like a tiny bean with cute legs!! Out of the three chibis, this one is the "most proportioned" one: as for one circle equals the head and the other one equals the body!
I've added a difference chart to let you check them real quick if you need to! I'll write everything down here as well, in case you can't read well!
4 HEADS:
Detailed eyebrows: leave more space for expressions;
The nose IS visible and adds more detail to the face;
Visible NECK and SHOULDERS;
The joints of the ARMS and LEGS (Elbows and Knees) are more visible;
Hands are bigger, more visible, and more detailed;
Feet are more detailed, leaving space for more detailed shoes.
--
3 HEADS:
Eyebrows can be drawn as cute circles! They still leave space for expressions, but they're simplified and (in my opinion) even more cute;
The eyes tend to be bigger, the nose disappears and the mouth is simplified;
The shoulders and neck are less visible, but still there;
The joints are no longer visible, UNLESS the arms/legs bend for the pose;
Feet disappear, leaving a flat, simplified version of them!
--
2 HEADS
The face is super simple and cute, here! Not much space for details;
Neck and shoulders are almost invisible!
Hands are tiny and simplified, the fingers almost look like tiny trangles! (Unless bended)
Super simple arms, body and legs!
4 HEAD CHIBIS - FACIAL PROPORTION
Let's start from the 4 head chibi, the more complex one:
To draw the head, you can start by drawing a simple circle (the black one underneath the red lines) as a simple guide. From there, you can add the chibi cheeks! They can be plumpy or less plumpy, up to your liking! Follow the line of the circle, and then create a slight bump that will form the cheek in the side and frontal view, and the nose in the side view.
You can divide the head into 3 parts:
1: Forehead, where the hairline and the eyebrows are situated; 2: This part will include the big, cute eyes of our chibi! They take out a whole portion of the head since they are a fundamental part of chibis! This part includes the nose, which works as a "union point" for the 2nd and 3rd half; 3: This is where the cheek bump-starts! It's connected to the nose, and includes the mouth and the "chin" of our chibi!
To give a guideline on WHERE to draw the EAR, start from the center of the eye (around where the pupil is,) and end it where there's the mouth.
Remember that the softer and rounder, the cuter! I'd advise using a round brush to achieve a more overall cute/innocent/soft look, such as the CLIP STUDIO PAINT watercolor brushes, or soft pencils!
4 HEAD CHIBIS - BODY PROPORTION
Let's talk about body proportions and how to approach them with the 4 heads chibi!
The body of our chibis are very similar to beans, pears, triangles, or one-piece swimsuits! You can use any shape you feel more comfortable with as a reference to draw the torso; which occupies the smaller part of the body of our chibi, from the neck to the pube.
The arms are as long as the torso, and the hands' fingers reach slightly underneath the chibi's pube, and you can use it as a reference to see it it's correct. As for the elbow, (likewise human anatomy) they are around the waist area.
Starting from the end of our "bean" or "pear" we can make the legs: they are longer and more human-like in this version of the chibis, and we can add the definition of the knee!
Together with waist, knees and feet, the legs are cover around the same length that the head covers.
TIPS: Remember that the rounder, the cuter! I'd suggest to rarely, (If not never) use too sharp shapes unless the character you're drawing requires it.
In psychology, round shapes are recognized by our brain as more friendly, and therefore they adapt better to a cute subject! You can see that the legs themselves have tiny bumps and they're not straight lines!
4-3 HEAD CHIBIS - EXPRESSIONS
Let's talk about expressions!!
I made this simple guideline for you to have a quick reference if you struggle with expressions! This guideline can be used for both the 4 AND 3 HEADS chibi versions! In the 3 HEADS one you just have to simplify a little bit the eyebrows and mouth. Or you can also keep it like this, if it's more of your liking!! Remember that you can always mix your emotions, as I did as an example: SADNESS + JOY = TEARS OF JOY.
But the combinations are A LOT! Try to experiment!
The intensity of the expression goes from 1 to 3 for the SAD and HAPPY reference.
Remember that:
When an intense emotion is being shown, the checks increase in color, becoming redder!
If someone is extremely happy, sad, embarrassed or angry, their checks and noses tend to turn bright red from the flowing of the blood into their faces!! In chibis, checks can be a super-cute add-on to use in your art!
When we show intense emotions, we usually shrink our eyes , expect for when we are scared or surprised, where they wide up! EYES are as important as eyebrows and mouths when it comes to expressions. Try to observe your own self in the mirror if you're unsure on how to proceed!
When showing intense sadness or joy, we can also close our eyes. some TIPS I could give to you are the following: the closed eye is usually drawn in the middle of the open eye! I did a small demonstration in the bottom right part of the drawing!
Also, if you add some "light" sparkle to them, it'll make them look lucid, cute and it'll add intensity!
4-3 CHIBI HAIR GUIDELINE - SKETCH
Let's talk about hair!
When it comes to hair, you have to think of the head as a sphere that's pretty much divided into two parts: FRONT and BACK.
The front part is where the BANG will be, while the BACK part is where the rest of the hair will flow. Setting an "O" (Center) as a starting point for your hair grow center can be extremely helpful, and it'll also help you create a flow of hair that's more consistent and harmonious!
Starting from the center, or our "O" (Center) point, you can trace lines to help you decide where your hair clumps of hair will land: image them as if they were to "hug" the head of your chibi!
Use soft and big strokes to make your hairstyle appear fluffy and cute! You can then add details to your clumps of hair to get more realism or texture!! This works for both your 4 heads and 3 heads chibi versions since they can get you space to get creative and add lots of details!
When you tie your hair, on the other hand, your hair strokes will follow the tied point.
As you can see in the picture, all your BACK hair will follow the lead to the "X" point, all going in that direction! It can help to decide where to put your pigtails or ponytail BEFORE starting to draw your BACK hair. If the bang is also tied up in the pony/pig tail, then it'll disappear and it will only leave the attachment of the hair visible (THE RED LINE that's shown in the first box!)
TIPS:
ALWAYS remember that hair FOLLOW GRAVITY! No matter the position of the head, they will always try to reach the center point of gravity: this means that, even if the head is tilted, the hair WON'T follow the head position and will flow toward the ground, eventually covering part of the face! Try to tilt your head when you look at yourself in the mirror and observe your hair!
Here are some examples of different bangs you can create! You can get creative and mix a lot of different type of hair length, textures and fluffiness! In the 6th chibi head, (the one with almost no-bang) I created an example of a non-existing bang, where only a couple of tufts of hair will be visible!
I drew some BACK hair to make you see the difference between them. As mentioned before, I also drew a version with pigtails! As you can see, the hair start from the center line of the head and then spread into two directions: the one where the hair is tied up! Feel free to mix and play with hair, and always use soft strokes! Don't worry about details too much, since you can always add them up later!
Extra Features - Drawing animal ears!
Let me show you some tips on how to draw cute animal ears!
As you can see, you can simply cut down the shape into triangles! Longer, wider, pointer, or rounder, but you can pretty much always use them as a base for your ears!
When drawing kitty ears, remember they are pointy, short, and wide!
Of course, it can variate depending on the type of cat, but I'm using a general shape.
Wolf/dog ears are usually longer and, overall, bigger and pointer!
I've added to the tutorial how to do floppy ears as well, in case you'd want those instead!
Bunny ears are slender, long, and round! They're extremely cute and you can customize them A LOT in the fur inside! You can even add hearts, stars, or maybe bells to them.
Last but not least, fennec ears! They are extremely cute, and differently from other ears, they tend to be VERY close and bend towards each other! As you can see, you can pretty much use the shape of a triangle here as well!
CLIP STUDIO TIPS:
You can notice from the picture that the ears are exactly the same. How can you do that?
CLIP STUDIO PAINT offers the possibility to use the SYMMETRY RULER. This can help spare TONS of time when drawing things that should be symmetrical!
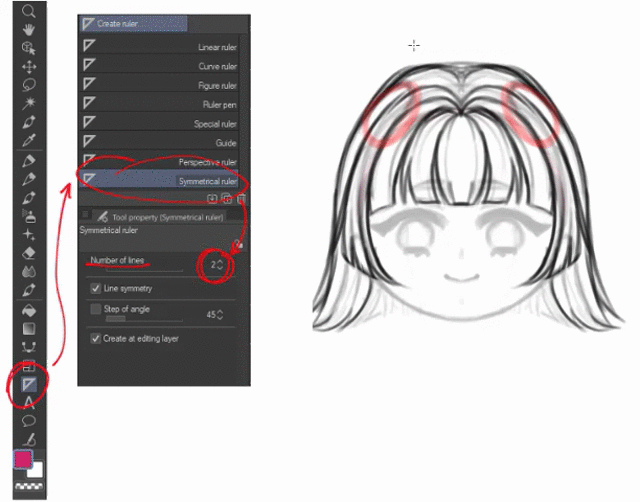
If you want to delete your ruler, simply go to the layer section and RIGHT-CLICK on it, and then press "DELETE RULER"!
You can also DRAG and DROP your ruler into another layer if you want to create something else in another layer!
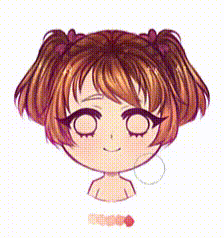
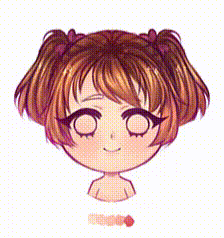
CHIBI HAIR GUIDELINE - COLOR
Let's talk about coloring!
I choose one of the previous sketches to use as an example for coloring! Every single one was the same, it doesn't matter which one you will choose.
Let's start from step 1:
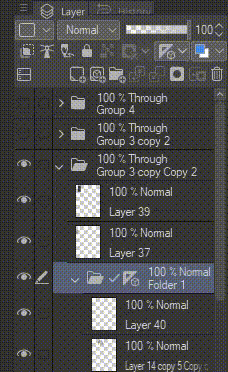
UNDER the lineart layer, create a layer in NORMAL. The lineart layer should also be set to NORMAL. Create the base color with whichever color you like the most! I choose a chocolate brown because I personally love chocolate-colored hair!
When you're happy with your base color, we can start to shade our piece. I usually create the base shadows using a SOFT AIRBRUSH. Let's create a MULTIPLY layer ON TOP of our base color layer, and then let's clip it to the layer below! You can see how to do it in the picture above. As you can see, your clipped shadow layer should have a pinkish-reddish like next to the layer.
|What does this do? - Basically, everything that you'll do in the clipped layer won't GO OUTSIDE the lines placed in the layer below it! Amazing, right? You don't have to worry about going around and playing with your airbrush!|
Now add some simple shadowing with your airbrush starting from the center/top and then some in the lower part. You should be left with a middle-gradient!
When you're happy with that, pick a watercolor brush (I've left the one I used in the picture, with my settings!) and create soft strokes. I usually create them following my lineart/sketch lines!
When you're done with the shadows, COMBINE your MULTIPLY CLIPPED LAYER and your NORMAL layer. You should now have a single layer that contains the shaded hair!
Before proceeding, let's change the color of our sketch/lineart! To do this quickly, Lock the transparent pixels of the layer , and then you can simply replace the color with any brush, or even the bucket tool! I'd always suggest NOT to use black In your linearts. Here I used a gradient that went from a darkish purple to a very dark purple!
Now, Lighting!!
Doesn't it makes everything cuter?
Let's start with something fairly simple: using a GLOW DODGE layer, pick a lighter color around the same tone of the hair color and use a soft brush to poke around some lighting! Feel free to go as light or as strong as you want!
Once you're satisfied, merge the two layers (as shown previously) and then create an ADD GLOW layer. With the same watercolor brush, create soft strokes in the light points of the hair until it starts to pop out! You can see the difference between the first and the second picture already, and we only used two layers! the ADD GLOW layer is amazing for lighting! I usually really like to add a "circle of light" on top of the hair, where they come from the head. If you look up photos of people in sunlight, you'll see that that part of hair catches a lot of light and shines plenty!!
Once you're satisfied, play around with more layer in ADD GLOW and GLOW DODGE, refining the light points as I did! I usually switch between the watercolor and the airbrush at this point! There's no settled rule, just play around until you're happy with the result!
I really love to add some coloring to the hair with an overlay layer to make the colors a bit different! I used pink, purple, yellow and white plashed all over the piece to make them more lively and shiny!!
After that, I used another ADD GLOW layer and I added some visible sparkles to make it more detailed. I find them very very cute, but you can skip them if you don't like them!!
CHIBI SKINTONE AND EYE COLORING
Now that we have colored the hair, let's learn how to color the skin! I've settled down four types of skin tones, but there are PLENTY MORE! Even lighter and darker skin tones (together with mid-tones!!) can easily be added to this chart, but I've tried to settle down a basic guideline!
It's fairly easy, and it doesn't require many layers to color the skin tone! In fact, we are gonna use only ONE skin tone layer for this tutorial!
I've drawn the palette together with the various step-by-step, if you wanna use it to help yourself while you learn. You're more than free to experiment or use your own skin tones!
Let's start: to color our skin tone we are gonna use a single layer in NORMAL, UNDERNEATH our lineart: we will then LOCK THE OPACITY* (Look below on how to do it!) and color on the same layer with the darker shades.
STEP ONE:
We will have our BASE skin tone, and then a slightly darker tone. Using an AIRBRUSH, color the checks, under the neck, around the face, and underneath the area that's covered by hair: these cast a shadow on the skin, making the parts where they touch it darker.

STEP TWO:
Using an even darker shade, let's make the checks even redder and the parts underneath the hair even darker. You can see how three simple colors are adding a lot of three-dimensionality to the piece already!
STEP THREE:
Here we are gonna darken the checks a bit more, but we're gonna do something different: instead of using a big brush to darken the area, we are gonna create some strokes right underneath the hair to make it POP out. Basically, you have to follow the line of the lineart and leave a darker line.**
STEP FOUR:
Overlay!! Create an Overlay layer and LOCK it (as shown previously) to the layer below. Use a lighter shade for the highlights and a redder tone to enhance the cheeks!
EYE COLORING
When doing the white part of the eye, remember that the darker the skin tone, the darker is the tone inside the eyes! You can always choose to make it pure white, but it'll look less harmonious!
Here's a quick STEP-BY-STEP with a palette!!
Starting from the first like, I used the colors of the lineart to create the shadows of the eye, even if the eye color is green; I choose to use the purplish color to make the shadows to make the eye more interesting and colorful!
From the second row, I started to use ADD GLOW(s) layers to create the light effect in a circle motion, until I was satisfied with the intensity. There's not really a "rule" for this, it's up to your liking!
From the third row, it's all polishing and making slight changes: I blurred the lineart around the eye to make it look softer, and then I added a shadow in a MULTIPLY layer.
I Previously created a CLIP STUDIO TIPS tutorial on how to draw and color anime eyes, you can check it out fore more clarity!
CHIBI EYE LIGHTS
Here are some lighting examples that you can use for your chibis!! As you can see, you can go ahead and get as creative as you want, even adding some figures inside the pupil! I ALWAYS use an ADD GLOW layer to create this effect, and, with simply a hard brush (but you can use a watercolor brush, too!) I add a PURE WHITE light to the eye!
DON'T use the symmetry tool to create the eye lights! Why?
Because it can make the character look cross-eyed.
CREATING A 4 HEADS CHIBI FROM SKETCH TO FINISH
Following the proportion charts I've explained above, let's start from the head! Let's draw a circle and then create the face shape (red lines). And then we can add the eyes, the nose, and the mouth!
The body! Let's start by attaching the body to the head via the neck!
After that, create the "bean/pear" shaped body, and from there you can attach the body limbs. If it helps, create the first half as I did, and then attach the rest.
As you can see, the arms look like tubes, you can use that as a reference!
!The last one has a different expression because I changed my mind about the character I was gonna make!
Now for the hair! Following the explanations I did before, I created the sketch for the hair, together with two triangles that are gonna be two cute kitty ears!
I figured she had a tail and that I did not show you how to draw one! For me, it's usually super comfortable to determine the "path" of the tail with a thin line, and then draw the actual tail around it as a shape with no details. When I'm satisfied, I add the details!
After I'm done with the pose, I clothed her! Feel free to draw the clothing of your character up to your liking, it doesn't have to be the same as mine. I added some tips on how to draw bells and the folds of the skirt, together with some cute ribbons types!
I also cleaned the lines around the hair, head and face!
After changing the lineart color to a pink tone, I've added the base color to my character, and then I used a MULTIPLY layer to create the shadows! As I explained before, I NEVER use black to create shadows! I created a palette for the skin and for the rest of the body for the shadows, but all I did was pick the colors from the lineart and then use them to shade my piece! I used the same brushes I used for the hair, an AIRBRUSH and a WATERCOLOR brush!
TIPS:
In CLIP STUDIO PAINT, if you RIGHT-CLICK you can use the EYEDROPPER (Shortcut - I),
which picks colors from all of your layers or only the selected layer (you can change which layer from the menu to the left!)
If you set the RIGHT-CLICK on your tablet pen, it'll be even faster!
As you can see, I'm picking up colors super quickly with this method!
Here's the version with the ADD GLOW and GLOW DODGE layer touches!!
!EXTRA!
When doing simple chibis as 3/2 heads, you can use super-simplified expressions! I created this simple chart to show you some examples of such sort!!
I hope you enjoyed the tutorial!
thank you for reading everything,
Aky
Users who liked this post


Comment