
This tip explains how to apply SF-like armor using the material "texture painting support action" that I created.
When I tried to write in the explanation column of the material, there were too many characters! What a mess ...
Please challenge with the material.
Use material
The following two materials are mainly used (English version)
- To view the material page in other languages, select the language at the bottom of the page.
Used in the finishing gradient map. You can use any gradient you like, but this material is especially suitable as it was specially made by me for the overall adjustment of the illustration with the gradient map feature.
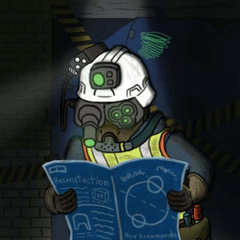
Sample illustration
The upper body part of the person in the picture below is the part painted using the "texture painting support action" and the attached SF armor texture.
How to paint
Software used: CLIP STUDIO PAINT iPad version (version 1.11.6)
(1) Paste the texture
Make a selection where you want to paste the texture, and paste the sci-fi-hex-tex01 texture attached to the "texture fill support action". You can change the angle and zoom in / out with the object selection tool, so paste the texture to fit the picture.
This time, the right arm part is made into a separate layer, and the angle of the texture is changed.
(2) Transform the texture with the distortion tool
Rasterize the texture, roughly shape it with Edit> Transform> Transform Mesh, and then use the Distortion tool to transform the texture to fit the person's body. (The distortion tool is in the color mixing tool if the software version is 1.11.6 or later)
So far, I've been working on layer modes by multiplication to make the line drawing easier to see.
(3) Execute "texture painting support action"
Change the texture to the compositing mode "normal" and combine it into one layer. After that, with that layer selected, execute the auto action "selection division" in the "texture fill support action". There are 3 selection layers, "Whole silhouette", "dark areas" and "highlights".
When using this auto action, use one layer for each part you want to divide into a selection range. It is convenient to put the layers in the folder and then execute the auto action because the selected layers will be organized in the folder.
(4) Paint the basic color
After painting the new layer with a dark background, double-click the thumbnail of the "Whole silhouette" layer to load the selection. Turn off the Show Selection Borders button at the top of the screen and fill it with a slightly lighter color.
I used the default material "Blur Airbrush".
(5) Apply basic light and dark
Create a layer of multiplication to load the "dark areas" selection and fill it with shadows. Furthermore, read the "highlights" selection range, create a new layer, add "addition (emission)", and paint the bright part.
(6) Add highlighting
When the light and darkness is sufficient, cancel the selection and create an addition (emission) layer to highlight each hexagon and the particularly bright areas such as the arms and chest.
(7) Apply a light emission effect
Load the "dark areas" selection, create a new layer and fill it with a bright color that is different in hue and hue from the entire picture. I used yellow this time. If you set the compositing mode of the layer to "Dodge (light emission)" and lower the opacity, it will look like the picture below.
(8) Completed using the gradation map
Select "Layer> New Tonal Correction Layer> Gradation Map" to create a gradient map layer. You can use any gradation you like, but here I used the blue gradation of my gradation material "nostalgia gradation set".
If you set the gradient map layer to the compositing mode "Overlay" and reduce the opacity moderately, gloss and shine will be created.
This completes the armor painting.
Example of changing the color with the same painting method
This is an example of using a green gradient for the finishing gradient map with the same texture and color painting method. It may also be used as a flooring material for science fiction buildings.
Thank you for watching until the end.
"Texture painting support action" makes it easy to paint various textures, not limited to this texture. have fun!
Users who liked this post


Comment