
Hello dear,
Annady here with you again on another article on transitioning from traditional art to digital art with ease on CLIP STUDIO PAINT (CSP),
_______
Before this on the previous series, we looked at ways we can turn our traditional comic into a digital comic, but in this particular sets of transitioning, we will be seeing the ways I particularly turn traditional illustration master piece into a digital illustration PNG & JEPG format.
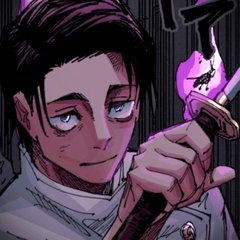
I will be showing my various workflow process use my already drawn image of (two friends from two different worlds of life), with them setting on the a high roof skyscraper,
_______
Be advised, that I will be only using the above image for all of the steps I will be explaining in today's tutorial article.
And this process was be carried out using an A4 paper for the traditional illustration meanwhile for the transitioning to digital illustration, I will be using CLIP STUDIO PAINT software to show their various creative features and what their do to add creative and beautiful to one's illustration.
Now, I will be breaking the transitioning, render and detail process into steps.
🔅 Step 1: Import of the illustration masterpiece
To import our traditional illustration, first open the CLIP STUDIO PAINT (CSP) software on your device which for me it's a [Tablet],
Click on [File] at the top of the canvas, on the mini dashboard that will appear, click on the [Create new from photo library] option.
____
A mini dashboard of our gallery will be displayed, then,
Select the traditional illustration image you want to import,
____
The illustration will then be imported onto the CSP canvas as new layer
With that done, we have just completed one step of the transition process,
Now onto the Next step,
🔅 Step 2: Line art extraction process
To Extract the our imported traditional illustration on clip studio paint have never been more easier, all one just need to do is firstly, locate the [Layer Property] dashboard which one do by
Clicking on the [Window] at the top will make different sets of options appear in a mini dashboard, click on the [Layer property] making it dashboard appear,
____
Now,
Click on the bar of the [Expression color (preview)] and select [Monochrome] from the three options,
____
Afterwards, I then adjusted the various settings as follows;
• I Set color to be made visible to only black by only clicking on the [black color icon].
• I set the color threshold to 128%.
• The Alpha threshold, I set to also 128%.
____
Notice:
That I how I left a black border lines for the top and bottom areas, I left those areas to make the illustration look more like a movie format illustration, but say you want to remove it, all you just need to do is select those areas and clear layer and they will be erase.
Also with the above process done, the traditional drawn line of my illustration has now been converted to digital line art.
Please be advised:
That the various above adjustment where made base on the present nature of my snap illustration image, so the adjustment you may now for your illustration may require so tinkering on your part or you may just be required to make use of mine.
🔅 Step 3: Line art refining process
With this current extracted line art of the illustration some may take a look at it and say it is good to good, but but but buuut…
Let try to do something to see if it is good to go for the next step.
First,
Start by selecting the imported image layer, opening the [Layer property] section, now enable the [Border effect] by clicking on it's icon, the round thingy over there, then click on the white bar beside the [edge color] options and select any brighter color which for me is red, now click on the [OK] button,
____
With the above mentioned process done, Looking very closely at current extracted illustration, we will notice that there then to be some sort of black dot like things on/in/outside the lines and those little things are known as [dust], so for the line art of our illustration to be free of those,
Go over to the [Sub tool: correct line], I can then locate the [remove dust] sub tool, using that Sub tool I draw five different sets of square shapes selecting the various areas I want the CSP detector erase their dust avoiding the nose region which I also knowingly made used dots as the Nostril of the two female characters.
____
And with that done, mosey of the dust will be removed but some part like take for example the part at the bottom right corner, the dust can only be erase by hand
Using the Eraser sub tool to erase those unwanted areas.
____
Now can go ahead and disable the [border effect] by
Clicking on the [Border effect icon] again.
____
• Use of Blending Modes
Next after that, I set the [Blending Modes] of the line art Layer to [Multiply], so for that the line art of the illustration to blend or show as sense of an overlapping expression when colors are added below it's Layer.
____
• Use of Lock Layer
Afterwards, I locked the line art layer by
Clicking on the [Lock layer icon],
Which will prevent any mistake of writing or doing anything on that particular layer.
____
Now at this point we are half way done, onto the next step.
🔅 Step 4: Adding of Base colors
In this particular step, the one most important CSP I found very helpful when I do color my illustration digitally is known as [Layer].
• Layers
Layer in digital art is a very useful and important key factor when as a digital artist you want to draw or color your work,
I always utilize this aspect of the digital, when I am to add colors to my illustration, I first of create a simple template of how I want the expression to be, by dividing the different sections of my illustration into the following;
• The Background elements, of which I divided into 3 different layers are shown below as 1, 2 & 3.
• The Midground elements, of which I divided into 3 different layers are shown below as 4, 5 & 6.
• The Foreground elements of which I divided into 3 different layers are shown below as 7, 8 & 9.
After the above is done, I then lock the transparency of the different created Layers.
____
Next, I fill in my different elements which are the background, Midground and foreground with a the base color selected for the illustration,
I create a [folder] and place all the different layers into the [folder] to help compose the layers.
____
• Know and understand your illustration composition
Composition is another aspect I never take likely when I draw or add my colors to my illustration, cause composition helps show our how our lighting transitioning should be and how to we as artists can easily draw the attention of our viewers.
Which for example as shown in the below illustration, I made used of the Golden spiral with the light source at the bottom left corner of the illustration and the light reflecting in a spiral way even onto that both main female characters.
____
• Use of Blending modes
With CSP Blending mode feature, adding of light or glowing effects has never been more easier,
To add a sense of glowing nostalgia to my illustration, I create a new layer above my previously created and packed folder, I set the [Blending mode] to [Color dodge]. Then using the soft airbrush and marker sub tool, I add bright orange glow effect to the illustration.
____
Now,
🔅 Step 5: Usefulness of CLIP STUDIO PAINT features
Using CLIP STUDIO PAINT (CSP) for some years now, I come to find many of CSP features fun and interesting to use like say for example;
• CSP Monochrome Effect
In my previous serie, I showed how I add the monochrome effect using my soft sub tool brushes.
Now, in the part of the serie I will be showing how I crop the monochrome effect to sections of my character using the [selection sub tool].
First I click on [material]>[Pattern] a mini dashboard will appear, I then click on [Ninja star like] material and drag it onto the canvas,
____
I first select the layers of the head band and crop top of the second female character and
I then use the [shrink selection sub tool] to select those areas,
____
Next,
I click on the [Invert icon] on the selection bar at the bottom of the selected areas and I also click on the [clear] button t the top to erase all the unwanted areas of the [monochrome effect].
____
I then repeat the process for the crop top native t-shirt the second character is putting on.
____
And below is the end result.
____
But I believe we can still do more to this illustration like for example,
• Using of CSP decoration Sub tool brush
Which one can locate in the [Sub tool: decoration], I used the [Soft circle] sub tool to add some round circles with soft edges to the illustration to show a sense bouncing of light ray.
____
And with the above done this masterpiece is done and here before is the final or finished illustration.
____
Now with my illustration finalize, before I export it, I like to play around with some of the newly added and improved function in CLIP STUDIO PAINT which re located in the [Filter effect].
🔅 Step 6: CSP Filter Effect
CSP has most the fun filter feature(s) I know and one of the better which I have come across and often use like for example;
• The Chromatic abbreviation
This features allows users give their illustration a color distorting appearance.
To achieve this, first I start by selecting the layer I want the effect to affect and I then
Clicking on the [Filter]>[Effect]>[Chromatic abbreviation],
____
Following that,
a mini dashboard will appear, I then adjust the following settings as follows;
• Radial (use center point)
• Intensity is set to 57%,
• Angle is set to -127%,
Then I click on the [OK] button
to set the chromatic abbreviation effect onto my illustration.
____
And Wala the effect is implemented or applied to the illustration.
____
Another particular set of [filters effect] I like using is the [pencil drawing].
• The Pencil drawing features
Pencil drawing effect is another effect I come to like in CSP, this feature allow you give your illustration a paper like appearance with hatchs,
Which to achieve that, I also start by
Clicking on the [Filter]>[Effect]>[pencil drawing],
____
A mini dashboard will appear, I then adjust the following settings as follows;
• Enable [outline],
• Enable [hatching],
•Set hatching size to 7,
• Set hatching roughness to 3,
• hatching angle I set to 130 degrees
While I left the grey output disable.
Then I click on the [OK] button
Which will then set the pencil drawing effect onto my illustration.
____
And the below illustration is the result.
____
The next effect features I really appreciate and found also fun which is known as [Fish eye lens effect]
• Use of Fish eye lens
This set of [filters effect] is part of the [distortion effect] features which are the name goes it change the form and shape of our illustration,
I often make use of this CSP most time, but say you want to use it for yourself, you will locate it by
Click on the [Filter]>[Distort]>[fish eye lens]
____
A mini dashboard will appear, I then adjust the following settings as follows;
• Distortion is set to 20.07%, • Area is set to affect the [entire selection],
• Radius is set to 44.6%,
• Shape is set to 0.00%, Click on the [OK] button
____
The illustration will be distorted to look like a form of television screen.
Now, double tap on the [Paper layer] at the bottom left corner, a mini dashboard with different colors will appear, now select a slightly dark color and then click on [OK].
____
Below is how the illustration will then appear as after the above is done.
____
Another way I do have fun with the CSP features is playing with the [Polar coordinates].
____
• Uses of polar coordinates
Polar coordinates effect is also one of the [distortion effect] features which can be located by doing the following;
Click on [Filter]>[Distort]>[Polar coordinates]
____
A mini dashboard will be displayed,
Clicking on the [Transformation method bar],
Three sets of options with be displayed;
• Rectangular to polar
• Polar to rectangular
• Spherize
Which will affect the illustration different as shown in the below illustration image.
____
Be advised:
This different sets of CSP features are not mostly necessary when you may be doing your own illustration, but I just showing you what I myself love doing to my illustration to see how the appear and I am fund of trying new things.
Now, my last and final step to the traditional process is known as the [Exporting process].
🔅 Step 7: Exporting process
How I export my illustration simply after the major process or in this case steps has been achieved, is by either
Clicking on the [Exporting] icon at the top of the canvas,
____
This Exporting process above is just the simple and easier way for users to export their work but in the CLIP STUDIO PAINT default format.
Meanwhile say you want to export your illustration in a PNG, JEPG or PSD (Photoshop Big Format) format,
Or you want to post your illustration online and you do not want some take your illustration for his/her own, you can use CSP watermarking features to engrave your logo onto your illustration.
All one need to do is as follows;
Click on [File]>[Export (single layer)]>[.png (PNG)],
____
A mini dashboard will be displayed,
Just click on the [OK] button,
____
Another dashboard will appear, now to engrave our logo as Watermark,
Enable the watermark by on square beside the [watermark] name at the bottom left corner and click on it setting for adjustment,
____
A new dashboard will appear,
Click on the [Tile] button which will make the imported item to repeat vertically and horizontally as well,
Next,
Click the [File photo library].
____
The gallery library will open, then select the item (which in this case is my logo),
____
Afterwards,
Change the [Blending mode] from (Normal) to (Soft light), Click on [OK] Button,
____
A review mini dashboard will appear,
Click on the [OK] button to progress to the next page.
____
The File dashboard will be open for to save the work,
Click on the [OK] button,
____
And the work will be saved, with that done I now have an illustration with my logo acting as a watermarked.
____
Conclusion
Thanks to everyone who went through this tutorial article, I am just hoping this aspect of the [transitioning from traditional art to digital art] series was of help to you all, and I am very happy to have this great opportunity to create this tutorial article. I will be casting off now, so byeee.
Ann signing out for now
😽😽😸😸😺
Users who liked this post


Comment