
Introduction & Tutorial Videos
Clip Studio Paint has several fill tools, which can be used in quite versatile ways. In this tutorial I will show you some ways to use them to paint flat colors and base color layers super quickly!
There is also an extra tutorial video right below in connection with this article. I recommend watching it, since it goes more into detail and shows you some additional tips and tricks!
I also have an older tutorial video that explains all of basics of the fill tool and auto select settings, like Tolerance, Area Scaling, Refer Multiple, Target Color, and so on. It is very extensive and shows you examples for all of those options, and compares them with different line-art types.
So I recommend watching it too!
Differences between the Fill Tools
You can basically separate the fill tools into 2 categories: The "regular" fill tools and the "selection" fill tools. Selection fill tools are "Close and Fill", "Paint Unfilled Area" and "Advanced Fill".
If you use a regular fill tool, then the pixel you clicked on in the picture matters. The tool will spread out the color based on the color information of that one pixel.
When using a selection fill tool, you make a selection, instead of clicking on a pixel. In that case the color information comes from the "Target Color" setting, of which there are several ones. Explaining all of them would be a bit too much for this tutorial.
In this tutorial I will only explain those Target Color settings that I normally use. At least for me they suffice for almost every situation. But if you want to see how the others work, then check out the second video above!
Both of these types of fill tools have their advantages and disadvantages. Knowing which ones to use in which situation, with the right settings, can safe you a lot of time!
Making a Base Color Layer
So, the first thing I normally do right after I finished drawing the lines is to make a so-called "Base Color Layer". By that I mean a layer with just one flat color that fills out the entire drawing.
There are several ways to paint in the color. But the method I normally use is quite reliable and fast. Faster than painting everything in manually or using the regular fill tool.
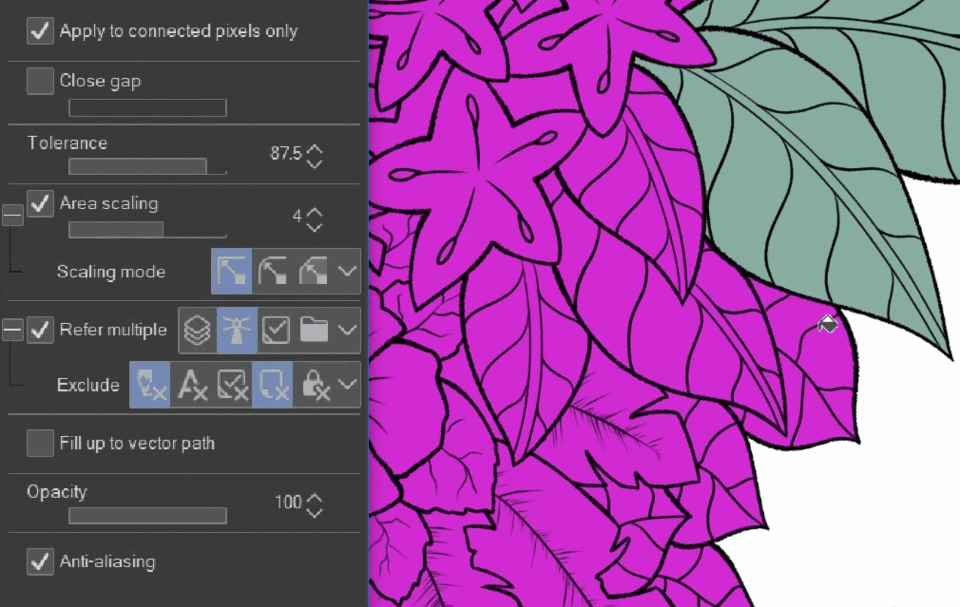
I usually use the "Advanced Fill" for that purpose. It works pretty much like the other selection fill tools, but the selection is simply the entire canvas. You can find it in the "Edit" menu.
Set the lines as reference layers, create a normal layer below them, and use these settings for the Advanced Fill tool:
✦ Target Color: "All enclosed areas including transparency"
Not only does it fill out the areas surrounded by the lines, but also the area underneath the lines! This makes sure that absolutely everything gets filled in without any missing spots.
✦ Tolerance: doesn't matter
Everything gets filled in anyways. Just set it to a small value.
✦ Area Scaling: small NEGATIVE value
As I said, all pixels underneath the lines get filled in. This includes the semi-transparent ones at the outer border. If those get fully filled in too, then it looks like the color in spilling over. The negative Area Scaling pulls those pixels back inwards by the amount you entered. Below is a comparison. Look very closely at the outer borders.
✦ Scaling Mode: "Rectangle" or "Round"
Those modes will always retreat the pixels inwards by the negative amount you entered as Area Scaling. Do not use "To darkest pixel". It works differently from the other two.
✦ Close Gap: only when needed
If your line work has gaps, maybe on purpose because of stylistic choices, then using this is an easy way to fill up your drawing. The amount depends on the size of the gaps. You'll most likely need to do some polishing work afterwards at those gaps though.
✦ Refer multiple: "Reference Layer"
This makes sure that only the lines on the References Layers are referred to. Any colors on other layers will be ignored.
✦ Exclude: only the Paper Layer
The Paper layer, which fills out everything, should always be excluded.
✦ Fill up to vector path: off
Then just click OK and the entire drawing gets filled in!
It's not quite done yet though. Some areas were filled in that weren't supposed to, because they also were surrounded by lines. Some sharp corners might need some erasing work too.
Areas that need to be erased are marked with blue down below.
Now it is the regular fill tool's time to shine!
If you select transparency as the color, then you can turn it into a convenient eraser. As a matter of fact, you can do that with pretty much any tool in Clip Studio Paint!
The settings are quite similar to the ones before. One key difference however is the "Area Scaling", which this time has a small POSITIVE value! You need to erase a little bit further into the lines, for the same reason as described further above.
With that you can just click into all the areas you want to be transparent. And after that choose an eraser brush and make some small corrections while going around the entire outer border.
Done! The Base Color Layer is ready now!
If you clip all of the following layers on top of this base color layer, you will stay with certainty within the drawing! So clip all the colors, shading, highlight, textures and so on over it!
Filling in Flat Colors Efficiently
Let's fill in some colors now. The base color layer alone is not enough.
Now there are two ways how to manage the flat colors: you either put them all on one layer, or each color gets its own layer.
I personally recommend creating an extra layer for each one of them. Adjusting things later becomes easier that way. Just make sure you label and colorize your layers so that you won't lose track. Otherwise it can happen very quickly that you end up with dozens of layers and you have no idea what is where.
Now the question is how you are going to fill in those colors efficiently. The fill tools give you many options, with each of them being useful in different situations.
We are going to start with the regular fill tool.
The settings are quite different compared to before. Let me go through them once again:
✦ Tolerance: high value
To make sure that the semi-transparent pixels below the lines are also filled in. Don't go for 100 though!
✦ Area Scaling & Scaling Mode: small value with "Rectangle"/"Round", OR high value with "To darkest pixel"
This depends on the type and thickness of your lines.
If you have lines with a somewhat consistent line thickness, then you can use "Rectangle" or "Round" and adjust the Area Scaling value to about half the line thickness.
If you have solid lines with variable thickness, then use "To Darkest Pixel". This will prevent the color from spilling over, even with a high Area Scaling value. This doesn't work very well with textured lines though.
✦ Refer Multiple: Reference Layer
The line layers are still set the reference layers.
✦Exclude: "Paper Layer", and maybe "Editing Layer"
It depends on the circumstances. If you want to paint over color that already exists on your layer, then exclude the editing layer so that it will be ignored.
✦ Fill up to vector path: optional if your lines were drawn on a vector layer
If you work with vector lines, you can turn this option on so that the fill tool only looks at the narrow vector path of the lines, and not the pixels. The lines' thickness and texture does not matter at all with this option. Neither does the Tolerance setting by the way.
In the sub tool settings under "Reference" you can also find the option "Include vector path"
The picture below describes pretty well what it does.
Down below is an example of how your settings could look like.
Additionally a small tip: If you hold left-click while using the regular fill tool, you can drag the cursor across adjacent areas and all of them will get filled in!
It saves the information of the pixel you clicked on, and so it will still ignore the lines when you move over them.
The GIF below shows you how it works. I also should say that the lines within the leaves are on a separate layer that is not set as reference layer. That is why the whole leaves get filled in.
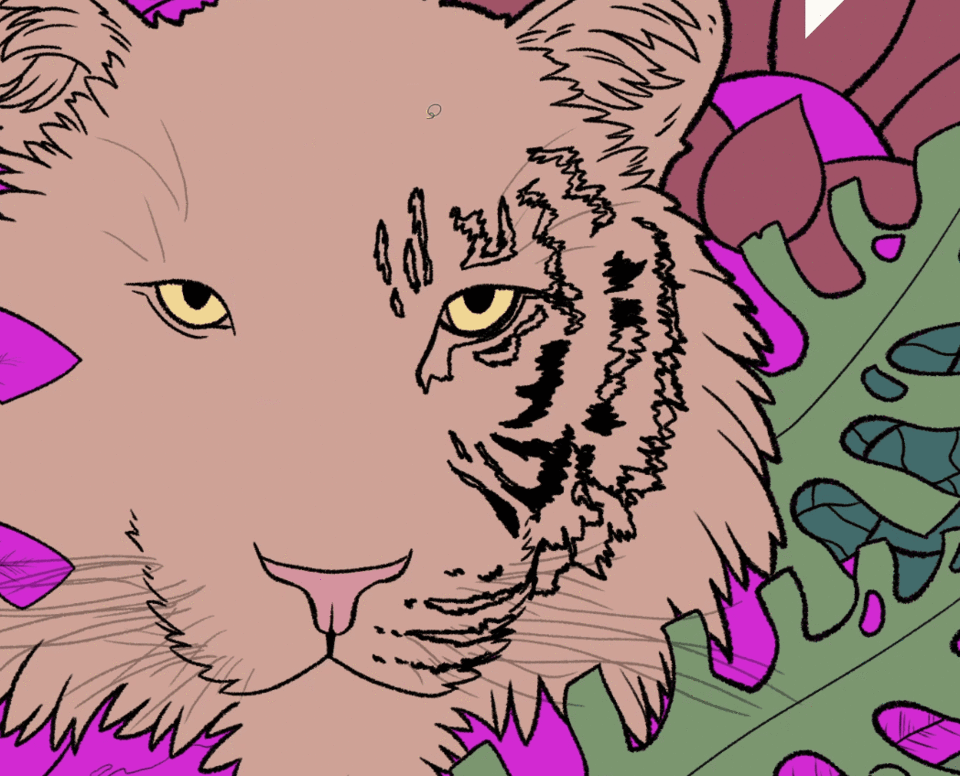
The "Close and Fill" and "Paint Unfilled Area Tools" can also come in handy!
If you have a lot of areas that would be tedious to fill in with the regular fill tool, then those can be very useful!
The settings are pretty much the same as with the regular fill tool right above. As for the "Target Color", I normally choose "Only transparent". When you have the lines set as reference layer, it will only fill in the transparent areas that are enclosed by the lines.
Important is that the areas you want to be filled in are COMPLETELY selected. If you leave out even the tiniest bit, it will not count it!
Down below you can see an example. Only the lower right selection would actually fill in the leaf.
The lines don't have to be on a separate layer though. For example I outlined some of the tiger's stripes, and want to fill them in on the same layer.
For that purpose I turned "Refer multiple" off, so that it only looks at what is on the layer we are working on.
Using the "Close and Fill" tool made filling in those stripes so much easier and quicker than filling everything in manually!
And so using all of those tools I filled in the entire drawing with flat colors!
You can use any of these flat colors and clip additional layers on top of them to add textures, shading, highlighting, correction layers, and so on. They give you a lot of versatility.
Down below you can see the finished drawing. I put textures, gradients and more color variations on top of those flat colors! I also colorized the lines by clipping layers and painting over the line layers.
Conclusion
I hope that this tutorial gave you a better understanding of fill tools and some ideas for how to use them! They really can safe you a lot of time and headaches.
Having to learn all of those different settings and tools might feel overwhelming, especially for a beginner. But it all makes sense in the end and you'll be able to get used to them in no time!
Again, I recommend watching the video at the top, since I go much more into detail with more examples and some extra tips in it!
Thanks for reading and watching, and have fun drawing!
Users who liked this post


Comment