10 Time Hacks on Clip Studio Paint
Introduction
Hello! My name is Hira Karmachela a.k.a BABE ODED. In this post I will share tips to hack your work time to be more effective and efficient when using Clip Studio Paint. I'm sure all of you who are reading this article know very well about the advantages of CSP over other graphics software.
Based on my experience using CSP professionally, this software has completely fulfilled all my graphic needs both for drawing and designing. Not only that, CSP is also very capable in making webtoons, comics, and animations. All because of the support of a very active community in developing assets, materials and tutorials like this.
I hope this post will be interesting tips for those of you who are looking for tips to hack your work time to be more effective and efficient when using CSP.
#1 New File Presets and Templates
Time Hack #1. We start by creating a new file. I highly recommend using presets which is CSP already provides several categories according to your needs. By using presets, you don't have to worry about determining the right dimensions and resolution for your project. You can even make advanced settings like bindings and borders.
Go to the File > New. Then a pop up dialog box will appear.
The sections marked above are time hacks to make starting your project more efficient. Select the project category you need, presets are available for the Illustration, Webtoon, Comic, and Animation project categories.
After selecting one of the project categories, then select the presets available in that category. Presets contain dimensional and resolution settings that have been confirmed to be relevant to your project's output needs.
There are more time hacks in this section especially for those of you who want to create comic projects. There are templates that already contain panel layouts which will definitely make your work more efficient.
Check the template box, then an additional pop up dialog box will appear.
Below is an example of a new file created based on the selected project category, preset, and template.
#2 Synchronizing Works on Mobile and PC
TimeHack #2. Today's work style is becoming more and more flexible. We get used to working from home or working anywhere other than the studio or office. So it's very important to always sync our work on PC with the mobile devices that we take with us on trips.
By synchronizing PC and mobile devices, we can always take our projects anywhere to continue working. Not only that, our projects can be easily published to social media without having to transfer files using additional applications or devices.
To sync PC and mobile devices, we must login on both devices with the same account. Open CSP on PC then click "Login".
A pop up window will appear then fill in the username and password.
Next, we go to the "Manage works" tab as shown in the image below. You will find the project files that you have on your PC device. Each of these files can be accessed on other devices if synced. To sync, make sure the file is closed or not in progress.
Select the files you want to sync by ticking the boxes provided. Then click the sync button in its lower left corner.
A confirmation window will appear.
If there are no problems, the file has been successfully synced, indicated by the synchronization button that turns blue.
Now let's try to open it on a mobile device. Open CSP on your phone. If you have a license then you can directly login to your account. Or you can get started for free for 1 hour per day.
Then click the profile icon as shown in the image below to login to your account.
Then enter your username and password.
Now you are logged in to your PC and mobile devices. On mobile devices, by default you are in the "Manage works" tab. In this app you will get no files at all. For that you have to go to the "Cloud" tab.
You will find the files that you previously synced from your PC. Select the file by checking the box provided then click the download button in the lower left corner.
The file is downloaded, the process can be seen in the Communication Management tab.
Once the file is downloaded, you can return to the "Manage works" tab and you will find the file in the "In this app" tab. Double tap on the file to open it.
Now you can edit files on your phone anywhere and anytime, independent of the studio or office. Once you're done editing and finishing the project on your phone, you can export your files and publish them directly to social media.
Click the burger menu at the top right.
Now you can edit files on your phone anywhere and anytime, independent of the studio or office. Once you're done editing and finishing the project on your phone, you can export your files and publish them directly to social media.
Click the burger menu at the top left. A menu will appear on the screen, go to File > Export (Single Layer) > select PNG > Save. Then confirm all the screens that appear by clicking OK.
After the export file is saved you will be presented with the "File operation/Share" screen. Select the export file you just saved then click the burger menu on the right.
Then click the "Share" button.
Next you can select the social media you want to publish your project on. For example, I chose Instagram Stories. Extraordinary! Clip Studio Paint really indulges us in work flexibility.
#3 Quick Access on Companion Mode
I'm sure you've often used shortcuts on the keyboard when using software. Especially in CSP, there is a very helpful feature called "Quick Access". This feature has been around for a long time which is useful for creating shortcuts in the form of icons of the features or operations that we need.
Not only shortcuts to tools or subtools but also hidden operations like Tonal Correction, Transform, and many more. If you don't find the "Quick Access" panel on the screen, you can just open it by going to Window > Quick Access.
But recently I discovered the most genius thing about software and CSP really made it happen. CSP provides a great update where you can use Quick Access through your phone that is synchronized with your PC through the Companion Mode feature.
Open CSP on your PC and Mobile.
Click on the phone icon in the Command Bar which will connect your PC and Phone.
Then a QR code will appear to be scanned using the CSP on your phone.
Also click the phone icon on the Command Bar on your phone.
Then click the "Scan QR code" button.
The phone will open the camera, then scan the QR code on the PC screen.
The camera will close after it finishes scanning the QR code. After that you will see the Quick Access panel on the phone screen which is exactly the same as the one on the PC. A new set will be created with the name "Companion" as the new tab. It has a shortcut in it by default.
Let's try one of the shortcuts. I clicked on the Free Transform icon on the phone and miraculously the operation was executed on the CSP that was on the PC.
You can also add other operations you need as Quick Access. Click the Quick Access Settings icon on your phone.
The Quick Access Settings window will appear on the PC screen. Select any operation you need from the list provided. For example, I selected an operation from the "Auto Action" category. Then select the specific operation you need and click the "Add" button.
You'll find the shortcut you just added in the Quick Access panel on both your PC and your phone.
#4 Color Wheel on Companion Mode
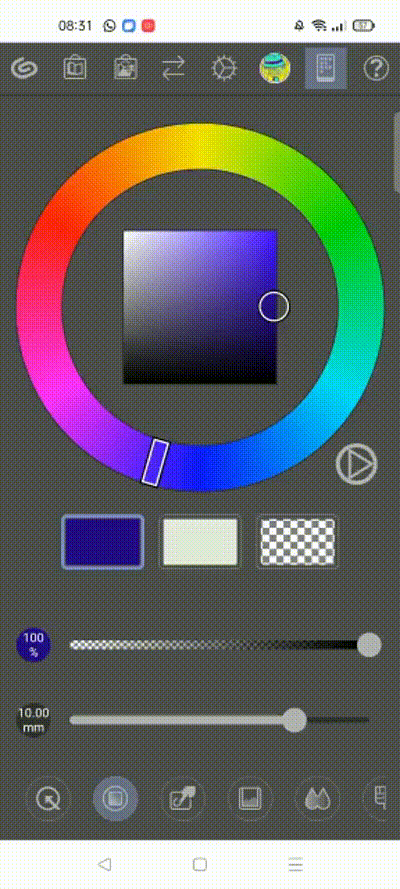
The coolest thing about Companion Mode is there are still a lot of time hacks that can be done on your phone. Next, let's try choosing colors through your phone.

Whatever color you choose on your phone, that color will be active on your PC screen.
#5 Gesture Pad on Companion Mode
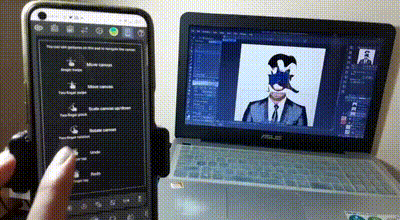
There are more cool things that make your work more efficient through your phone. You can position the canvas on the PC screen by using finger gestures on your phone screen.
Follow the gestures available on the screen using your fingers.

#6 Sub-View Pallete on Companion Mode
Do you often need reference images when working? I've had this happen, opening a reference image as a different window/canvas on a PC. It makes the workspace cramped and claustrophobic.
But that won't happen again, because you can open the reference image on your phone at the same time you can see and use the color scheme of the reference image.
Through the Sub-View Pallete feature in Companion Mode, you can open an image or take a picture from the camera via your cellphone.
Now you can work with a free workspace on your PC while viewing reference images clearly from your cellphone.
#7 Color Mixing on Companion Mode
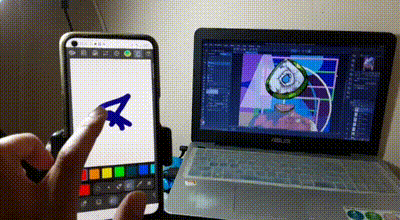
Still in Companion Mode. The most fun thing about digital painting is mixing colors with your fingers without having to worry about getting dirty. You can now do this with your phone as your color palette.

Brush the selected colors with the Brush, Blend it, then select the color with the Eyedropper.
#8 Webtoon Preview on Companion Mode
For those of you who are working on webtoons. Now you can preview your work on your mobile. It just so happens that I don't have a webtoon at the moment, at least I can see my work when it's displayed on the phone screen.
#9 Mode Switch on Companion Mode
One more feature of Companion Mode. You can turn your phone into a mode switch from supporting keys like Shift, Ctrl, and Alt without having to rely on the keyboard on your PC.
As you know, you need the Shift key to create a straight line or the Alt key to pick a color instantly on the canvas.
#10 Auto Action
One more time hack which you should not miss is Auto Action. Broadly speaking, it can be said that this feature completes a series of operations in just one click. How could that be?
You may have been faced with a simple project but had to complete a large number of files. For example, providing color adjustments, changing the canvas size and resolution, or converting one image format to another. In principle, Auto Action works by recording work steps as a series of actions that can be played back to be applied to different files.
Auto Actions can be easily found in the group of panels on the right, usually next to the Layers panel.
If you don't find it, you can go to Window > Auto Action.
To fully understand this feature let's start with creating custom actions. Open an image that you need to adjust. Then click the small button in the lower right corner of the Auto Actions panel to create a new action.
In this example I will create an Auto Action for Resize and Tonal Correction. A new action slot will appear then specify the name of the action.
Just click on the red circle icon at the bottom of the panel to start recording your work steps as an action.
Perform the steps sequentially such as Change Image Resolution > Brightness/Contrast > Hue/Saturation/Luminosity > Level Correction > Save > Close. If all steps have been done then click on the red square icon to stop recording the action.
Now you can open as many other files as you need to perform similar operations with just one click.
Then you just need to click the play icon at the bottom of the panel to execute the action and apply the operation to the open file.

Note: You may still need to confirm by pressing the button in some operations such as in the "Save" operation in the image above. After that, Auto Action will continue the next action according to the steps that have been recorded.
OK! That's all I can share. Hope it is useful and please support me to make more tips.


Comment