How to use text tools (Settings)

-
 MVP ◆This user has contributed greatly to the management of the community, by posting many great responses to the questions asked. Once every three months, MVPs are determined based on the points earned during that period and will be recognized accordingly.
 -
 New Valuable Player (NVP) ◆These are the next-best contributors to the community after MVPs. This is awarded to users who have not yet won an MVP award, based on the number of points they have earned.
 -
 Official Expert ◆Chosen out of all MVP awardees, who are already proof of excellence, this is a testimony of outstanding correspondence in the community. After careful screening, they are appointed by CELSYS and assume their position.Note: Formally called “Evangelists”
 -
 CELSYS official moderators ◆Moderators are official CELSYS staff members who are fluent in Japanese as well as various other languages. As moderators are not experts on software or creative work, they will not be able to directly answer your questions. However, moderators will provide communication and language support to ensure that everyone can smoothly communicate with each other.
 -
 CELSYS officialThis is the official administrator account.
Supported from Clip Studio Paint Ver. 2.1.0
In Clip Studio Paint the size and spacing of text characters can be adjusted, and “Ruby character (reading)” functions also exist. The following will describe how to use these tools.
[1] Timing of text setting
The detailed adjustments of the text are done via the [Tool Property] and [Sub Tool Detail] palette (PRO/EX).
The [Sub Tool Detail] palette is displayed by selecting [Window] > [Sub Tool Detail] or by clicking the [Sub Tool Detail] icon on the bottom right of the [Tool Property] palette.
Depending on whether you adjust the text settings before or during the text input, the settings will be applied to the text frames created afterwards or not.
■1. Changing the settings before entering text
When no text is entered (or text has already been confirmed and the input is completed), nothing is displayed in the preview (part framed in red) of the [Tool Property] and the [Sub Tool Details] palette, and the line of the text frame is displayed in black.
Note: The operation handle design has been changed from Ver. 1.9.1
The current course uses screenshots from before Ver. 1.9.0.
If the text settings are changed before entering text, the same settings will be applied to all text frames created subsequently.
■2. Changing the settings while entering text
When entering text, [Text editing] is displayed in the preview (part framed in red) of the [Tool Property] and the [Sub Tool Detail] palette, and the outline of the text frame is displayed in green.
If the text settings are changed while entering text, the settings will only be applied to the current text frame.
After creating a new text frame and entering text the settings from before will be applied again.
[2] Settings for the [Font] category
The font type, size and other modifications can be adjusted.
■1. [Font]
Select the font to use. Fonts can be selected from the Font List, which displays registered fonts, and Mixing font, which combines different fonts according to their character types, such as kanji and hiragana in Japanese.
In the Font list, you can search for fonts and view a history of fonts used.
■2. [Size], [Horizontal ratio] and [Vertical ratio]
・[Size] specifies the character size.
・[Horizontal ratio] extends/shortens the width of a character in %.
・[Vertical ratio] extends/shortens the height of a character in %.
Note: Character settings for Japanese manga
In general, 18/20 Q (class) is the most common character size for dialog used with B4 manga manuscripts when submitting to Japanese manga magazines. In pt-units (points-units), it should be roughly 12-14pt. When it comes to line spacing, it is recommended to use 125% if there is no character reading and 150% if there is character reading.
Manga manuscripts (for commercial magazines) that are printed in B4 are usually reduced in size and are actually drawn 1.2 times larger. Consider this when creating a one-to-one draft.
Since fanzine manuscripts are usually printed in their “actual sizes”, it is recommended to set the size of the text to roughly 10-12 pt. The line spacing should be roughly 125%.
The units for the text are initially set to [pt (points)], but they can be set to [Q (class)] under [Text unit] in the [Ruler/Unit] category of the [Preferences] window found in the [File] menu.
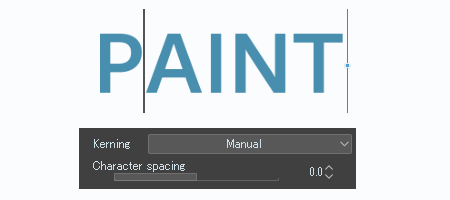
■3.[Kerning]
Starting from Ver. 2.3, you can adjust character spacing by setting kerning. Kerning allows you to adjust the spacing between characters individually.
[Metrics] and [Manual] are two options for adjusting [Kerning]. [Metrics] automatically adjusts the spacing between specific character combinations based on the information contained in the font, while [Manual] allows you to adjust the spacing between selected characters using numbers or sliders. The following image shows kerning between each character.
If you choose the [Manual] option, you can adjust the spacing between letters by placing the caret where you want to make changes. Move the slider to change the spacing between letters. In addition to using the slider, you can also make similar changes by holding down the [Alt] key and pressing the [←] or [→] keys.
For vertical writing, hold down the [Alt] key and press the [↑] or [↓] key.
If you set [Kerning] to [Metrics] after the caret is displayed on the canvas before entering text, kerning will be applied automatically as soon as you enter the text.
■4. [Word space] and [Character spacing]
This adjusts the gap between characters. [Word space] and [Character spacing] are set with points and % respectively.
■5. [Style]
Bold/Italic/Open Face can be set here.
■6. [Open Type]
You can use some of the set Open Type font features. [Roman ligatures] can support ligatures that are combinations of specific characters. [Contextual alternates] replaces the character shape with a shape that matches the characters before and after it.
[3] Settings for [Line space/Alignment]
■1. [Justify]
[Justify] sets the alignment of texts with multiple lines. The direction of the alignment depends on whether the text is vertical or horizontal.
Setting [Alignment], will override the [Justify] setting.
■2. [Wrap text at frame]/[Justify]/[Position in frame]
When [Wrap text at frame] is enabled, the text frame can be resized after entering text and the text will automatically wrap at the edge of the frame.
Starting from version 2.3, you can set the display method of characters within the frame to [Justify].
[Justify] adjusts the character spacing for lines that do not wrap at the edges of the text frame, no matter which item is selected, so that they wrap at the edges of the frame.
Setting [Justify], will override the [Alignment] setting.
You can choose to align the last line from [Align last line left], [Align last line center], [Align last line right], or [Justify]. For vertical writing, [Align last line left] becomes [Align last line top] and [Align last line right] becomes [Align last line bottom].
[Position in frame] allows you to set the alignment of the entered text. You can select from [Up], [Center], and [Bottom].
■3. [Line space]
This specifies the space between lines. The settings under [How to specify], are set in pixel units for [Specify length] and in % (percentage) for [By percentage].
For dialog in manga, it is common to set this to around 125%-140%. Setting [How to specify] to [By percentage] will make it easier to handle, as the ratio of line spaces do not change when the text size is changed.
[4] Settings for the [Text] category
The settings for all texts are made here, including the [Vertical] and [Horizontal] alignment.
■1. [Text direction]
Set the alignment to vertical or horizontal.
■2. [Anti-aliasing]
Choose from [Canvas setting] > [ON] or [OFF].
Initially this is set to [Canvas setting], while anti-aliasing is turned OFF if the canvas’ basic expression color is set to [Monochrome].
**Note**
The [Basic expression color] of a document is set when the canvas is first created (figure below). After that, it can be changed by selecting the [Edit] menu ([Page Management] menu for the EX version) > [Change basic page settings].
■3. [Edge] and [Edge color]
This adds edges around the characters. Edges are added to individual text frames independently from the layer property’s border effects. Click the color bar next to [Edge color] to select a color.
Note:
Another way to add edges to text is by using the [Border effect] from the [Layer Property] palette.
However, edges are added to individual layers with this method.
When using the [Text] tool and the [Tool Property] palette, the settings are only applied to the selected text frame.
In this case, edges cannot be added to balloons created with the balloon tools.
・Use the [Text] tool to put edges around individual text frames.
・Use the [Border effect] in the layer property palette to put edges around the contents of an entire layer.
■5. [Background color]
Use this to add color to the text’s background. Under [Opacity], you can configure the opacity of the colors.
[5] Settings for the [Edit settings] category
Additionally to the text color, you can set whether to place the text frame on an existing text layer or a new text layer.
■1. [Text color]
Selects a text color here. The [User color] uses a specific color that has been set in advance. This can be specified by clicking [Select user color...] in the drop-down menu.
The main color and sub color are the same as those in the tool palette. The colors in use are reflected under [Text color].
■2. [How to add]
Select here, whether to create a layer when creating a text frame or not.
[6] Settings for the [Circular text]
From Ver. 3.0 onwards, you can input text along a curved path. You can adjust the text direction, circle size, etc.
■1. [Circular text]
Turn on to arrange text in a circle. When arranged in a circle, readings and text after the second line will not be displayed.
Hint:
Select the [Circular Text] sub tool from the [Sub Tool] palette. You can input text even with Circular Text turned on from the beginning.
■2.[Radius]
You can adjust the circle size by dragging the slider or entering numeric values to set the radius. You can also resize the circle by dragging the handles around the circle on the canvas.
■3. [Direction]
You can select the direction of the text alignment from [Clockwise] and [Counterclockwise].
■4. [Space evenly]
When turned on, the text will be arranged evenly in a circle.
Hint: Start point and end point
When you select text using the [Text] tool or [Object] sub tool, multiple handles will be displayed on the circle.
- Handle 1 is the starting point of the text. Drag to adjust the starting point of the text and change the visible range of the text.
- Handle 2 is the midpoint of the text. Change the position of the text by dragging the circle, which moves both the start and end points. Drag the circle to adjust the text's direction, dragging within the circle will rotate it counterclockwise, and outside to rotate it clockwise.
- Handle 3 can change the Ending point of the text. Drag to adjust the end point of the text and change the visible range of the text.
[7] Setting for the [Transformation settings] category
You can transform the text by manipulating the handles of the text frame. You can adjust the text transformation settings here.
■1. [Show resize handle]
Shows/hides the text frame resize handles.
■2. [Transformation method]
You can select the type of text transformation from [Enlarge/Reduce/Rotate], [Enlarge/Reduce], [Rotate], [Skew], and [Scale/Rotate/Skew]. If you turn on [Keep aspect ratio], you can enlarge or reduce the text while keeping the aspect ratio fixed.
■3. [Rotation angle]
You can adjust the angle at which the text frame is rotated.
■4. [Tilt]
You can adjust the tilt of the text. It can be set both horizontally and vertically.
■5. [Flip Horizontal/Flip Vertical]
Text can be flipped.
[8] Saving text settings in the sub tools
When repeatedly using specific text settings for font type and size, it is possible to duplicate the settings in the sub tool palette and save them.
Users who liked this post


Comment