Starting on Clip Studio Paint with Small S! Part 1

-
 MVP ◆This user has contributed greatly to the management of the community, by posting many great responses to the questions asked. Once every three months, MVPs are determined based on the points earned during that period and will be recognized accordingly.
 -
 New Valuable Player (NVP) ◆These are the next-best contributors to the community after MVPs. This is awarded to users who have not yet won an MVP award, based on the number of points they have earned.
 -
 Official Expert ◆Chosen out of all MVP awardees, who are already proof of excellence, this is a testimony of outstanding correspondence in the community. After careful screening, they are appointed by CELSYS and assume their position.Note: Formally called “Evangelists”
 -
 CELSYS official moderators ◆Moderators are official CELSYS staff members who are fluent in Japanese as well as various other languages. As moderators are not experts on software or creative work, they will not be able to directly answer your questions. However, moderators will provide communication and language support to ensure that everyone can smoothly communicate with each other.
 -
 CELSYS officialThis is the official administrator account.
The convenience and fun of digital art with professional illustrators of “Small S”
In this series, professional illustrators will introduce the convenience and fun of digital art to other artists who rarely create art on computers.
When first creating art, many people turn to the familiarity of pen and paper, but many are interested in digital art as well.
However, you might be worried about how to use the tools and software.
This series introduces the basics of Clip Studio Paint so that beginners can use it with ease to enjoy creating their art, without having to learn the more complex functions.
Clip Studio Paint is a drawing software that is often used by contributors to the Japanese illustration magazine “Small S" as well as professional illustrators.
It has the advantage of allowing artists to easily do things that are difficult or even impossible when working traditionally. The software has a lot of useful functions to learn.
Over this series, you can learn and draw alongside real beginners to digital drawing software as we introduce some tips for digital art!
Artists for Part 1: Kabako and Asamane
Kabako: A professional artist who uses Clip Studio Paint. Her work has also been used in social games and featured in Kikan S and Musume Type magazines.
Asamane: A junior-high school student who normally inks with traditional pens and colors with watercolors or copic markers. She has created digital art on a smartphone using ibisPaint.
The artists for this part are Asamane, a newbie to digital art, and Kabako, a professional illustrator who uses Clip Studio Paint for her work.
We’ll watch Asamane create her first art in Clip Studio Paint and focus on some important points for beginners.
Kabako will help out on more difficult areas.
While giving advice on how to create digital art, Kabako will show us her own drawing process.
Watch these two artists create their works and try out Clip Studio Paint for yourself.
What can you do with Clip Studio Paint?
This is the screen when you open Clip Studio Paint. It is great for its wide range of functions so that you can complete all processes from sketching to inking, coloring, color adjustments, and finishing touches.
In the [Sub Tool] palette, select brushes to draw lines and add color.
In the [Brush size] palette and [Tool Property] palette, you can change the brush thickness and opacity.
In the [Color wheel] palette, you can choose any color you like.
In the [Navigator] palette, you can view a zoomed-out or zoomed-in view of your canvas, or a rotated or flipped view.
In the [Layer] palette, you can create new layers.
Let’s get started
① As it’s her first time using Clip Studio Paint, Asamane starts off by importing a traditional pen sketch and adding or erasing some lines.
② The right foot didn’t fit on the paper, so she draws it in. She matches the size of the brush to the traditional lines for a natural effect.
③ She also makes the hair longer than the original sketch.
Kabako: To draw long lines, use one quick swoop for a clean line.
■ Connecting broken lines
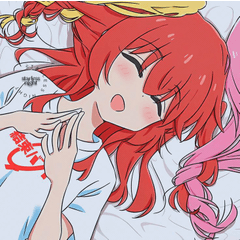
After finishing the line art, she fills each part with color. To begin with, the color spills out where the lines aren’t connected. She adds some extra lines in the red part so that the fill tool will work properly.
Note: Adjusting traditional line art on the computer
Asamane didn’t draw one of the feet on her original sketch, so she added it in using Clip Studio Paint. It’s not hard to match up the line thickness or the color, so you can easily make adjustments.
Let’s see how Kabako does it!
Kabako starts her process in Clip Studio Paint. She does her rough sketch, detailed sketch, clean line art, coloring and final adjustments all in Clip Studio Paint.
① She starts off with a rough sketch shown in blue.
② A circle represents the head size. She draws an outline of the face inside this circle.
③ She draws in the eyes. You can erase as much as you like with digital art, so she can redraw the eyes many times.
④ She draws the details of the bangs. She draws around the eyes.
⑤ She draws the hair on either side of the face in the same way, adding a strand of hair falling on the wrong side of the parting.
⑥ Next are the animal ears. These are placed on the right and left, following the curve of the head.
⑦ She draws the mouth. It’s drawn small and smiling for a cute impression.
⑧ Then, Kabako draws the body. She sketches some rough lines to work out the shape of the legs.
⑨ She draws the sleeves. It’s easy to draw the shape of these using the rough blue lines as a guide.
⑩ Next are the crossed fingers of the hand. These are an important element, so she draws it in detail even at the sketch stage.
⑪ She draws the decorative ribbon and the pleated skirt.
⑫ Lastly, she draws the tail, cushions, and some hearts to finish off the rough lines.
Hint: Creating your art on separate layers makes it easier to change or edit later
Kabako splits her work into many layers, even at the line art stage.
For example, when drawing the hair, she splits the bangs, sides, and longer hair at the back into three separate layers.
This means she can try out several hair styles for the back using the same fringe, such as by drawing a wavy bob on one layer and long straight hair on another. After comparing the styles, she chooses one.
With this method, she can easily switch the hair up from short hair to long hair without having to redraw the whole thing, just by hiding the layer she no longer needs.
Using many layers makes it easy to change things if you’re undecided, or to make corrections at later stages.
▼ Kabako uses many layers even at the rough lines stage.
Although Kabako doesn’t rename her layers, you can rename each one to anything you like.
It’s useful to rename the layers so you know what each one is for.
Some digital software have a very limited number of layers, but with Clip Studio Paint, you can create a lot of layers.
Inking the rough lines
① She chooses which layer’s lines to draw, then uses the [Layer color] option and clicks the blue square to change the black lines to a light blue.
② Next, she draws clean lines based on the rough version. She focuses on making the lines thicker or thinner as needed.
③ By changing the rough lines to blue, it’s easier to see where the clean lines are.
④ Using the rough lines as a guide, she finishes inking.
Hint: Change the color of your draft lines with one click!
To draw clean lines over a rough sketch when working traditionally, you need a light box to make the paper transparent so you can trace the lines. But light boxes are pretty expensive...
In Clip Studio Paint, you can change the rough lines to light blue or any other color so that you can draw the clean lines on top.
When using light blue lines as a guide, you can easily distinguish draft lines from clean lines.
You can also adjust the opacity of the color, which helps when drawing thinner clean lines.
Asamane tries painting the skin
① Kabako: Make a separate layer for each part, then fill each one with the base color. This time, let’s use seven layers. Use the Fill tool to add flat colors.
② Kabako: Now let’s paint the shadows. Although it takes time, coloring each part on a different layer means you can paint without going out of the area.
Hint: Painting without going out of the area!
Kabako uses the [Lock Transparent Pixel] tool.
With this simple setting, you simply click the icon to lock the transparent pixels.
▲ When you lock transparent pixels, you can only draw within the existing drawn area.
③ Asamane: I use the [Airbrush] tool to create a sense of depth around the chest. But it’s more difficult than I thought...
Note: Here, Asamane has changed the tool to the [Airbrush] > [Soft] to paint with a smooth gradient.
④ Kabako: To create a three-dimensional effect, let’s make an area that pops out. First, lightly paint in the shadows across a wide area. It’s okay if the shadow covers too much area initially. Then, use the eraser to clear some of the shading.
⑤ Asamane: I’ll give it a try... It’s difficult to clear the shading to create a three-dimensional effect, but I think it looks better than before.
Note: Asamane changed to the [Brush] > [Watercolor] > [Dense watercolor] tool to paint with a light effect.
⑥ Asamane: I erased the line under the breast because it looked a bit odd after painting. Leaving only the color creates a more realistic effect. It was easy to erase the line.
⑦ Kabako: Personally I like creating a line on the stomach as this creates a 3D effect. Draw a vertical line so that you can paint the indent tidily. Meanwhile, you can create nice variation by using a sharp shadow for the ribbon.
⑧ Asamane: I paint the edge of the upper thigh in a light color. This makes it look like light is reflecting and creates a 3D effect. I also paint a highlight in the center of the thigh to make the skin look shiny and smooth. I think I did a great job!
⑨ Kabako: I use the soft [Airbrush] tool for the cheeks, and paint the shadows appropriately using the [Dense watercolor] sub tool. You can also change the color of the line art in places to create a 3D effect and emphasize parts.
Asamane: I think I did a great job of shading the shadows on the neck with the [Dense watercolor] tool that you showed me.
■ Asamane’s painting of the skin
It took Asamane about four hours to paint half of the skin.
While painting, she felt that the most important thing for her to learn about is layers.
With traditional art, everything is done on the same piece of paper, so she said she doesn’t really know about layers. She wants to learn when to make a new layer.
In this piece, she put the foreground hand on a different layer to the body. This meant that the colors didn’t go out of their areas and she could paint without worrying.
Asamane: It was refreshing to paint in a completely new way. I could have kept on painting for ages, it was so fun.
Kabako paints Asamane’s line art
① Asamane painted light and soft shadows, but Kabako paints bold shadows over a wide area.
② Coloring the cheeks orange first and then adding pink creates the effect of the transparency of the skin. It’s a cute effect.
③ To create balance with the purple hair, she adds some purple-toned shading. This is easy to do with digital art, as you can simply select the same color and paint it lightly.
④ She lightens the tips of the bangs. Adding a gradient to the skin tone creates the effect of translucency, which is a unique effect of digital art. The bangs now look much more airy.
⑤ Next, she boldly shades the hair. From a design perspective, using bold and sharp shadows creates more variation in the image.
⑥ She adds more detailed shading to the bangs, shading each section of hair. Because the bangs are reflecting some of the skin color, they appear bright and sit next to the skin nicely.
Finally, let’s see how Kabako colors skin on her own drawing!
① Kabako: I gradually build up the color of the skin, so I like to start off with a color that looks just a bit too faint. I also paint over the bangs.
② I paint the shadows of the bangs. Even if you paint roughly with a dark color, I can still clean it up beautifully because it’s digital. This will blend in nicely after I’ve painted the hair.
③ I paint the cheeks pink to create the impression of flushed skin. Then, I add diagonal lines on a layer set to [Multiply] so it adds to the lower colors. This makes the lines blend in with the skin.
④ I paint the shadows on the fingers to create a three-dimensional effect. I depict the knuckles with a quick sweeping stroke. The shadows on the fingers make them stand out.
⑤ By adding shadows, the position of the hands is easier to understand, creating a sense of depth. I add darker shadows on the hand in the front.
⑥ Next, I add some purple-toned darker shadows on the back hand. With different tones for the base color and the shadow colors, the skin looks brighter and more alive.
■ Kabako’s finished skin
Kabako kept the face bright and painted a natural red-toned blush.
Meanwhile, other areas were painted with dark and sharp shadows, such as the neck, upper thighs under the skirt, and forehead under the bangs.
It might seem odd that she painted the bangs in skin color, but this will be explained in the next part when she shows us how she paints the hair.
In the next part, Kabako will paint the hair and clothes!
What is Small S?
Small S (styled as "SS") is a Japanese illustration magazine that was first published in 2005.
With the slogan "A magazine for tutorials and submissions", it often features special articles with step-by-step guides of how an illustration was made, alongside many illustrations submitted by readers. It includes artworks made both traditionally and digitally.
Readers can submit their illustrations online (Japanese only).
Users who liked this post


Comment